
I found minimal step-by-step guides for the TaoTao TBR7 rear brake assembly. I noticed that the TBR7 and Hawk 250 motorcycles share the same rear brake pedal setup, so I pieced Hawk 250 information with my current TBR7 design to complete the process.
I was unhappy with hunting and pecking around for information and found that some Chinese Dual-Sport Motorcycles have different setups, especially where the brake light switch is installed. So here is the process I finally used to assemble my rear brake pedal and springs.
Safety first: ( FAQ: Motorcycle Garage Safety Rules )Before you work on your TaoTao TBR7 motorcycle or Hawk 250 motorcycle, please make sure it’s safe. The engine is off. You are working on a level surface. To prevent the motorcycle from rolling, place it in gear and check. The motorcycle is standing securely, on a stand, or even on its kickstand.
FYI: Wear Safety Glasses!
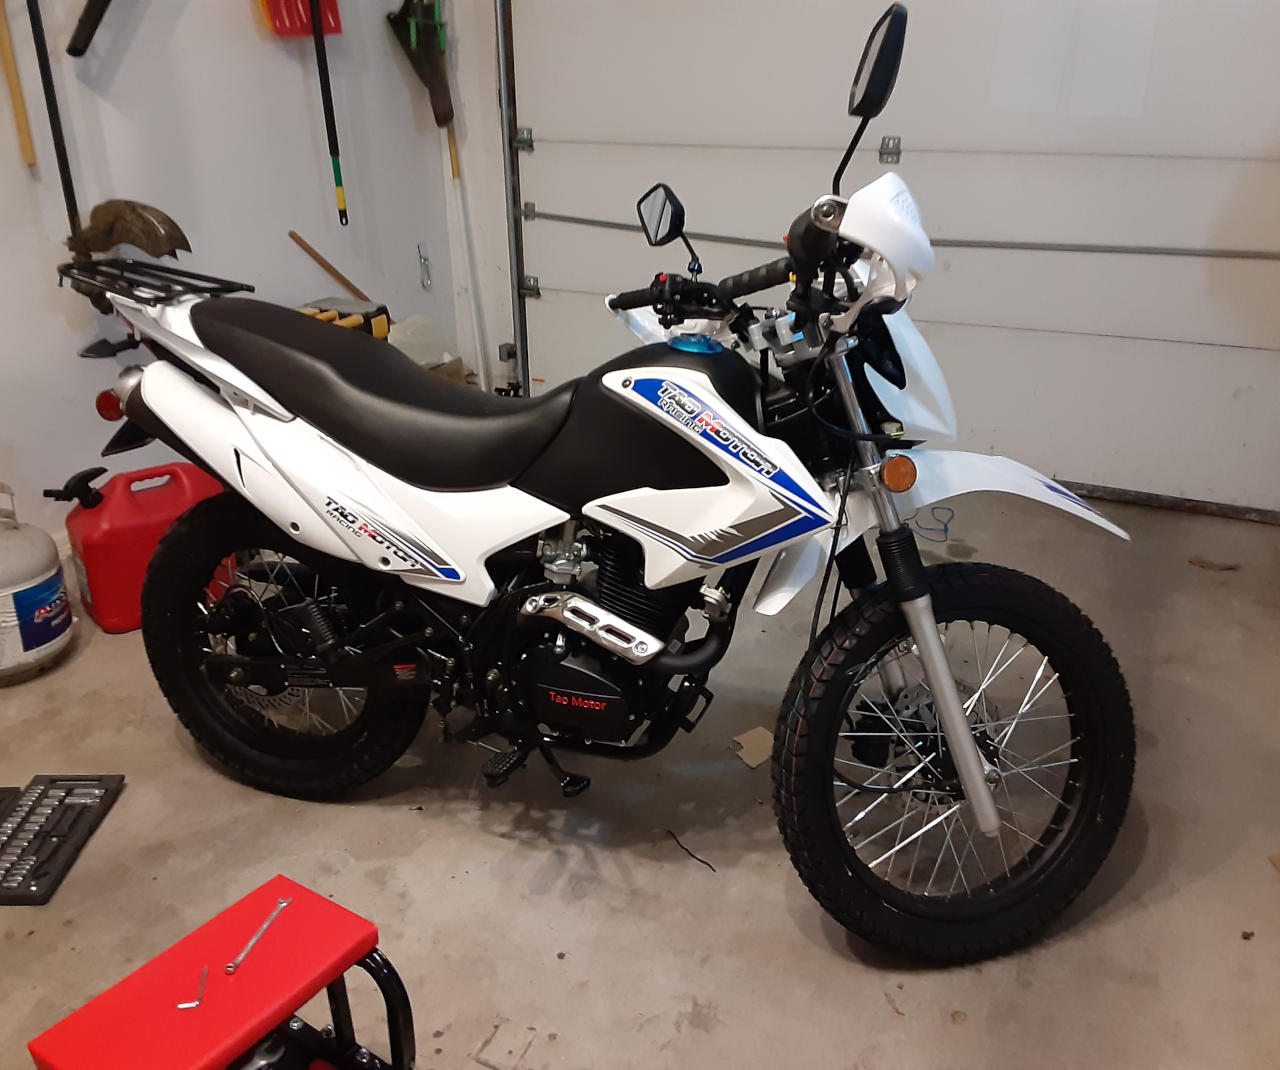
Remember, I am a new motorcycle owner, and doing the final building of my TaoTao TBR7 motorcycle was the first motorcycle I ever assembled. I am concerned about how I put together my bike due to limited information, so I hope to share my experience to help you. Other TBR7 Assembly Instructions I am trying to put together.
TaoTao TBR7 Rear Brake Assembly Steps:
This information might make you realize putting together a motorcycle is outside your scope of skills, and you need to get professional mechanical help.
That is OK; get a safe bike and have fun riding it safely.
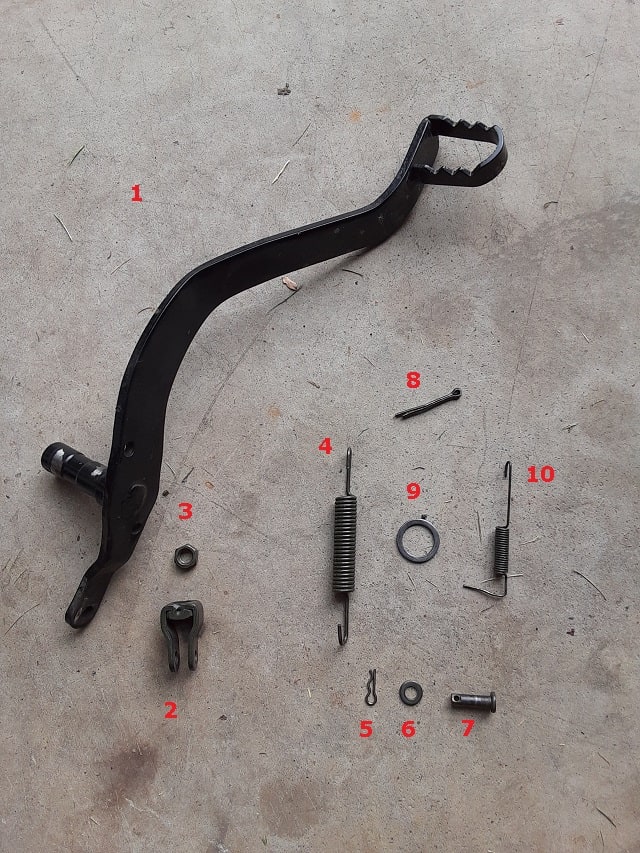
Step 1: Layout All The Rear Brake Parts.
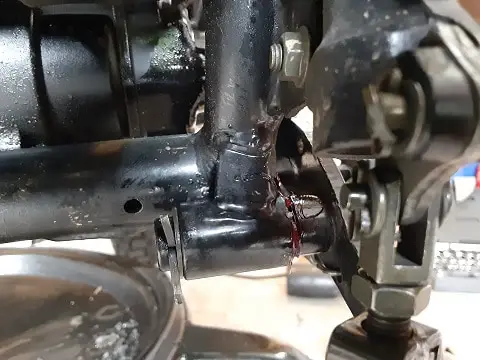
I have laid out the rear brake parts and labeled them with numbers. I placed numbers by the brake parts because I wanted to ensure I didn’t rely on names(some I guessed) and cause you confusion. Please look at the photo:
Step 2: Screw-On The Rear Brake Piston Locking Nut.
The rear brake piston locking nut(#3) helps hold the rear brake piston coupler(#2) in place. This step was not so obvious since the rear brake pedal and coupler are later joined by a pin, which should hold the two parts in place. However, there was an extra part, the lock nut(#3), so I used it for this application.
Note: the lock nut(#3) is held in place by tightening it against the coupler(#2), so I did NOT use thread locker.
Step 3: Screw-On The Rear Brake Piston Coupler.
The rear brake coupler(#2) is the connecting point of the piston to the rear brake pedal(#1). For now, loosely screw the coupler on, and have the locking nut(#3) high enough out of the way to allow for final adjustments later.
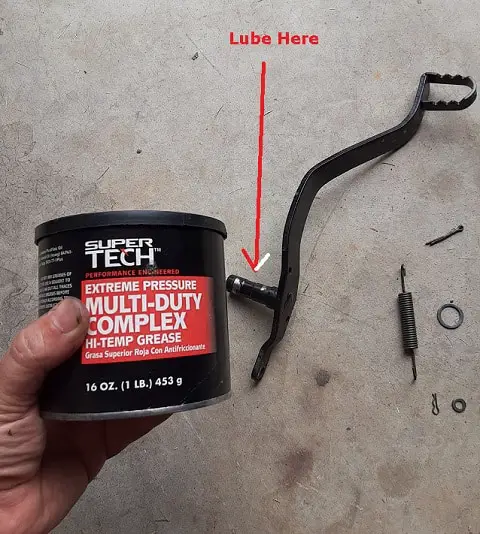
Step 4: Lube The Rear Brake Pedal Axle.
Anything that does together, and slides or moves, I add grease. A small tube of grease is cheap compared to rusted rear brakes seizing, or having the rear brakes get stuck and overheat your rear brake disc. So lube your rear brake pedal(#1).
Step 5: Attach The Rear Brake Pedal and The Pedal Return Spring.
Installing the rear brake pedal(#1) is several small steps. Please use photos to follow along.
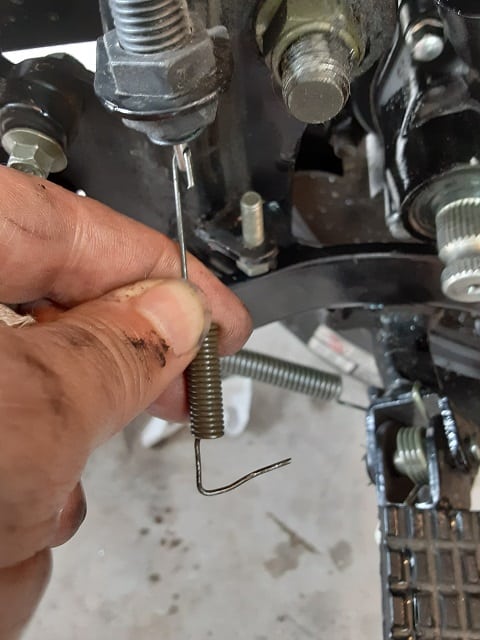
Step 5a. Find Spring Mounting Pin on the foot peg.
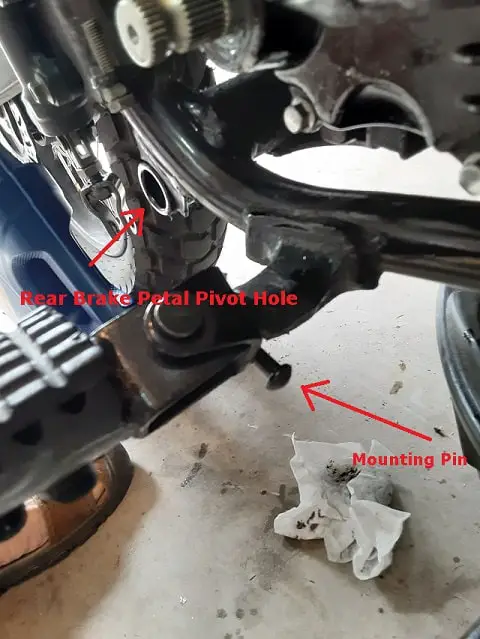
Step 5b. Attach and hang the rear brake pedal return spring(#4), the larger of the springs. The final photo will show what hole on the rear brake pedal to hand the spring(#4) from.
Step 5c. Take the free end of the rear brake pedal return spring(#4) and hook it to the spring mounting pin. The spring will route under the foot peg.
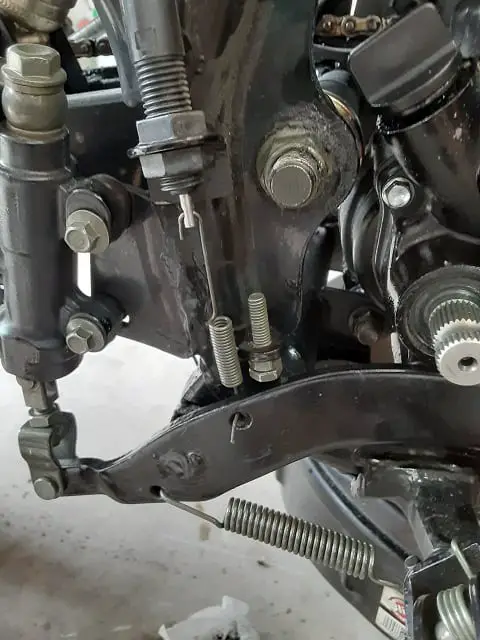
Step 5d. Pulling spring(#4), line up and insert the rear brake pedal(#1) into the pedal’s pivot hole. The rear brake pedal will arch over the foot peg.
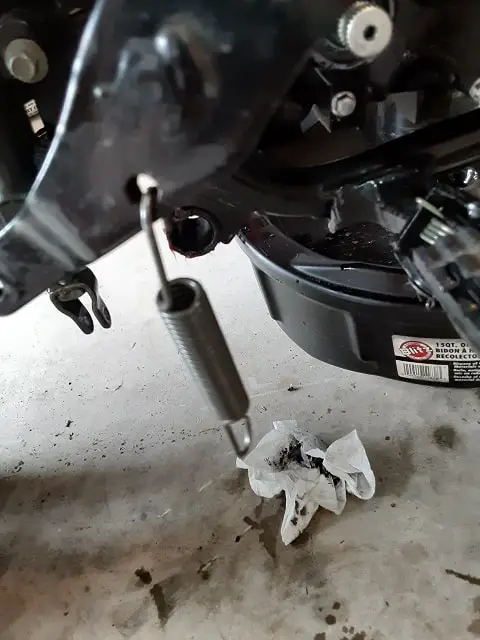
Step 5e. Finally Rear Brake pedal is inserted. Look at how the return spring(#4) is inserted into the lower hole on the rear brake pedal.
Take a look at the last step. You will notice the return spring(#4) is mounted on the hole below the rear pedal axle.
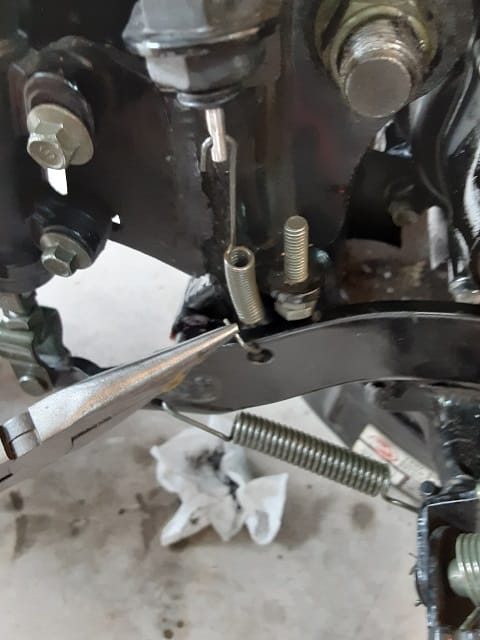
Step 5f. Put down on the pedal with your hand, and see if it properly returns. I found my TBR7 wasn’t too responsive, and wouldn’t snap back fast. There is a lot of paint on the pedal axle that seems to bind the pedal. If you are concerned, this is an extra step, you can clean out the pivot hole and rear brake axle of this paint and redo this step. I didn’t clean the paint off. I just accepted the rear brake pedal was clunky. The rear brake pedal function improved with use.
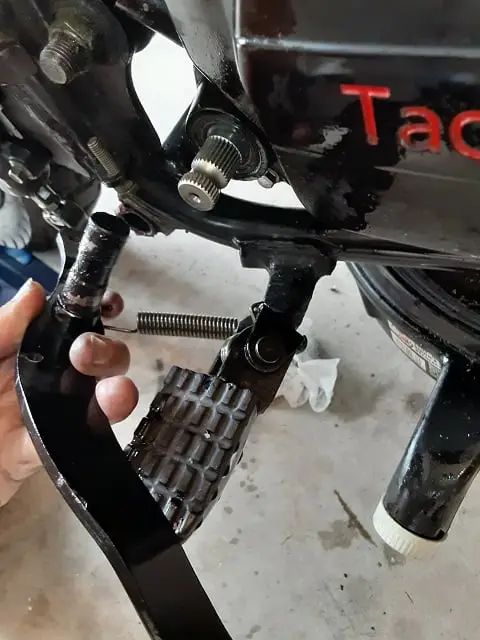
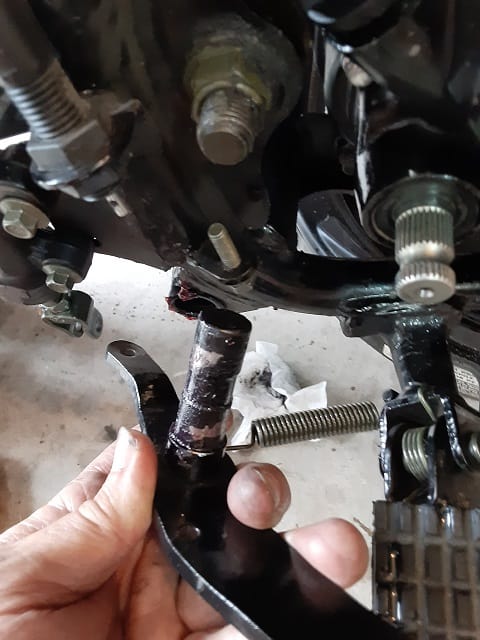
Step 6: Secure The Rear Brake Pedal.
Now that the rear brake pedal is inserted in its pivot hole, we must secure the pedal against falling out. This step is done with a washer(#9) and a split cotter pin(#8).
Under the motorcycle, where the pedal axle extends past the pivot hole, slip on the washer(#9). After the washer(#9) is slipped on, find the small hole in end of the pedal’s axle and insert the split cotter pin(#8).
Now separate the ends of the split cotter pin(#8) and curve around the pedal’s axle.
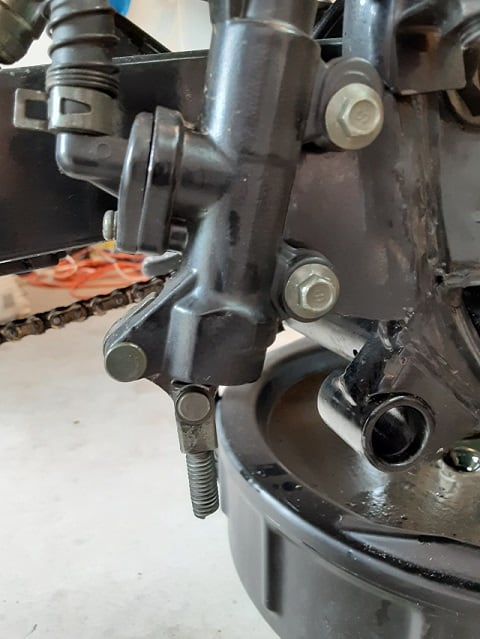
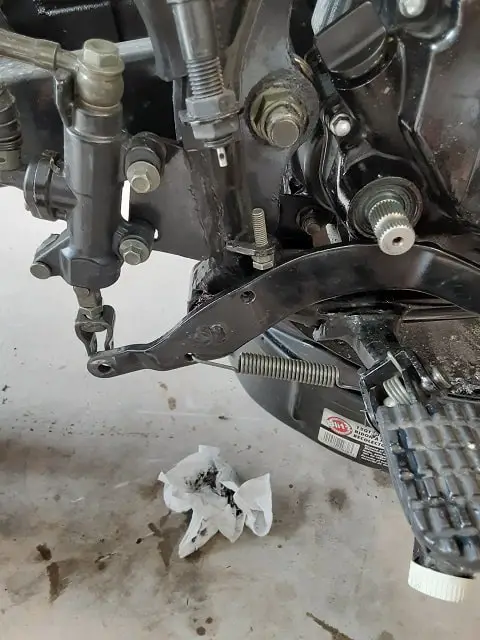
Step 7: Adjust Rear Brake Piston Coupler.
With the pedal not depressed, look at the rear section of the pedal. There is a hole in that section of the pedal and should line up with the coupler(#2). If the coupler(#2) is too low, swing the coupler(#2) back, and turn it to raise it. Swing the coupler(#2) back onto the pedal and recheck for alignment. If too high, do the same thing, but this time lower the coupler(#2).
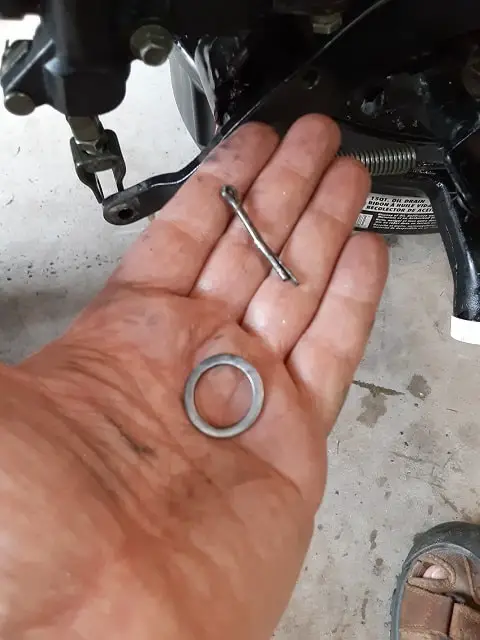
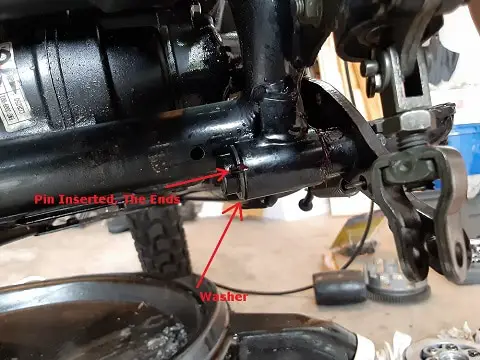
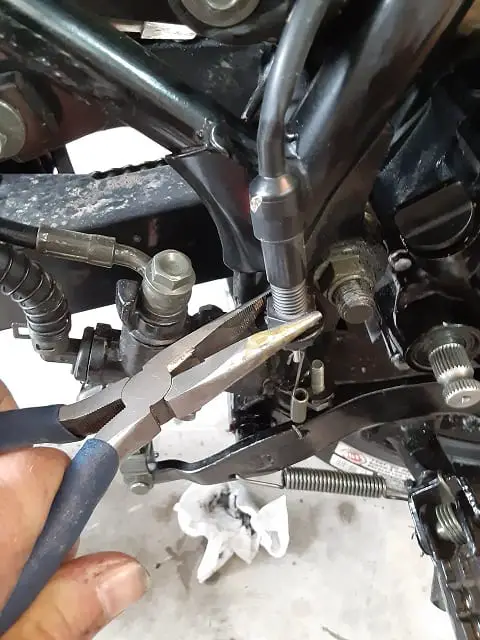
Step 8: Insert And Secure Rear Brake Piston Coupler To Pedal.
Once the coupler(#2) hole is lined up with the hole at the end of the rear brake pedal, slip in the pin(#7). The end of the pin(#7) will be exposed on the other side of the coupler(#2), and this is where you will slip over the smaller washer(#6). Once the washer is on, there is a tiny hole at the end of the pin(#7) where you can insert the carter key(#5), securing the washer(#6) and pin(#7) into place.
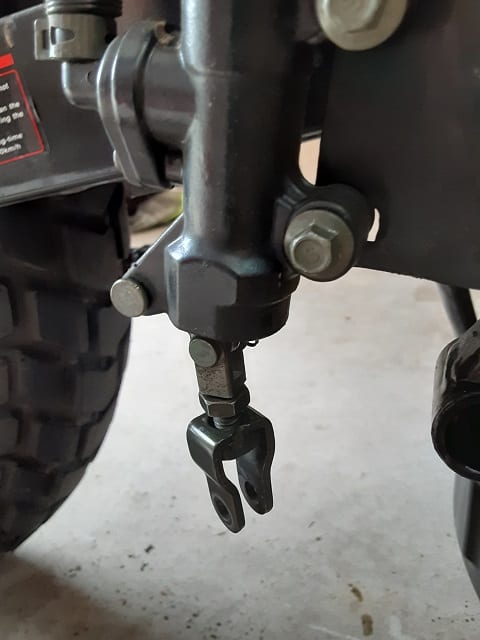
Step 9: Secure Rear Brake Pedal Coupler With The Lock Nut.
Press down on the rear brake pedal(#1) and test if the pressure is transferred into an upward force on the rear brake cylinder.
Once you feel the rear brakes work (as any would on the TBR7 or Hawk 250), secure the rear brake coupler by turning down the lock nut. Using a wrench, tighten the nut till it feels snug.
Note: I had my lock nut loosen, and the only problem I noticed was the strange sound the assembly made. Still unsure about the sound, but not a big deal. I just tightened the lock nut up again in the field and moved on.
Step 10: Brake Light Switch.
Time has come to attach the rear brake light switch to the rear brake pedal via its spring(#10). Installation take place over several small steps.
Note: some TBR7 and Hawk 250 motorcycles were reported online as having an integral rear brake cylinder and brake switch. So if you don’t see a separate brake switch, these steps will not work for you. I am NOT familiar with the integrated version, so I apologize.
10a. Take the spring’s curved end and hook into the brake switch hole.
10b. Fish the straight end of the spring(#10) into the hole on the top portion of the rear brake pedal.
10c. With needle-nose pliers, bend the straight end of the spring(#10) such it becomes a hook and will not fall off the rear brake pedal.
Step 11. Testing/Adjusting Brake Light.
Now that everything is installed, now comes the step actually to test the rear brake light switch. Turn the key to the on position. Keep the headlight switch off for easier testing, and press down on the brake pedal.
Using the two lock nuts, move the switch up and down such that the brake light comes on when the brake pedal is pushed, and then the brake light goes out when the brake pedal is released. The lock nuts for my TBR7 are plastic, so I was gentle with tightening them but did use needle-nose pliers to adjust them.
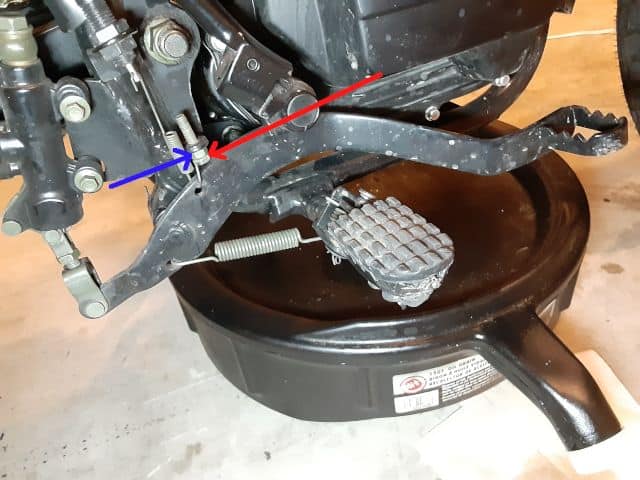
NOTE: Rear Brake Adjustment Information
Now, this part is up to how you ride and how you want to adjust how your rear brakes, and if done wrong, it might result in an accident(see professional mechanical advice if your bike has problems). This bolt limits the back brake pedal movement in the brake release direction, and I figure this is to position the brake pedal at the ready-to-start braking.
A bolt and lock nut came on my TaoTao TBR7 dual-sport motorcycle, which was screwed all the way in and locked.
I’ve seen other motorcycle photos(TBR7, Hawk 250, Brozz 250, etc.) where this bolt was completely missing, and no one mentioned it being misplaced or complained about it being lost.
I am addressing this part here because, over time, I feel this part might have resulted in some bikes’ brakes misbehaving and locking up ( What Can Cause Rear Brakes Not Release On A Hawk 250, TBR7, Brozz 250, etc.? ).
So how do I keep my rear brake return adjustment bolt? I keep it completely threaded in and locked.
My choice, If I have to remove the rear brake foot pedal in the future, I might even remove this bolt to prevent it from coming loose and interfering with my bike’s brake operations.
You do you. I just wanted to mention it here. The bolt is fully screwed upward and locked with a nut, which works for me. Remember, I’m a motorcycle novice, and if you have other suggestions, please leave a comment.
Installation Is Now Complete, Time For A Test Ride.
I used common sense. I got on the TBR7, pushed with my feet, and tested the rear brake. If it failed, I had the front brake still, and the engine was off so that I could have used the clutch in an emergency. The rear brake worked well for me, so the real test ride was the first test after assembling the TBR7.
It was exciting and fun(remember, this is my first motorcycle), and since the brakes both worked, it felt safe. As safe as any TBR7, or Hawk 250, could feel on these bikes. 😀
Thank you for visiting, I hope this post inspired you, and you ride safe!!!
Click To See My Recommended
TBR7 Upgrades

Hi I’m Tom, A New Motorcycle Rider and Blog Author.
I am a new rider(Pa Learners Permit at the end of 2020, and I received a Pa Motorcycle License in 2021 after passing a Motorcycle Safety Course).
I bought my first motorcycle, a TaoTao TBR7, at the beginning of 2021 and have been doing upgrades on that motorcycle since.
I added to my motorcycle collection by buying a Boom Vader Gen 2 in 2022, and that Grom-Clone motorcycle has been upgraded by me as well.
I continue to ride my Boom Vader Gen 2 motorcycle as well as my TaoTao TBR7 dual-sport bike.
Read more on my About Me page.
Fun Fact: I’ve only been on one group ride.

Hey just linked to the rear break install from TBR7.com, well done!
Thanks, I looked over your site: TBR7.Com and love it.
I built my TBR7 at the start of this year, and compared to Hawk 250s, there was so little online information about assembling the components. You won’t believe how often I just couldn’t find parts simply because I couldn’t recognize them. Finding brake parts, coupler especially, was a pain.
Future TBR7, even Hawk 250, owners are going to benefit from the time and effort we are putting into documenting our adventure with these motorcycles.
Keep up the excellent work!
This was great. First time bike owner and looking forward to learning all the ins and outs. Bought the Tbr7. Loving it so far.
This was VERY helpful for me putting on the brake lever! Thanks!
Yes, the TaoTao TBR7, like the Hawk 250 and the Brozz 250, has a weird setup for the rear brake foot pedal. I found it difficult since the design is counter intuitive in my opinion.
Glad this brake assembly post could help, I’m no motorcycle mechanic, but do like documenting the work I do on my TBR7.
Good luck, Ride Safe, Ride Fun!