
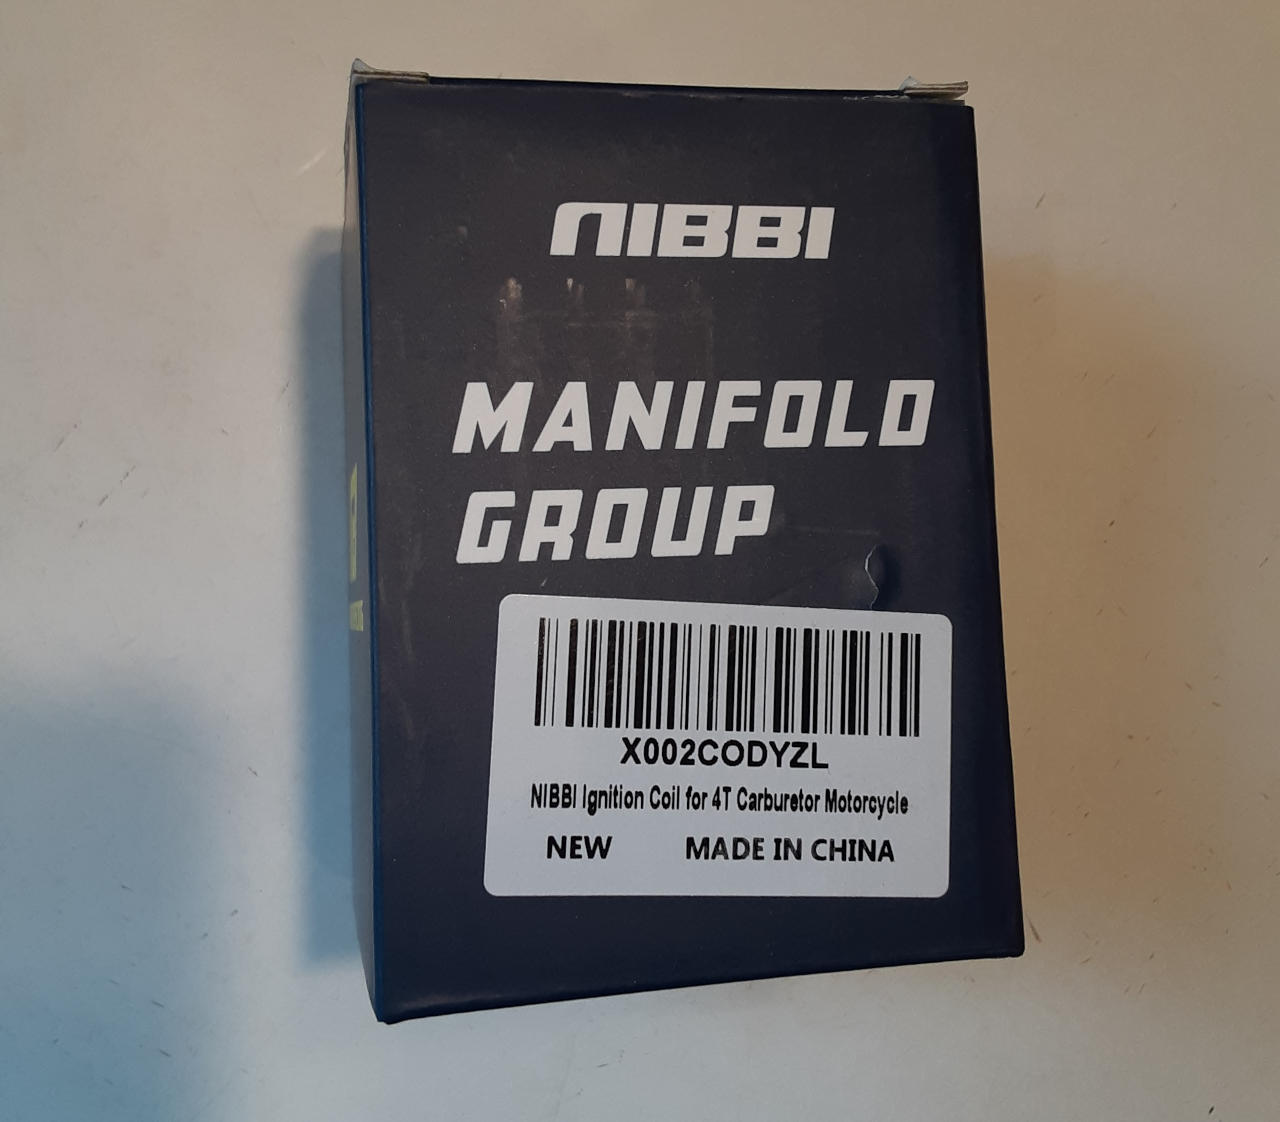
I bought a “Racing” Nibbi ignition coil (My TBR7 New Nibbi Ignition Coil Came In! )to replace the stock ignition coil on my TaoTao TBR7. I have had the TBR7 for about a year now, and I continue to improve the motorcycle with upgrades like this. I completed the installation and documented my Nibbi ignition coil installation instructions here.
This is the one I purchased, it was low priced, but check for current prices here:
Author’s Notice: This page contains affiliate links, for which I may earn a commission by their use. Also, as an Amazon Associate, I earn from qualifying Amazon purchases.
NIBBI Performance Ignition Coil Fit for 4T Carburetor Motorcycle
My goal is to create a single source of information for all to use as a guide when it comes time to replace your stock ignition coil with a Nibbi ignition coil. Remember, I am a new motorcyclist and NOT a motorcycle mechanic; I like to document my TaoTao TBR7 motorcycle upgrades as a DIY’er.
FYI: Chonda Ignition Coil Information
Much of the steps I took were those I found on several forums and YT videos of other Chonda owners upgrading their stock ignition coil to the Nibbi coil. As expected, most of the information was posted by Hawk 250 owners.
Since I used scattered Hawk 250 ignition coil installation information, I feel these ignition coil installation instructions should be sufficient for my fellow Chonda owners(Hawk 250, Brozz 250, etc.)
Getting Ready For New Nibbi Ignition Coil Installation.
Give me six hours to chop down a tree and I will spend the first four sharpening the axe.
Abraham Lincoln
Ignition Parts Needed:
1.-Nibbi Ignition Coil. (Click For Nibbi Coil Current Prices)
2.-Optional: New Spark Plug Boot. I bought a new MSD non-resistor spark plug boot (Current Prices)and will use it for this installation, but I will demonstrate how to use the stock TBR7 resistor style spark plug boot at the end. I cover why a non-resistor spark plug boot might be a good choice in an earlier post: TaoTao TBR7 Spark Plug Boot Replacement Time: Only 10 Steps!
Tools Needed:
1.- Metric combination wrenches.
2.- Needle Nose Pliers.
3.- Wire Cutters/Stripper.
FYI: Building My List of Must-Have Tools For Motorcycle Owners
Miscellaneous Materials:
1.- Blue Thread Locker.
2.- Dielectric Grease.
Setting Up Motorcycle For Ignition Coil Replacement.
I take some basic installation steps every time I do motorcycle maintenance, upgrades, or repairs.
1.- Motorcycle Safety First.
I know this might be reluctant, but Safety is No Accident!
A simple list, you can add to the steps to keep yourself when working on your motorcycle.
- Ensure the motorcycle is on a level surface and will not roll away.
- Take precautions against fires. Be prepared to collect and clean up any spilled fuel. Have a fire extinguisher ready. Do not work around open ignition sources.
- Ventilation. I cover this since there is a step where you have to remove the fuel tank, and gasoline fumes can be released in the process.
- Personal Protective Equipment (PPE). Use safety glasses(I use ones with readers Safety Glasses With Readers.) and gloves where needed.
- First Aid Kit. Just in case. 😀
My FAQ: My Motorcycle Garage Safety Rules – FAQ
2.- Stage Tools, Materials, and Parts.
Hate having to reach around finding small parts while I’m in the mists of actually doing the work. Better to stage everything before you start for a quicker, safer installation. FYI: Must-Have Motorcycle Tools.
Remove The TaoTao TBR7’s Motorcycle Gas Tank.
1.- Remove Side Body panels on the motorcycle.
No surprise here, those panels spend so much time off my TBR7 for work, I sometimes don’t even put them back on.
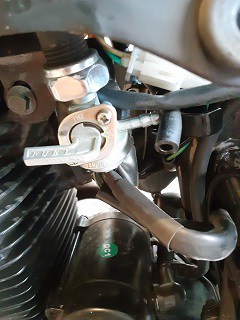
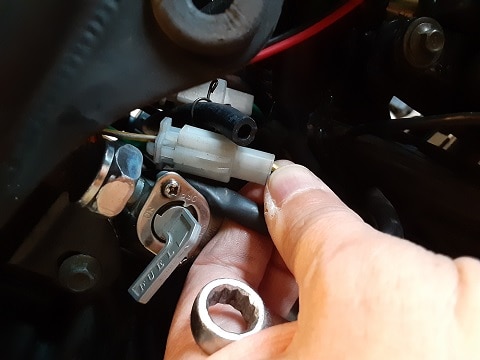
2.- Ensure Fuel Line Petcock Is Closed.
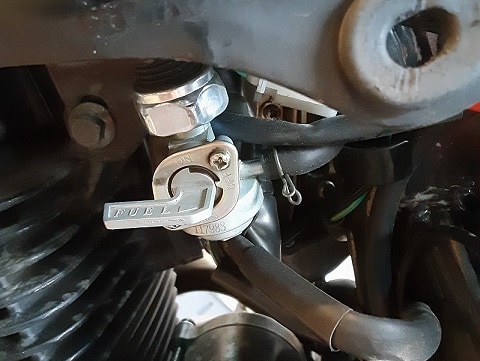
3.- Disconnect The Fuel Line From The TBR7’s Motorcycle Gas Tank.
- Compressed the clamp and slid away from matting surfaces.
- Carefully twist and slide fuel line off fuel petcock valve outlet.

4.- Remove Motorcycle Fuel Tank Mounting Bolt.
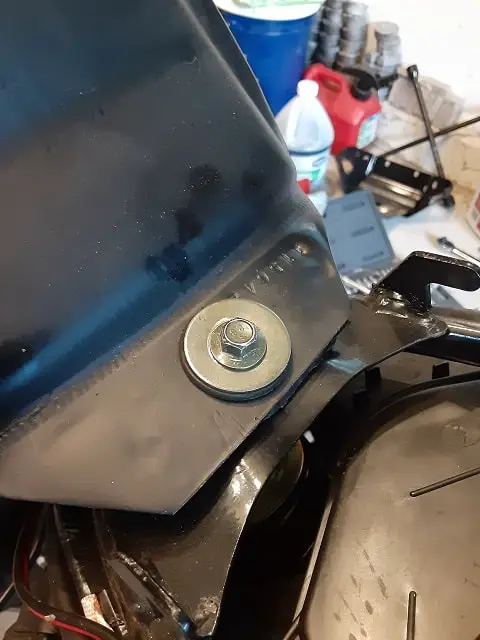
5.- Partially Lift Motorcycle Fuel Tank And Disconnect Gas Gauge Connector.
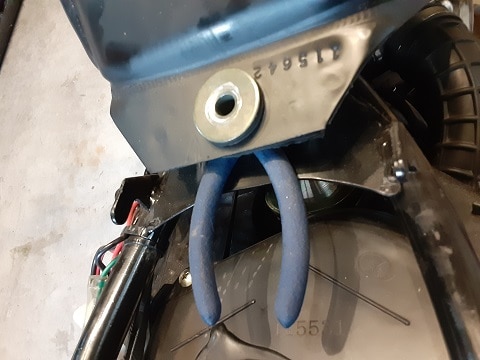
6.- Remove The TBR7’s Gas Tank.
Slide back the gas tank, lifting it carefully away from the motorcycle. Safely place the motorcycle fuel tank on a level surface where it will not be damaged or overturned.
Note: If there is any gasoline in the tank, it adds both weight and instability to handing the gas tank. The gas can move around, sloshing around the inside of the tank. Be Careful!
Caution: keep the motorcycle fuel tank upright since the fuel cap is not entirely sealed, and this precaution avoids spilling gasoline.
With the gas tank removed, you have better access to the installed (stock) ignition coil—time to move forward.
Remove The TBR7’s Stock Installed Ignition Coil.
These steps are pretty straightforward. Don’t lose bolts; they are reused.
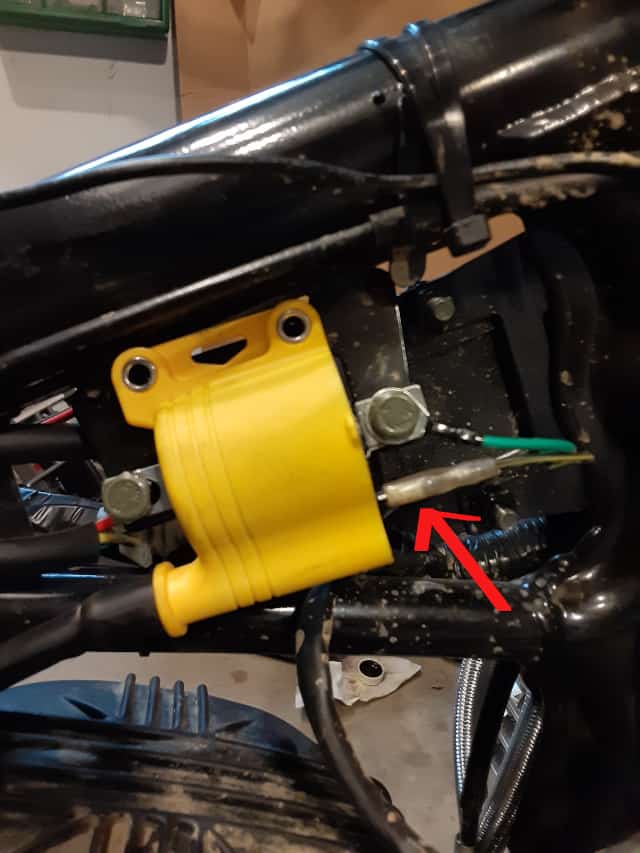
1.- Remove Spark Plug Boot From The Spark Plug.
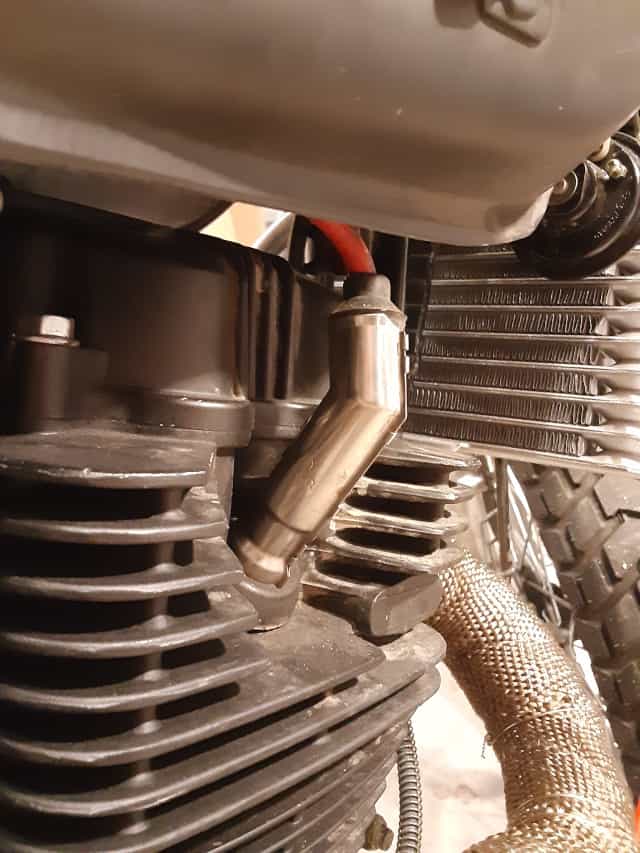
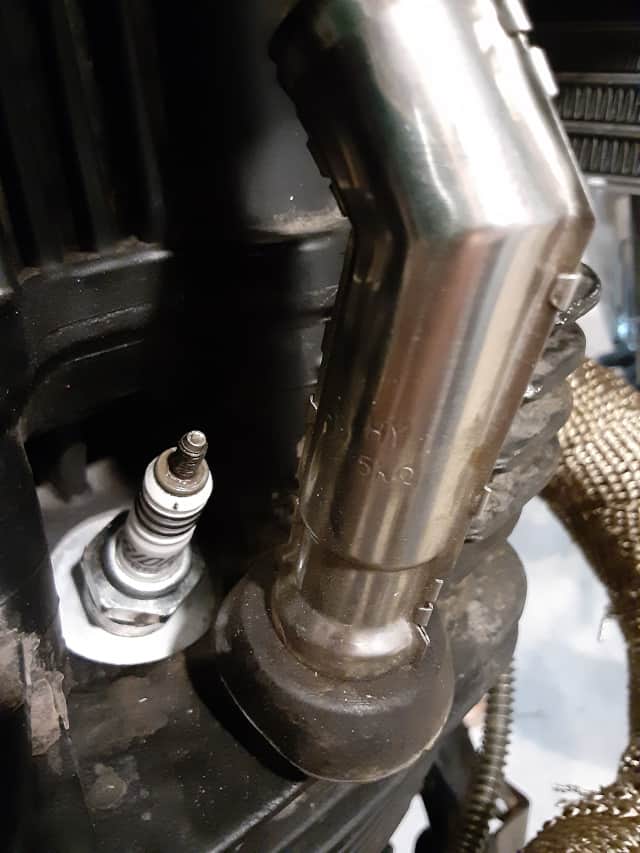
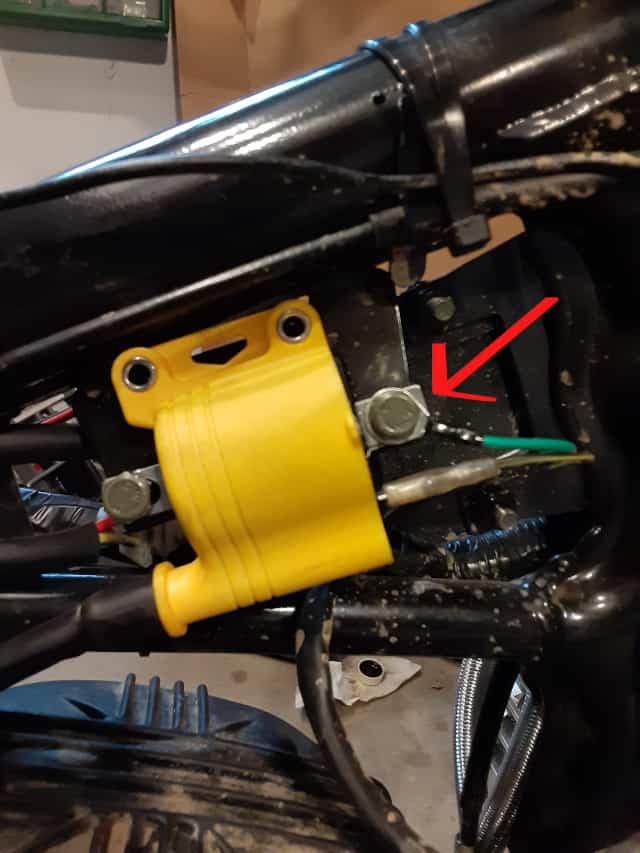
2.- Disconnect The Small Wire From The Ignition Coil.
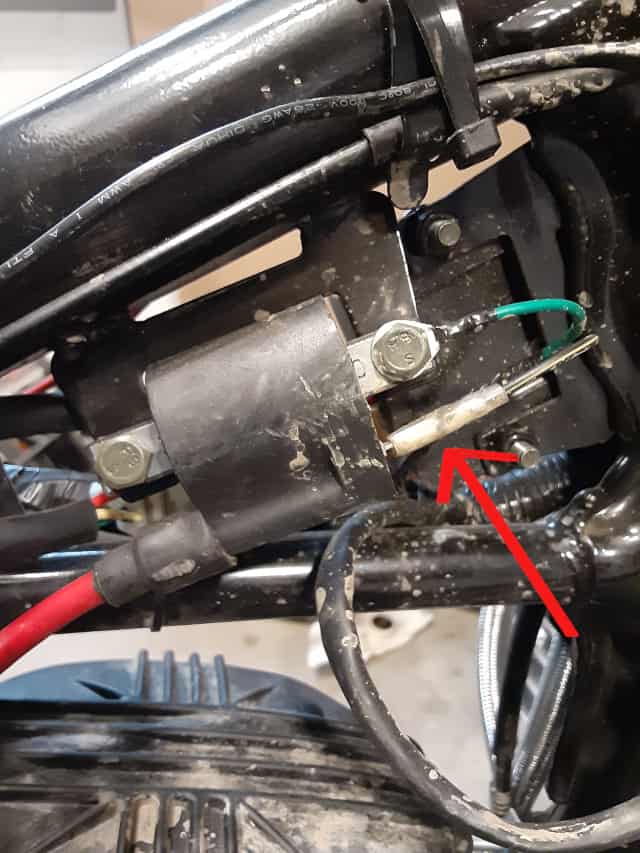
3.- Remove The Ignition Coil Mounting Bolts.
Save these mounting bolts. I use a magnetic tray for small parts like this: Magnetic Parts Tray on Amazon.
Once the tiny wire is disconnected and the mounting bolts are removed, the ignition coil is removed to the next phase.
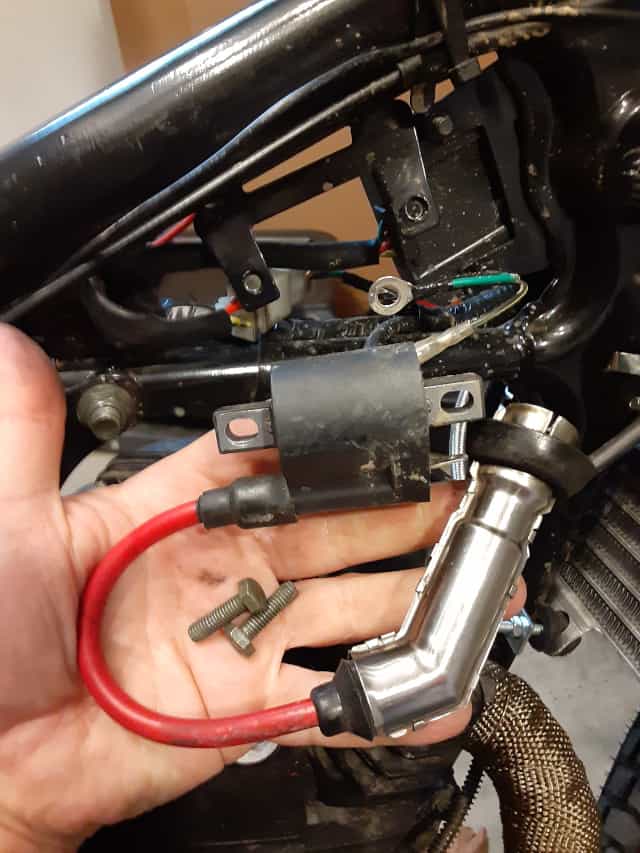
Install The New Motorcycle Ignition Coil.
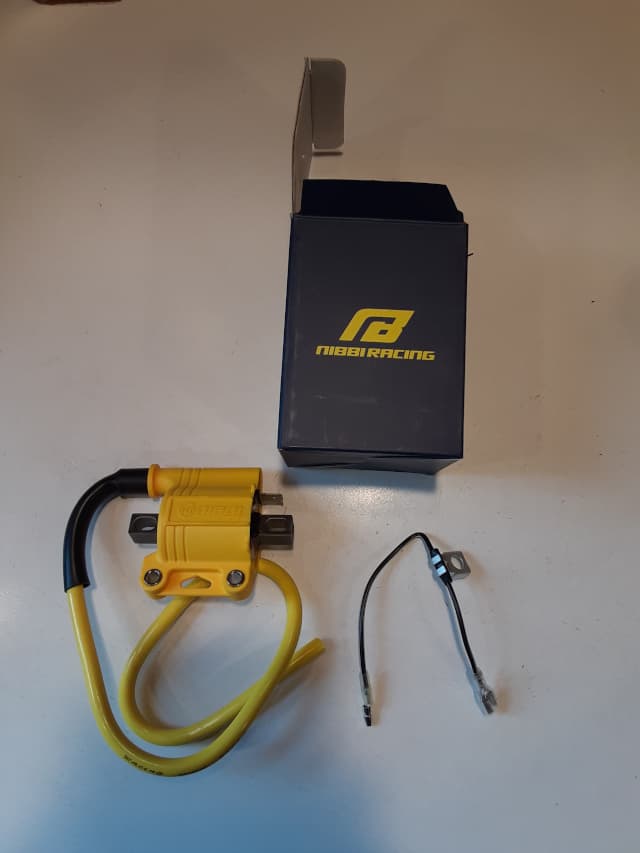
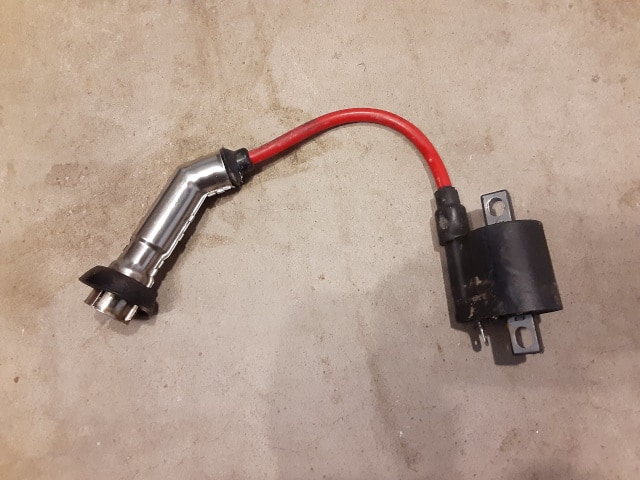
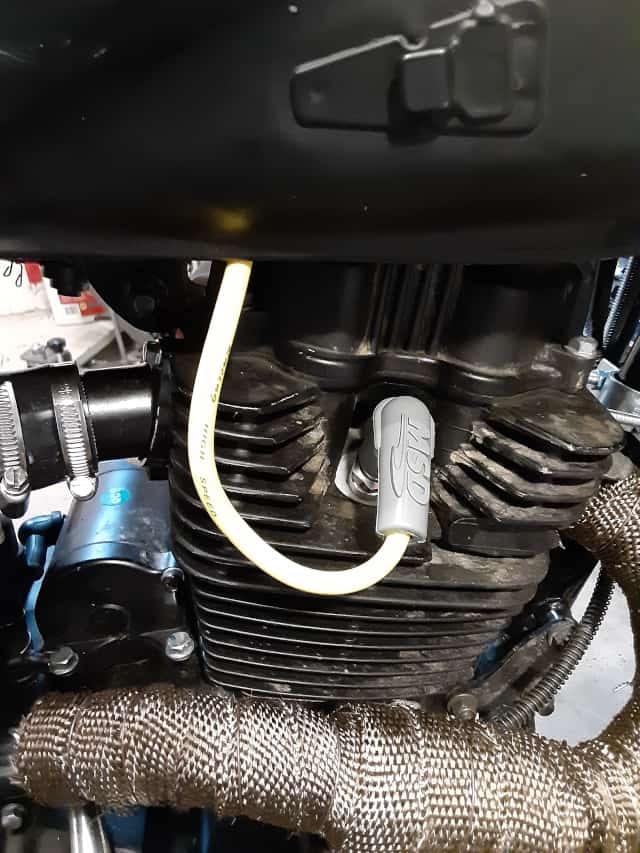
Take a moment to enjoy the good looks of the new “Racing” Nibbi Ignition Coil. After you complete the installation, the coil will not be visible, and the only reminder of your work will be the yellow spark plug wire and hopefully the ‘racing’ feeling of your motorcycle. :p
1.-Reusing old bolts, mount new motorcycle ignition coil with spark plug wire going rearward and quick connected going forward.
- I used a blue thread locker on the bolts.
- The forward bolt, I passed through the ignition coil hole and then through the ground wire ring.
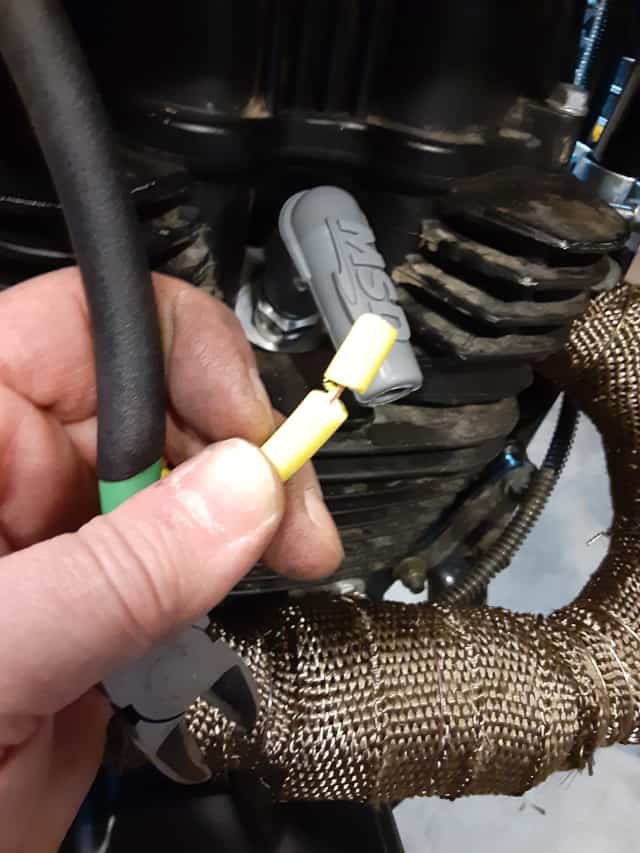
2.-Connect wire with a quick disconnect to the ignition coil.
I checked my work and again looked at the “Racing” Nibbi ignition coil since the motorcycle fuel tank will hide it.
Reinstall Motorcycle Fuel Tank.
1.- Place motorcycle fuel tank on the bike frame, lining up front mounts and rear mounting bolt hole.
2.- Lift the rear of the tank and reconnect the fuel gauge quick disconnect.
3.- Reinstall fuel tank mounting bolt.
Again I use a blue thread locker and do NOT crank down on this bolt due to stories of the weld breaking and leaking fuel. I snug the bolt, but barely snug.
4.- Reconnect the Fuel line, including the hose spring clamp.
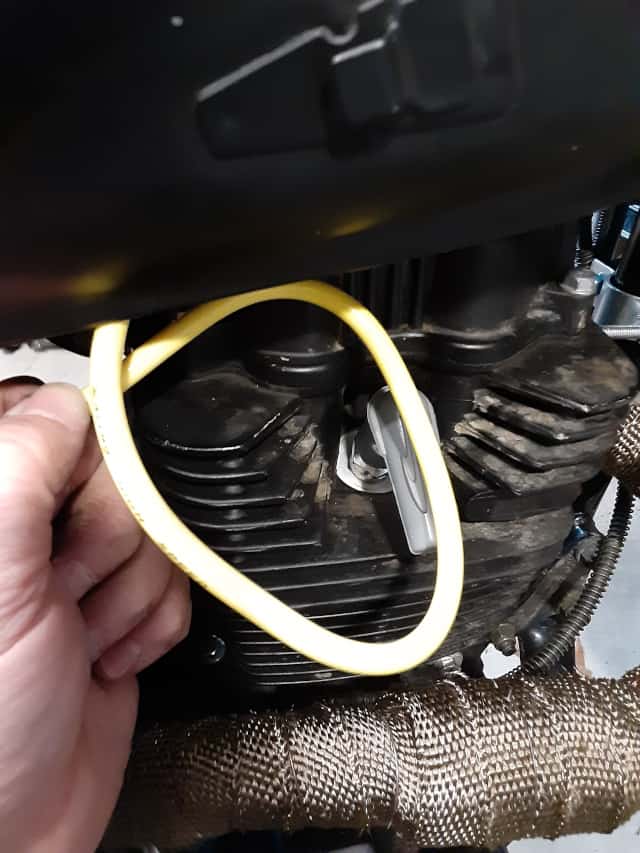
Cut Spark Plug Wire To Proper Length
There is debate as to whether cutting the wire is necessary. Some people curl up extra spark plug wire while others cut it. I cut it since I figure less wire means less energy lost, directing more energy towards the spark plug gap.
1. Put spark plug boot you plan to use on the spark plug.
In my case, I am using a non-resistor spark plug boot, a MSD spark plug boot, but you can use the stock spark plug boot for this step if you are not upgrading.
2. Measure the spark plug wire to the spark plug boot, checking clearances from the spark plug boot.
Measure twice.
3.- Cut Spark plug wire.
Cut once.
Install Spark Plug Boot(Stock TBR7 Boot).
I’ll start by showing how I made set up the connection with the new Nibbi ignition coil spark plug wire and the stock TBR7 stock spark plug boot.
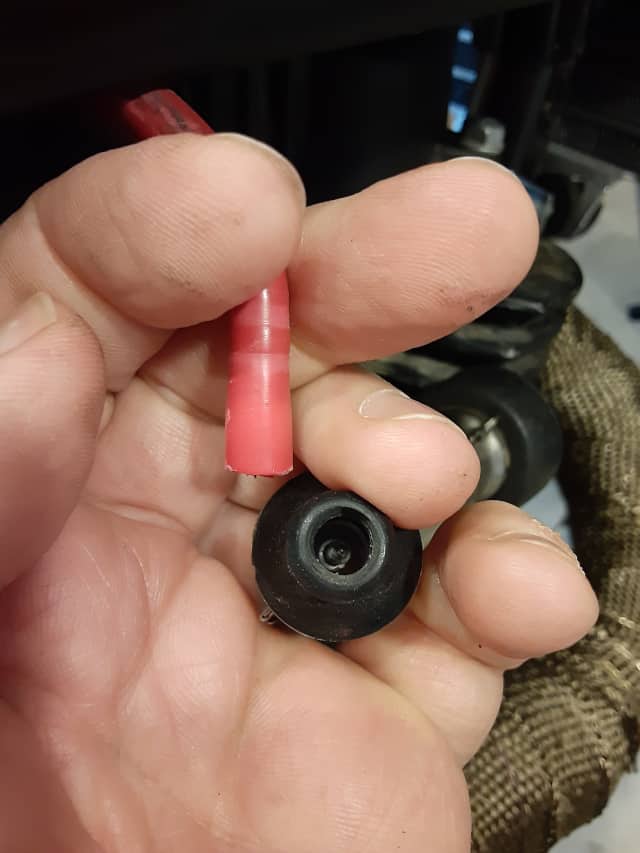
1.- Remove stock spark plug boot from stock ignition coil spark plug wire.
Holding the spark plug wire firmly, rotate the stock spark plug boot counterclockwise. There is an internal connector screw in the stock spark plug boot that rotates, and you should feel it lose its connection after a couple of turns.
2.- Check the stock spark plug boot screw.
Is the screw present? Do you see it in the stock spark plug boot? If so, you can proceed. If not, I believe it’s time to upgrade to a non-resistor spark plug boot like the MSD I purchased.
3. Put spark plug boot you plan to use on the spark plug.
This case the stock spark plug boot.
4. Measure the spark plug wire to the spark plug boot, checking clearances from the spark plug boot.
Measure twice.
5.- Cut Spark plug wire.
Cut once.
6.- Push cut end of spark plug wire into stock spark plug boot.
Apply slight pressure when you meet resistance for the next step.
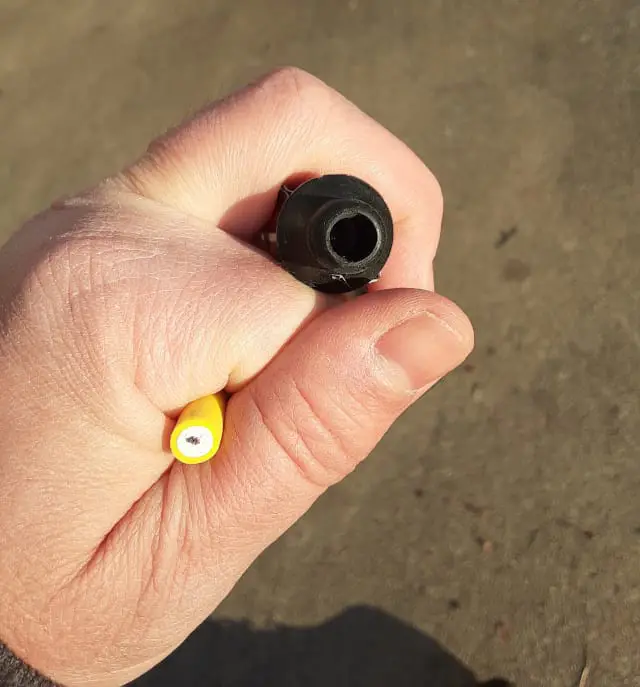
7.- Screw on stock spark plug boot.
Rotate stock spark plug boot in a clockwise direction. This rotation will allow the screw metal conductor in the spark plug boot screw into the spark plug wire. Rotate till you feel resistance.
8.- Test Spark Plug Boot and Spark plug wire connection.
Slightly tug the spark plug wire to confirm a good connection with the stock spark plug boot.
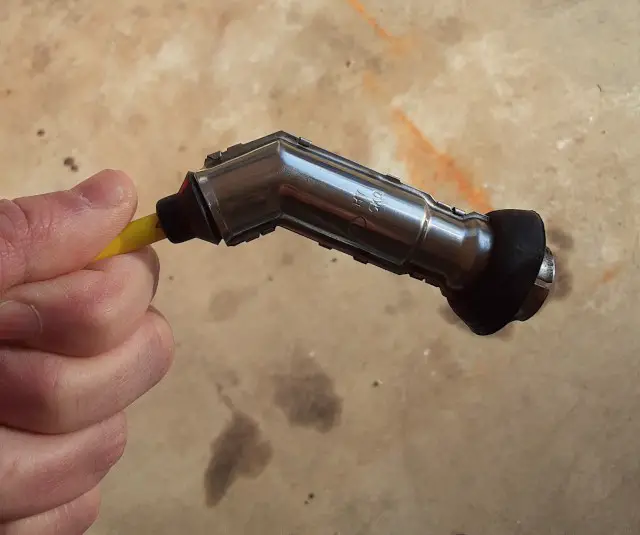
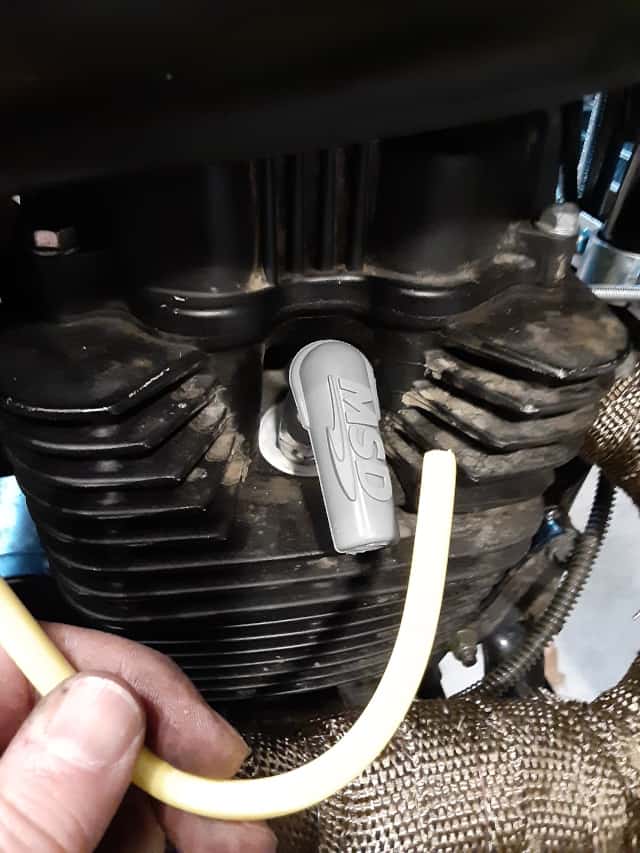
9.- Test the new spark plug boot by installing it on the spark plug.
Remember, the stock TBR7 spark plug boot connects to a thin post type spark plug terminal. If you look at the stock spark plug terminal you will see what I mean.
Install Spark Plug Boot(For MSD Non-resistor Spark Plug Boot).
Follow this order if you use the typical Chonda upgrade(Why I did it: TBR7 Motorcycle Spark Plug Boot Upgrade), an MSD non-resistor spark plug boot.
Also outlined here: TaoTao TBR7 Spark Plug Boot Replacement Time: Only 10 Steps!
1.-Cut back about 1/4″ of insulation, careful not to cut the internal conductor.
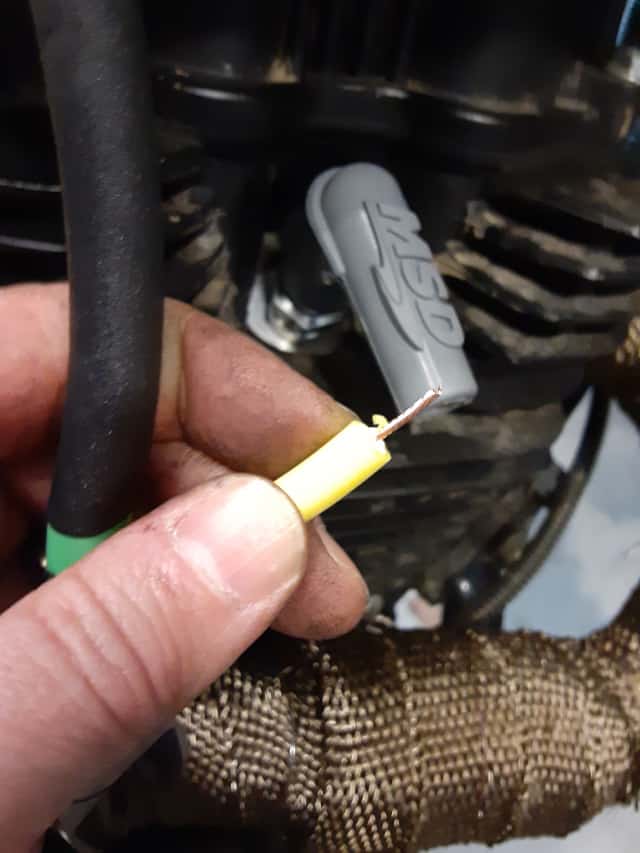
2.- Slide Spark Plug Wire Into Its Crimp, And Slide Spark Plug Conductor Into Its Crimp.
3.- Crimp The Spark Plug Wire Terminal.
Angle the spark plug wire and metal terminal towards the spark plug.
Once aligned, gently crimp around the spark plug wire jacket and crimp around the spark plug conductor.
With lining up the spark plug terminal before crimping, there is a minimal twisting of the spark plug wire to install it on the spark plug.
FYI, this step requires two crimps, which is called a double crimp connection. The spark plug wire’s conductor and jacket are under one crimp with single crimp connections.
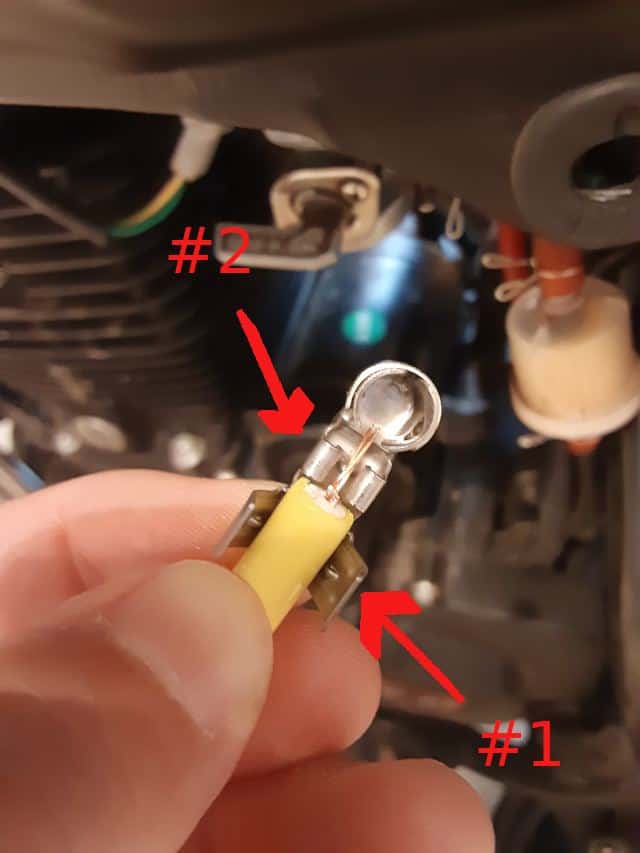
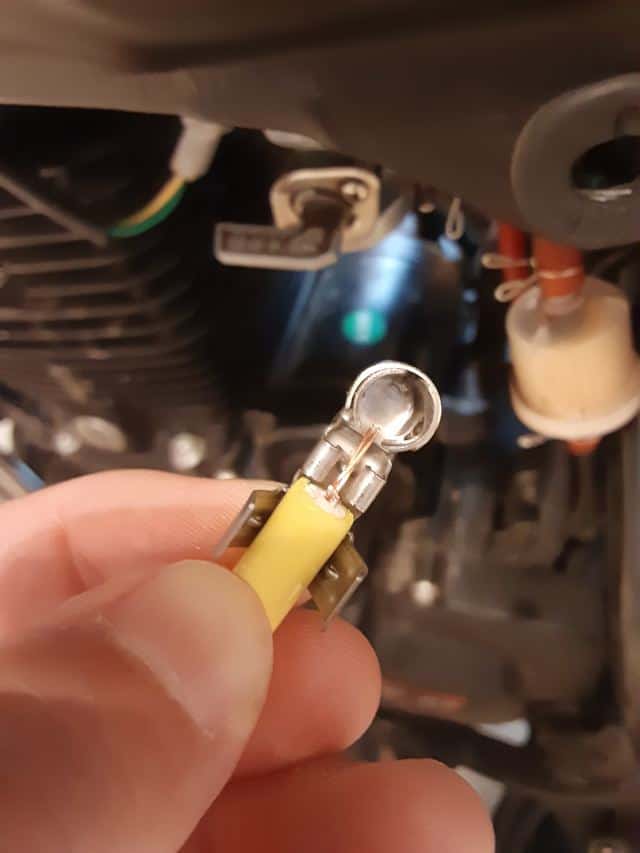
4.- Slide On The New Spark Plug Boot.
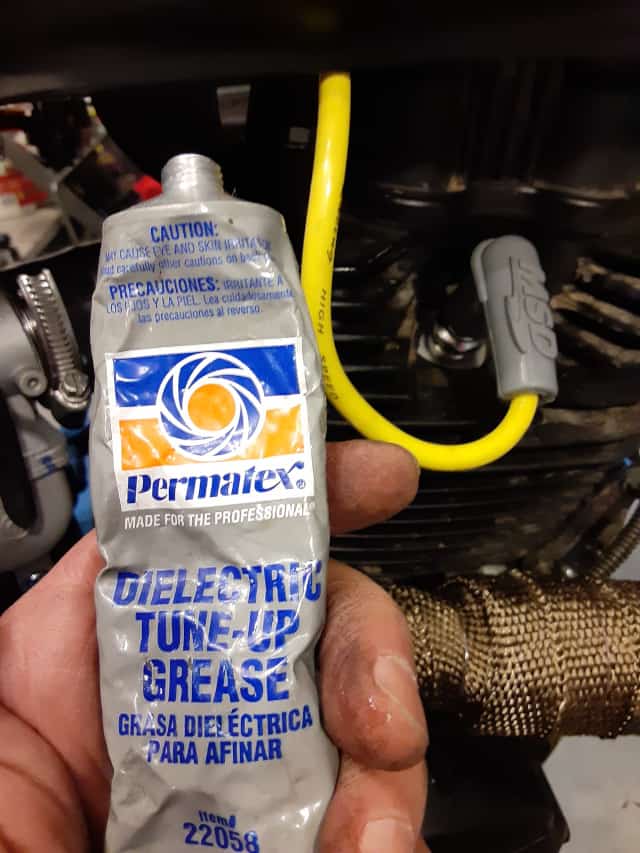
Install rubber boot over spark plug wire end. I used a little dielectric grease to help slide the crimped terminal end into the rubber boot, but it’s not necessary, I am told.
5.- Test The New Spark Plug Boot By Connecting It To The Spark Plug.
Note: if you have the stock spark plug or used the spark plug boot, the spark plug terminal might not secure properly on the MSD spark plug boot. The MSD spark plug boot connects to a larger rounder spark plug terminal, while the stock spark plug.
Install a new spark plug, (My past spark plug upgrade: TBR7 Spark Plug Upgrade.), with the larger round terminal, or reinstall the round spark plug terminal if it was removed during a past spark plug upgrade.
Test Your Work & Clean Up.
Follow standard starting procedures. Ensure the motorcycle starts up and then goes for a test ride.
My outcome from this upgrade. I felt the motorcycle started up quicker, with fewer cranks. In the ride portion of my test, the motorcycle felt more responsive to throttle twisting. This might be subjective, but the new Nibbi ignition coil did have ‘Racing” in its name.
Regardless this was a nice upgrade to the TBR7, and the Hawk 250 owners that I read did the same upgrade, did not regret doing it. Nor do I.
Boom Vader Ignition Coil I Bought:
NIBBI Performance Ignition Coil Fit for 4T Carburetor Motorcycle
Click To See My Recommended
TBR7 Upgrades

Hi I’m Tom, A New Motorcycle Rider and Blog Author.
I am a new rider(Pa Learners Permit at the end of 2020, and I received a Pa Motorcycle License in 2021 after passing a Motorcycle Safety Course).
I bought my first motorcycle, a TaoTao TBR7, at the beginning of 2021 and have been doing upgrades on that motorcycle since.
I added to my motorcycle collection by buying a Boom Vader Gen 2 in 2022, and that Grom-Clone motorcycle has been upgraded by me as well.
I continue to ride my Boom Vader Gen 2 motorcycle as well as my TaoTao TBR7 dual-sport bike.
Read more on my About Me page.
Fun Fact: I’ve only been on one group ride.
