
The high price of replacing your motorcycle clutch plates( Motorcycle Clutch Plate Replacement Cost: The TBR7, Hawk 250, Brozz 250, Magician, etc. ) at a motorcycle shop makes more motorcycle riders do their work. So I’m covering how to replace your motorcycle clutch plates using my TaoTao TBR7 motorcycle (similar engine to Hawk 250, Magician, other Chonda Bikes).
Cost is a major driving force for this regular maintenance item becoming a DIY item on your to-do list. So I researched, how to replace your motorcycle clutch plates, and actually did it. Here’s how:
Also, buying motorcycles that shops don’t want to touch, and being a tinkerer, I was happy to learn how to do maintenance on my motorcycle clutch. Anything I can do that makes the bike shift smoother is a win.
FYI, in the past, I replaced my TaoTao TBR7 clutch plates by buying a clutch packet and just dropping that setup into my motorcycle. Now I know better and will save more money by changing my clutch by actually changing the individual friction plates.
My Motorcycle Is A TBR7, A Chinese Dual-sport.
I am targeting my fellow Chonda Motorcycle Owners(TaoTao TBR7, Hawk 250, Brozz 250, etc.). Still, much of my documentation is generic enough for other motorcycles too.
These Chinese Dual-sport motorcycles(TBR7, Hawk 250, etc.) are based on the Honda CG-125/150 engine, which has been bored to reach 229cc in displacement and is very close to the CG-250 size.
Set Up For The Clutch Plate Replacement Project.
Like any good project, preparation is where a lot of focus is lost.
Give me six hours to chop down a tree and I will spend the first four sharpening the axe.
Abraham Lincoln
Here we will prepare before we get started to save hassle and frustration.
Bike Shop Safety First.
For my clutch plate replacement project, I kept the motorcycle on the kickstand and just secured the motorcycle wheels from rolling.
Disassembling the motorcycle clutch can disengage the typical anti-roll method of “just keeping the bike in gear,” so take the time to chock the wheels and work on level service.
Remember: FAQ-Motorcycle Garage Safety Rules
Motorcycle Clutch Plate Tools Needed
Essential shop tools ( Must Have Tools For Motorcycle Owners ) are needed—wrenches, screwdriver, a ratchet set, etc.
Most people do not have a vital tool in their average garage: the wrench attachment to remove specific model fasteners. My TaoTao TBR7 motorcycle, like the Hawk 250, Brozz 250, TT250, etc., is based on the Honda engine design.
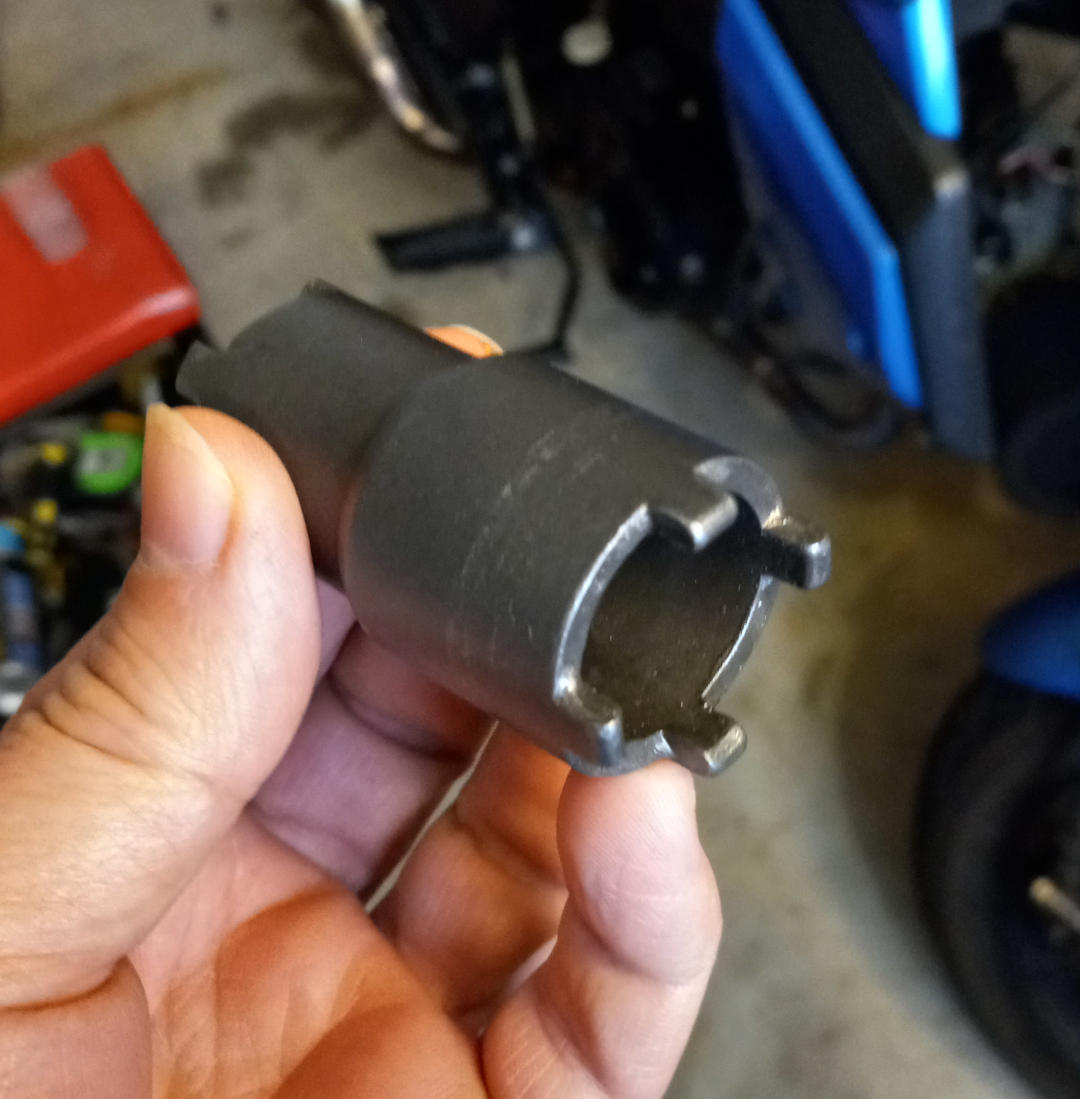
So to do my clutch plate replacement, I need access to the clutch plates. For my motorcycle engine design, I need to remove the centrifugal oil filter for easier access. So for my bike, I need a Clutch Tool Wrench Lock Nut Spanner for Motorcycles.
Author’s Notice: This page contains affiliate links, for which I may earn a commission by their use. Also, as an Amazon Associate, I earn from qualifying Amazon purchases.
Got the Clutch Tool Wrench Lock Nut Spanner for Motorcycle tool cheap on Amazon. FYI, where I also ordered my motorcycle clutch plates for convenience. What it looks like:
Motorcycle Shop Materials Needed.
I kept this simple for me. I only needed fresh motorcycle oil( What TBR7 Oil Type Do I Need? ) and clean, sturdy shop towels. I started loving the blue towels; they clean up the oil better and are less linty than kitchen paper towels(Plan on buying these blue shop towels in bulk to save more money).
Motorcycle Clutch Replacement Plates
For my TaoTao TBR7 motorcycle, I picked up matching clutch plates from Amazon. This Seven plate kit was the correct size for my bike and cheap, and it might match your motorcycle too. Check your Motorcycle Owner’s Manual or Shop Manual.
These are the plates I ordered for my TaoTao TBR7 motorcycle. Should match Hawk 250, Brozz 250, etc, just confirm.
Click For Current Motorcycle Clutch Friction Plate Kit For Zongshen Prices.
Once you have the clutch friction plates and about a day before you do the clutch plate replacement, soak your new plates in clean motorcycle oil. This way, they are properly lubricated and ready as soon as you install them.
Steps To Replace My Motorcycle Clutch Plates
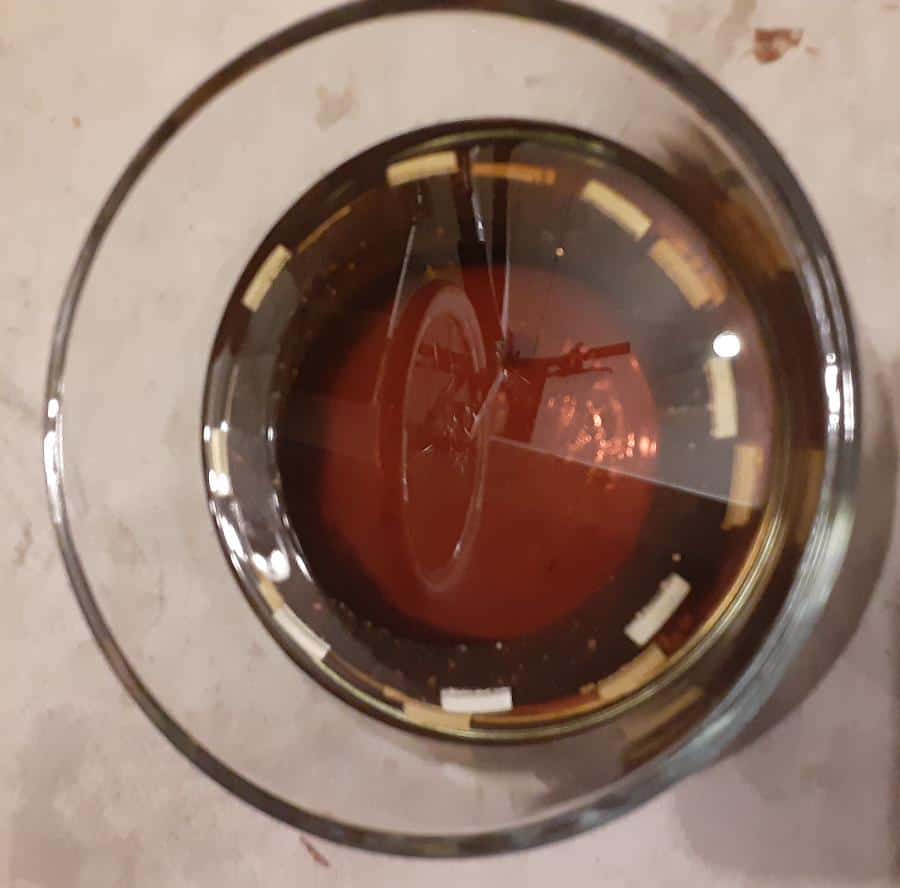
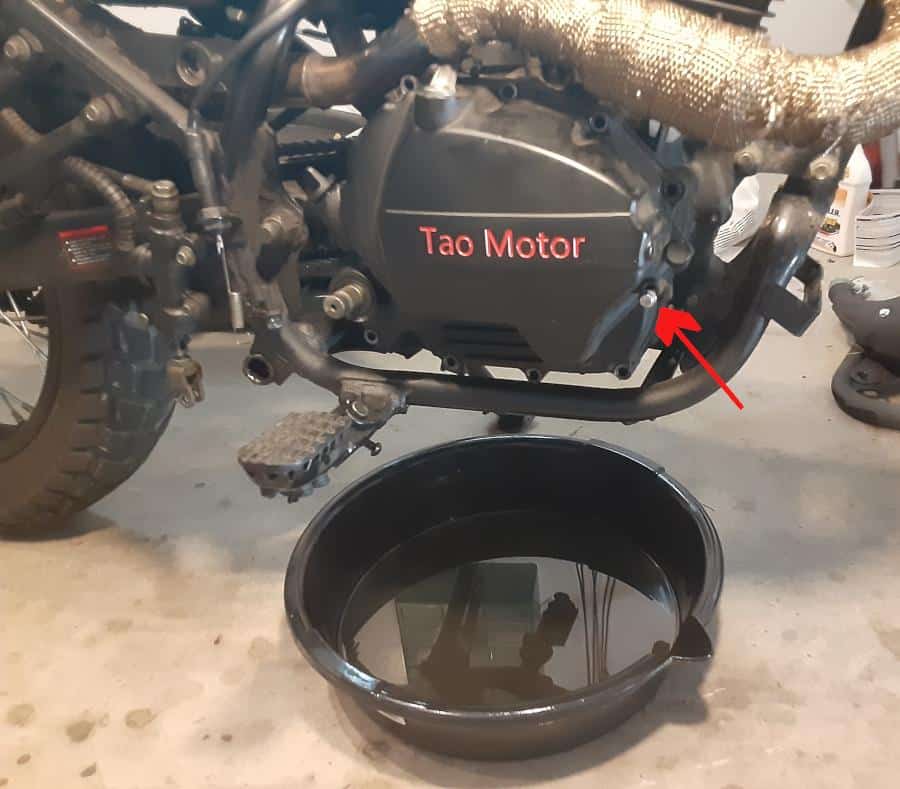
1.- Drain The Motorcycle Oil.
I timed the clutch plate replacement with the time to change the oil since draining the motorcycle oil is the first step. Saves money and wastes resources like oil.
Under my TBR7 motorcycle, an oil drain plug uses a 17mm wrench to remove.
Once the plug is out, the oil is drained into a pan.
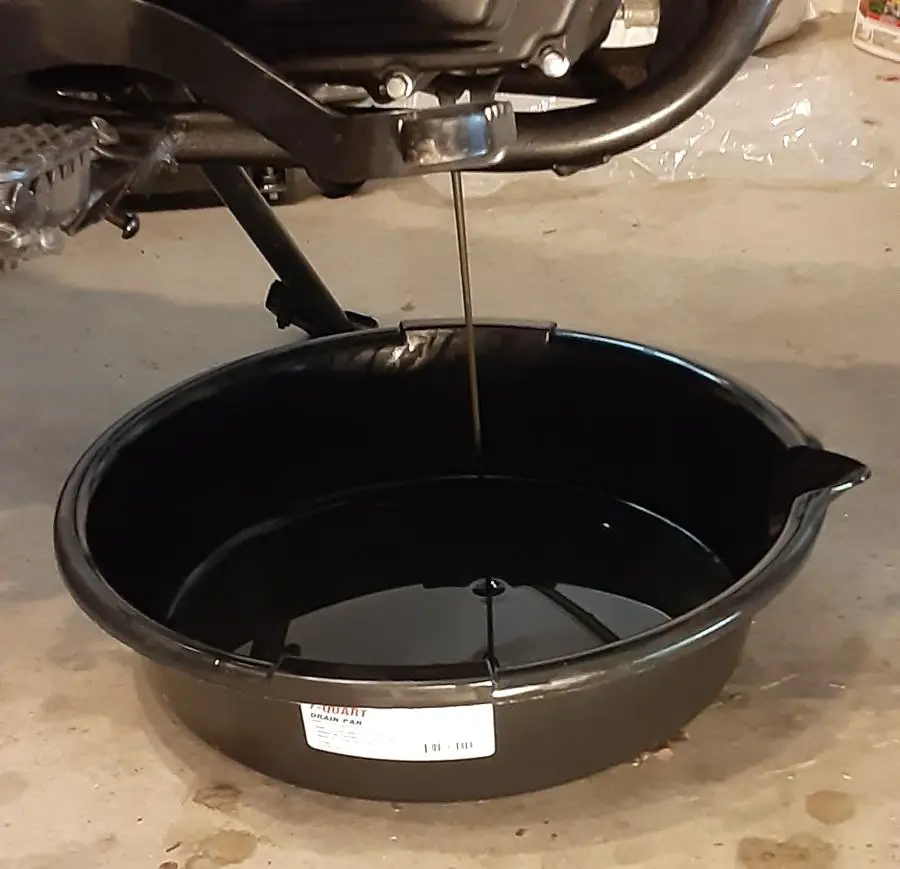
Once the plug is removed, let the old oil drain into your collection device. I have a cheap pan, and then I look at the magnet on the end of the drain plug( Are Motorcycle Magnetic Oil Drain Plugs Worth It? ).
Is the material excessive? Is there something you should be worried about? Some material is wear and tear, but if you see large chunks of metal on the plug, you might want to find the source of it( Metal Shavings In The Motorcycle Oil!!! ).
I leave the pan under the bike the whole time I do the clutch plate replacement. Catch any additional oil drips out, so I can make room for new clean motorcycle oil.
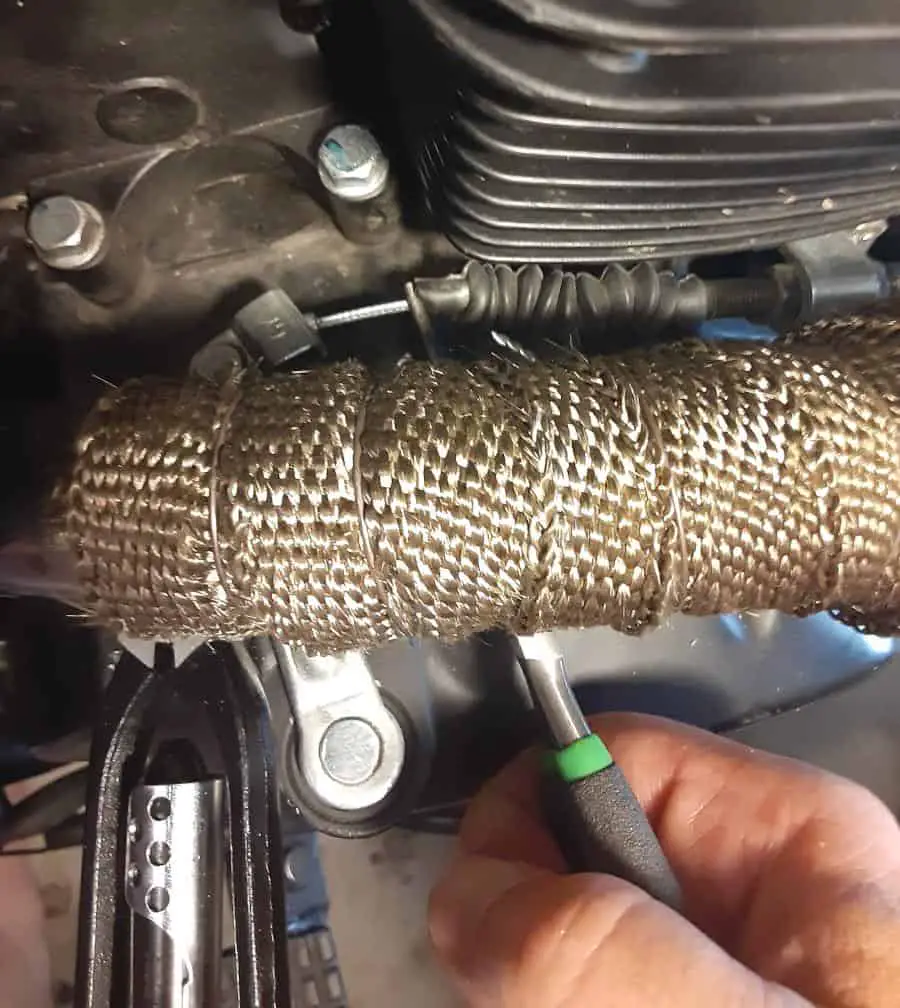
2.- Disconnect The Clutch Cable.
The old way I used to do this was to loosen the clutch cable adjuster till the cable was so loose it almost fell off the clutch arm.
I found an easier way to remove the clutch cable.
I force the clutch arm forward, this case wedging a set of pliers between the exhaust piping(unseen underside, so fear of scratches) and the clutch arm. The clutch arm moves forward.

Using needle nose pliers and enough slack, I grab the clutch cable and unhook it from the clutch arm. Now the clutch cable is disconnected from the clutch arm.
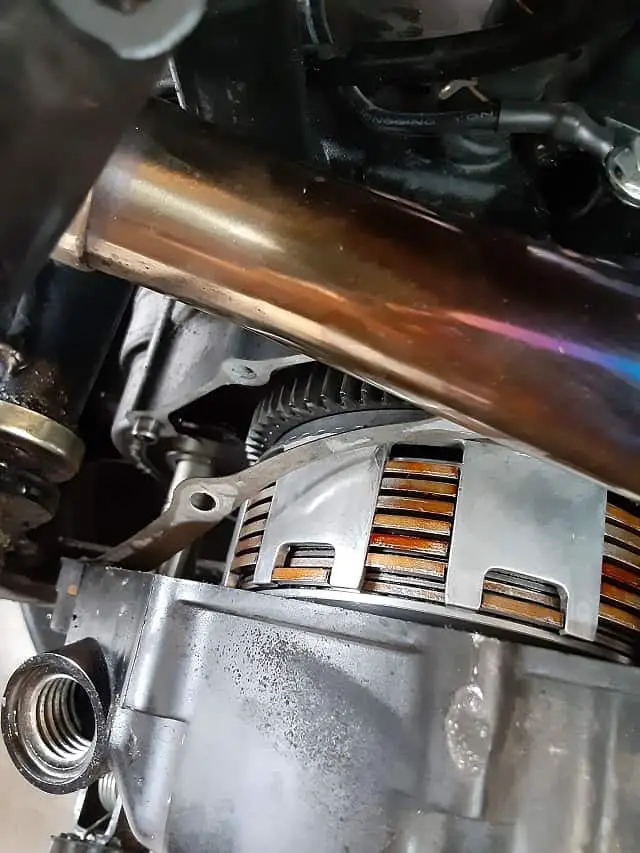
3.- Get Access to Clutch Plates.
This step is a two-part process. Removing the external blocks to the clutch plates and removing the internal block to the clutch plates.
External Process – Remove The Engine Clutch Cover.
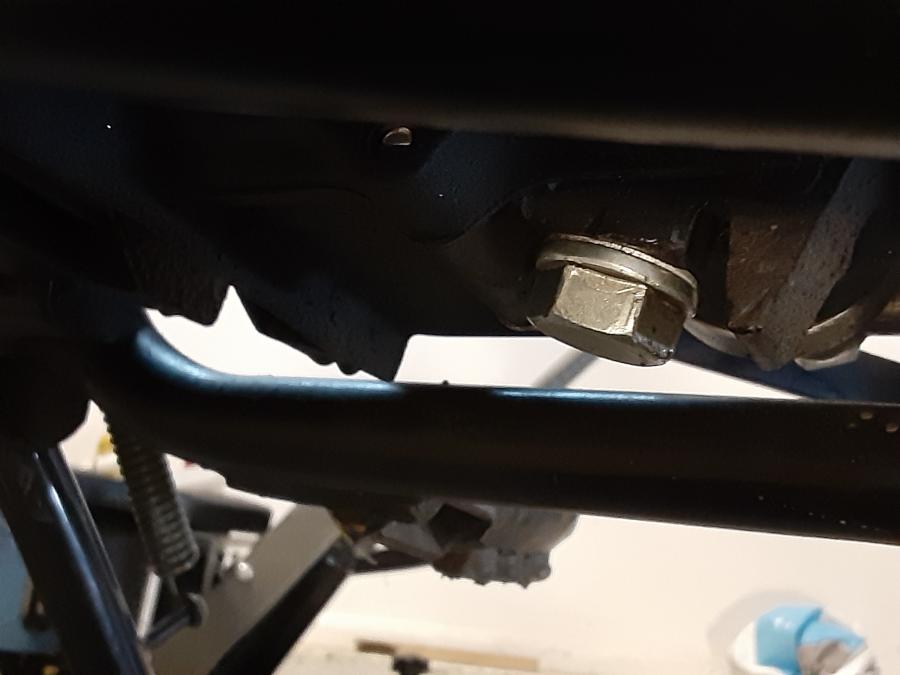
To get access to my clutch cover and remove it, I have to remove the foot brake pedal(not a problem, time to clean and re-grease it, too) and the kickstarter( TBR7 Kick Start? My Kickstarter Works! ). You can remove the engine clutch cover with these out of the way.
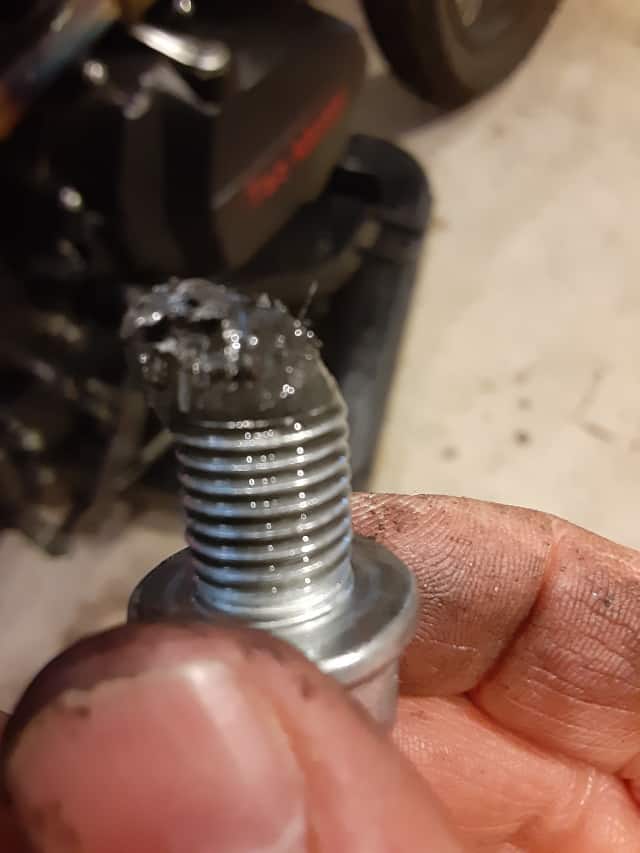
My TBR7 motorcycle has ten same-sized bolts and one longer-sized bolt. Be sure of your motorcycle, and keep track of any odd-sized bolts and where you removed those bolts from.

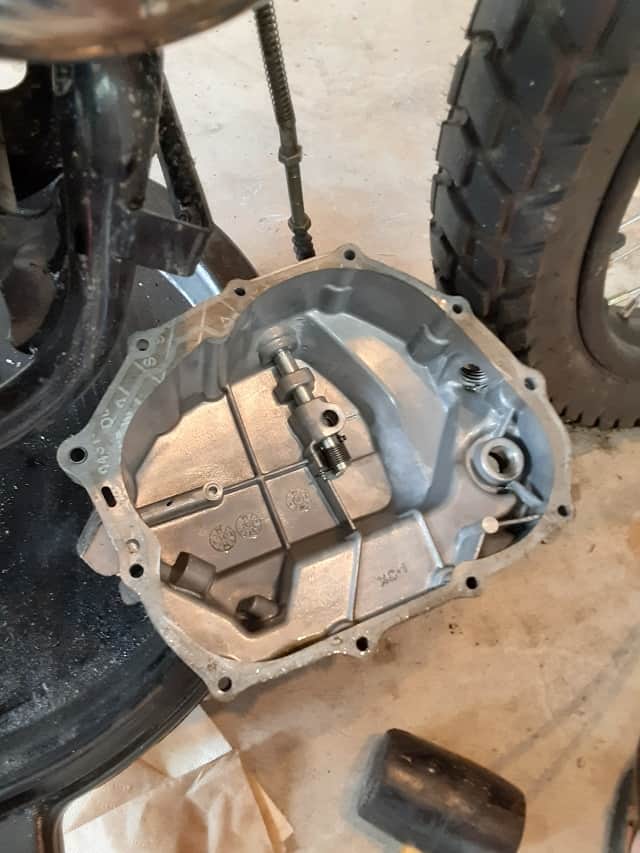
Carefully tap(use a rubber mallet) and remove the clutch cover. Remove the cover and loosen the gasket so the gasket can be reused.
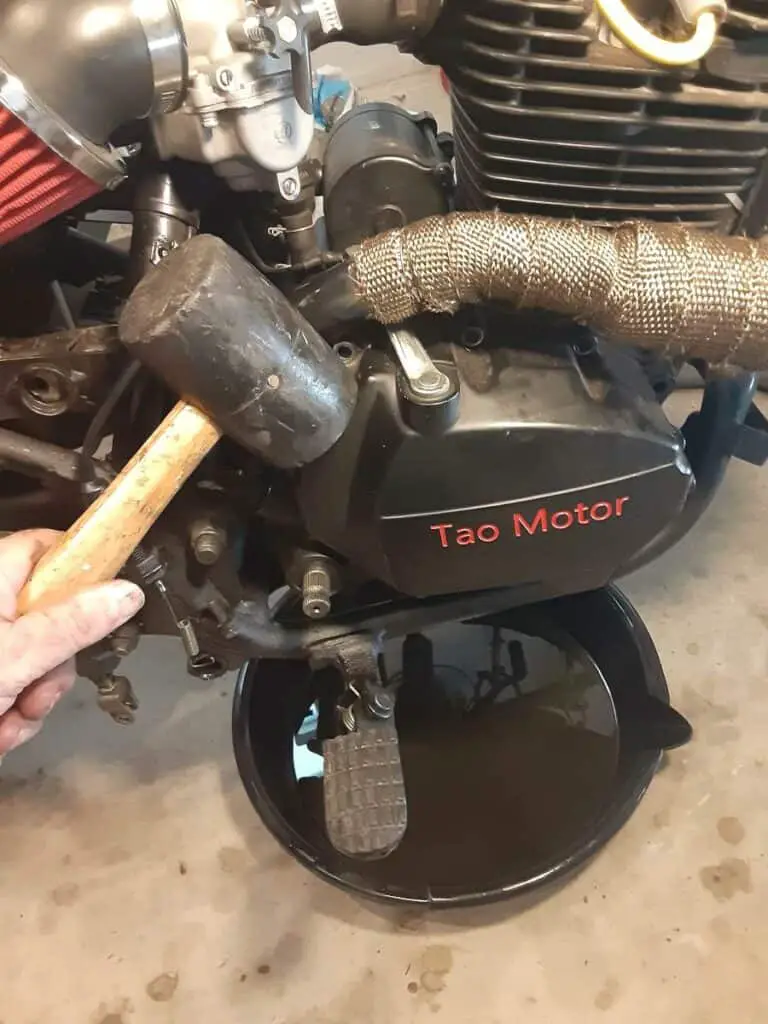
Once the engine’s clutch case cover was off, I wiped out all remaining oil and debris, examining the amount of gunk I found for abnormal wear.
Carefully placed the crankcase cover, gasket, and bolts to the side. I covered the cover to prevent anything from falling inside of it. Again, blue shop towels came in handy.
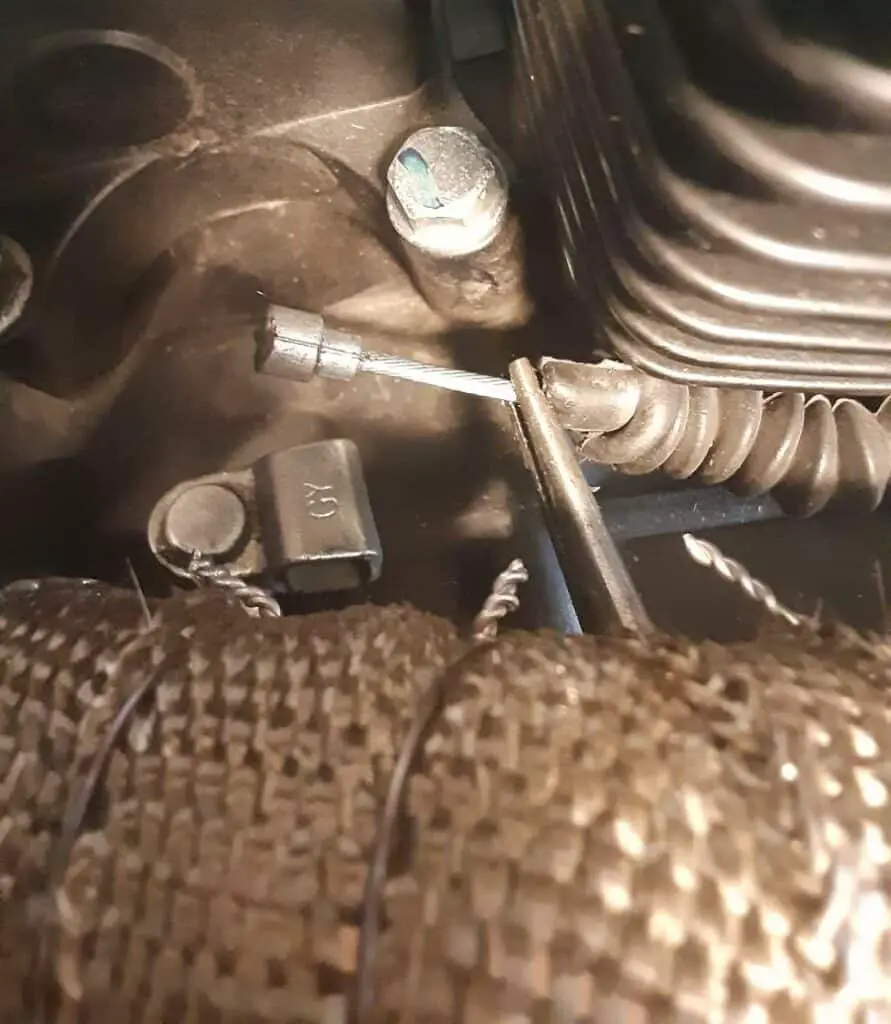
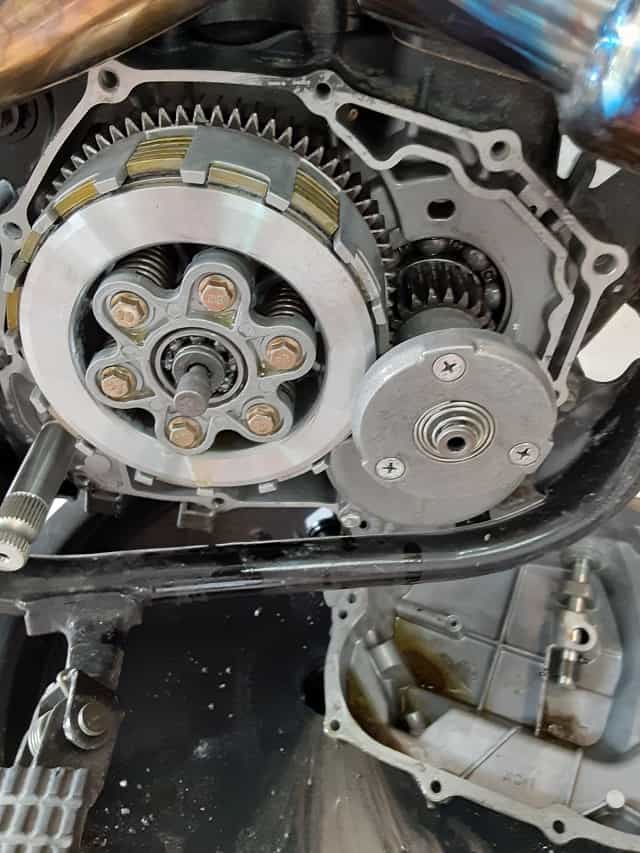
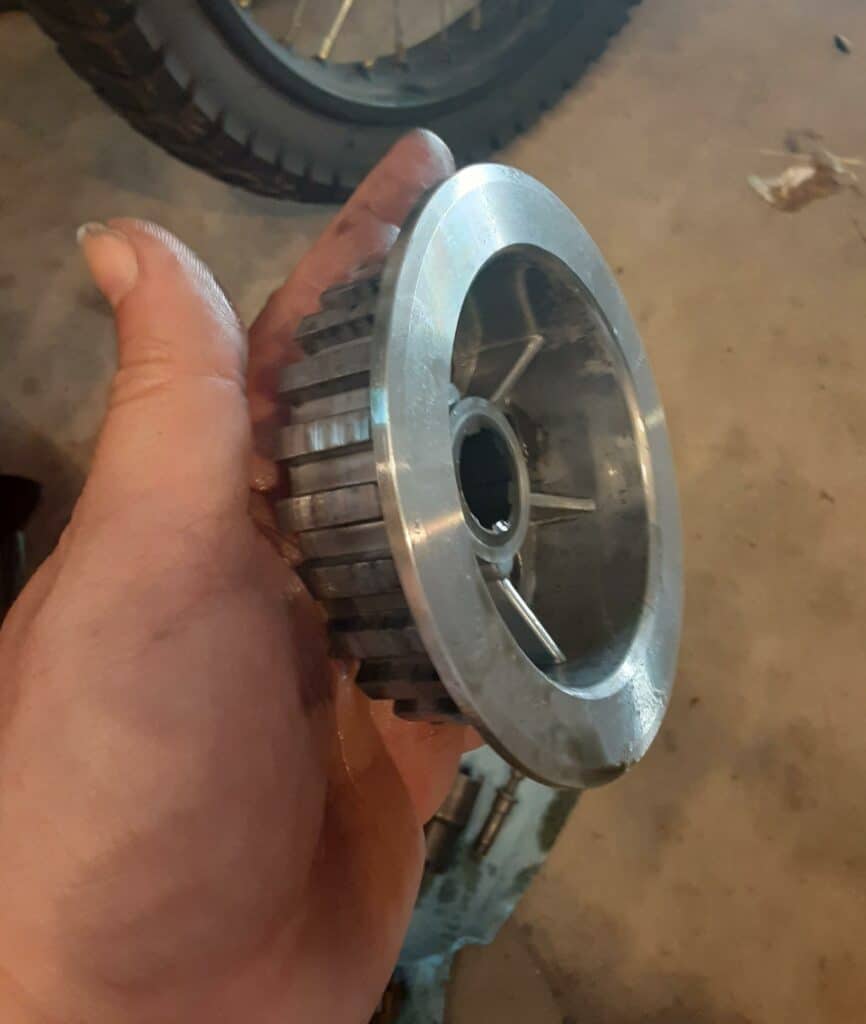
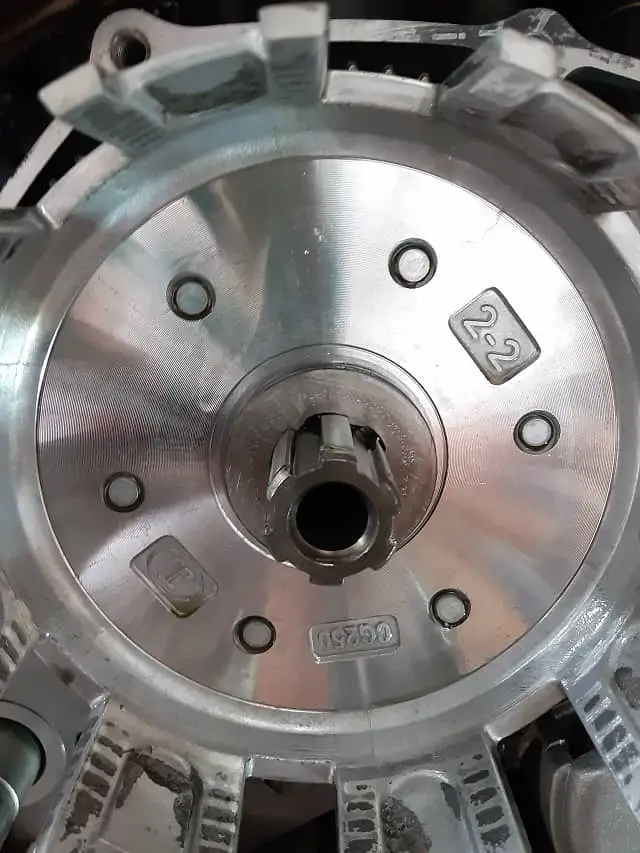
Internal Process – Remove the centrifugal oil filter.
My motorcycle has a centrifugal oil filter that blocks access to the clutch plates. Once the engine clutch cover is removed, you have full access to the clutch plates for some motorcycles.
Even if you don’t need to remove your centrifugal oil filter, if installed, this is an excellent time to open the filter and clean it. If your motorcycle has an internal oil strainer, this is also a good time to remove the oil strainer and clean that as well.
- Use a gear locking tool, or carefully jam a flat-head screwdriver into the gears to prevent them from rotating.

- Remove the three cover screws.
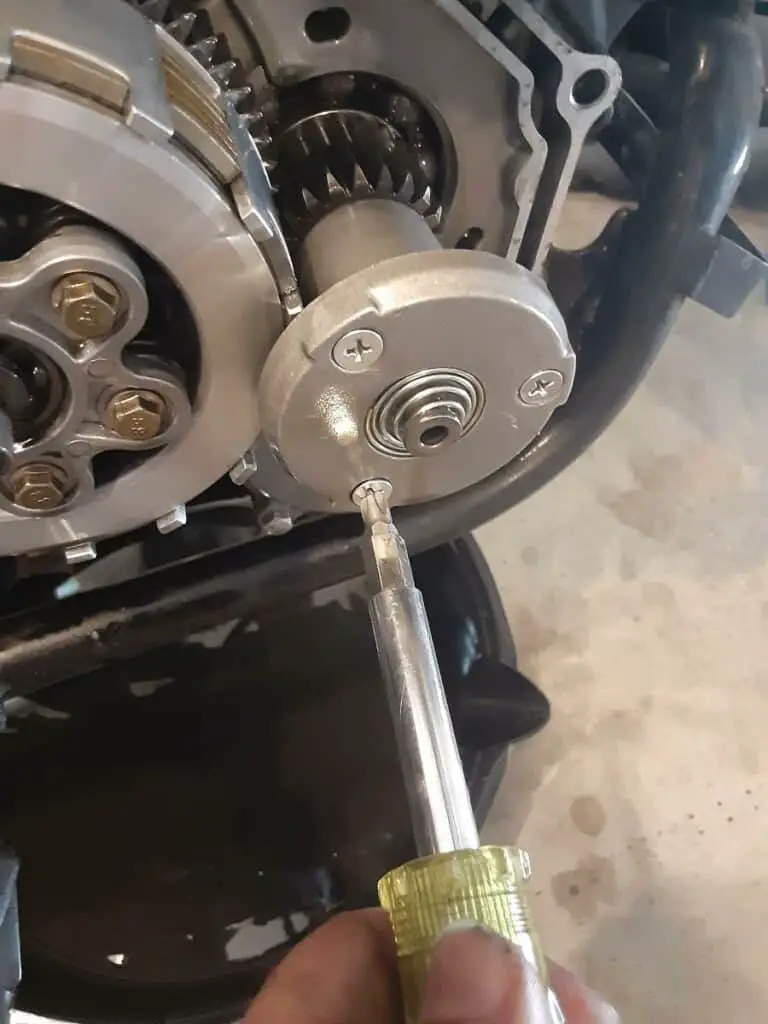
- Remove the cover, and carefully remove and examine the gasket. Usually not damaged, so very reusable, I found.
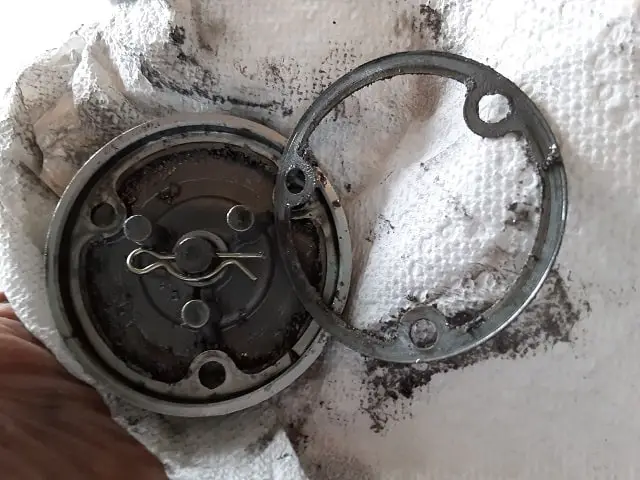
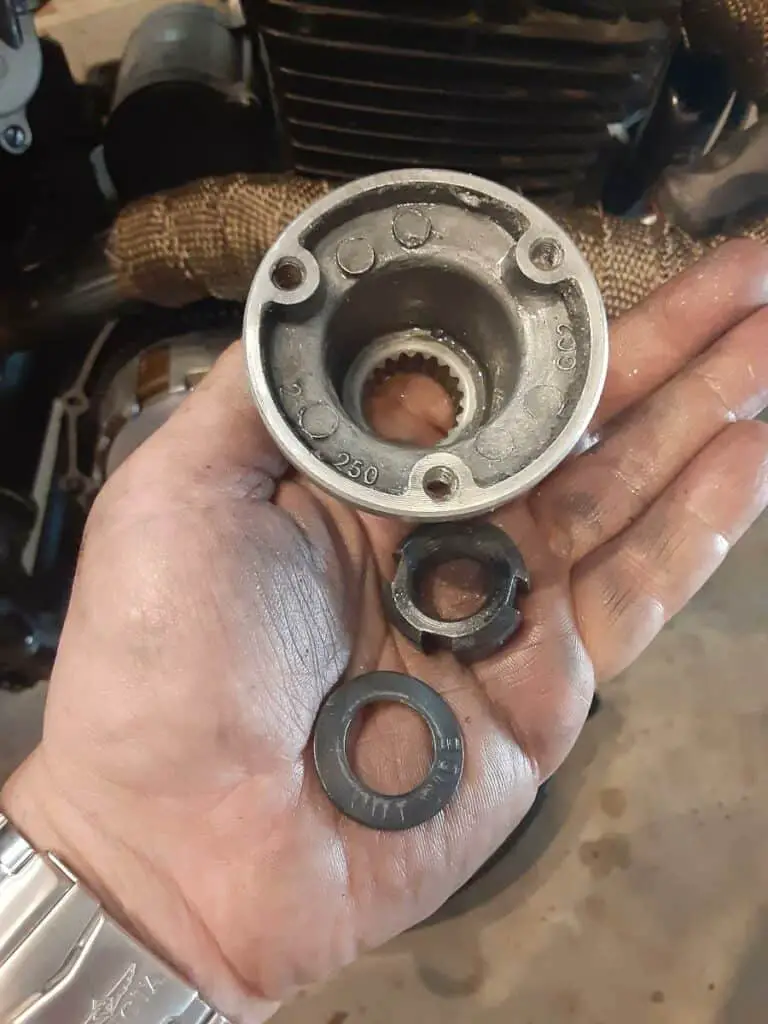
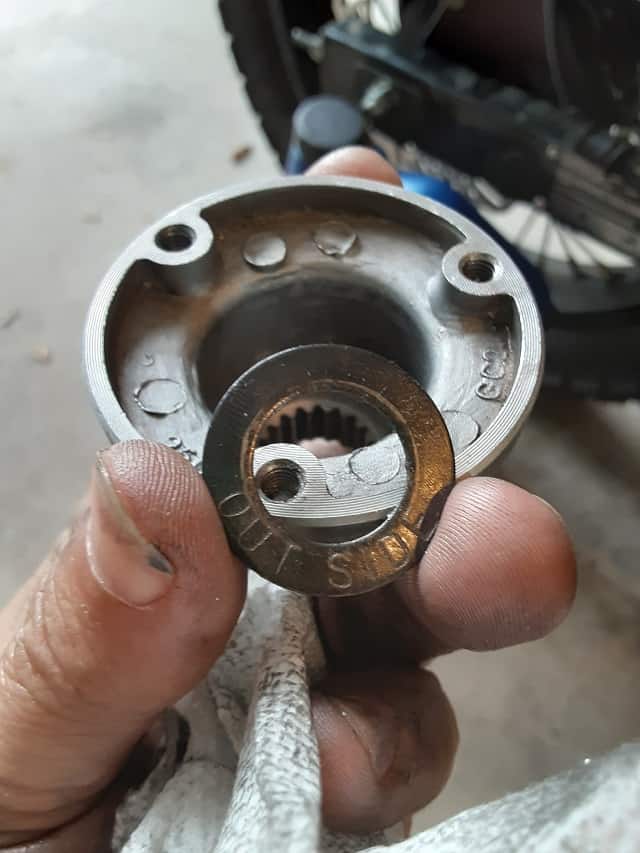
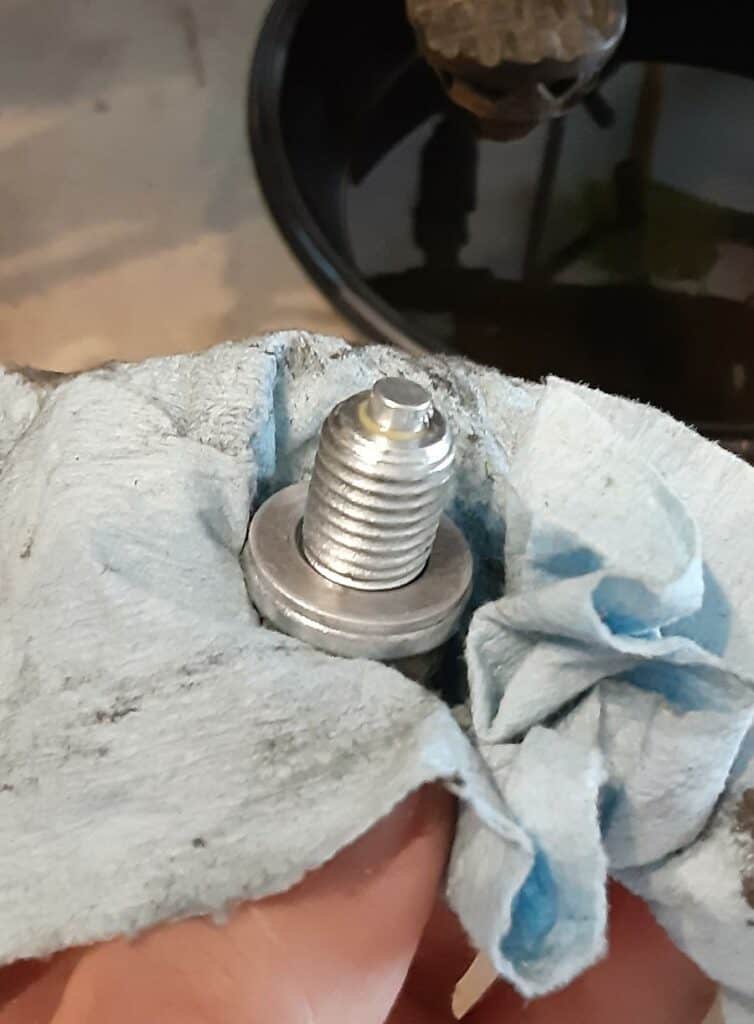
- Move the filter housing using the adapter tool. Unscrew the nut, remove the washer(Note the text on the washer) and remove the housing.
- Clean this centrifugal filter. I used a small flat head to scrap out junk, and brake cleaner helped.
- Set these parts aside, and cover them to help keep them clean.
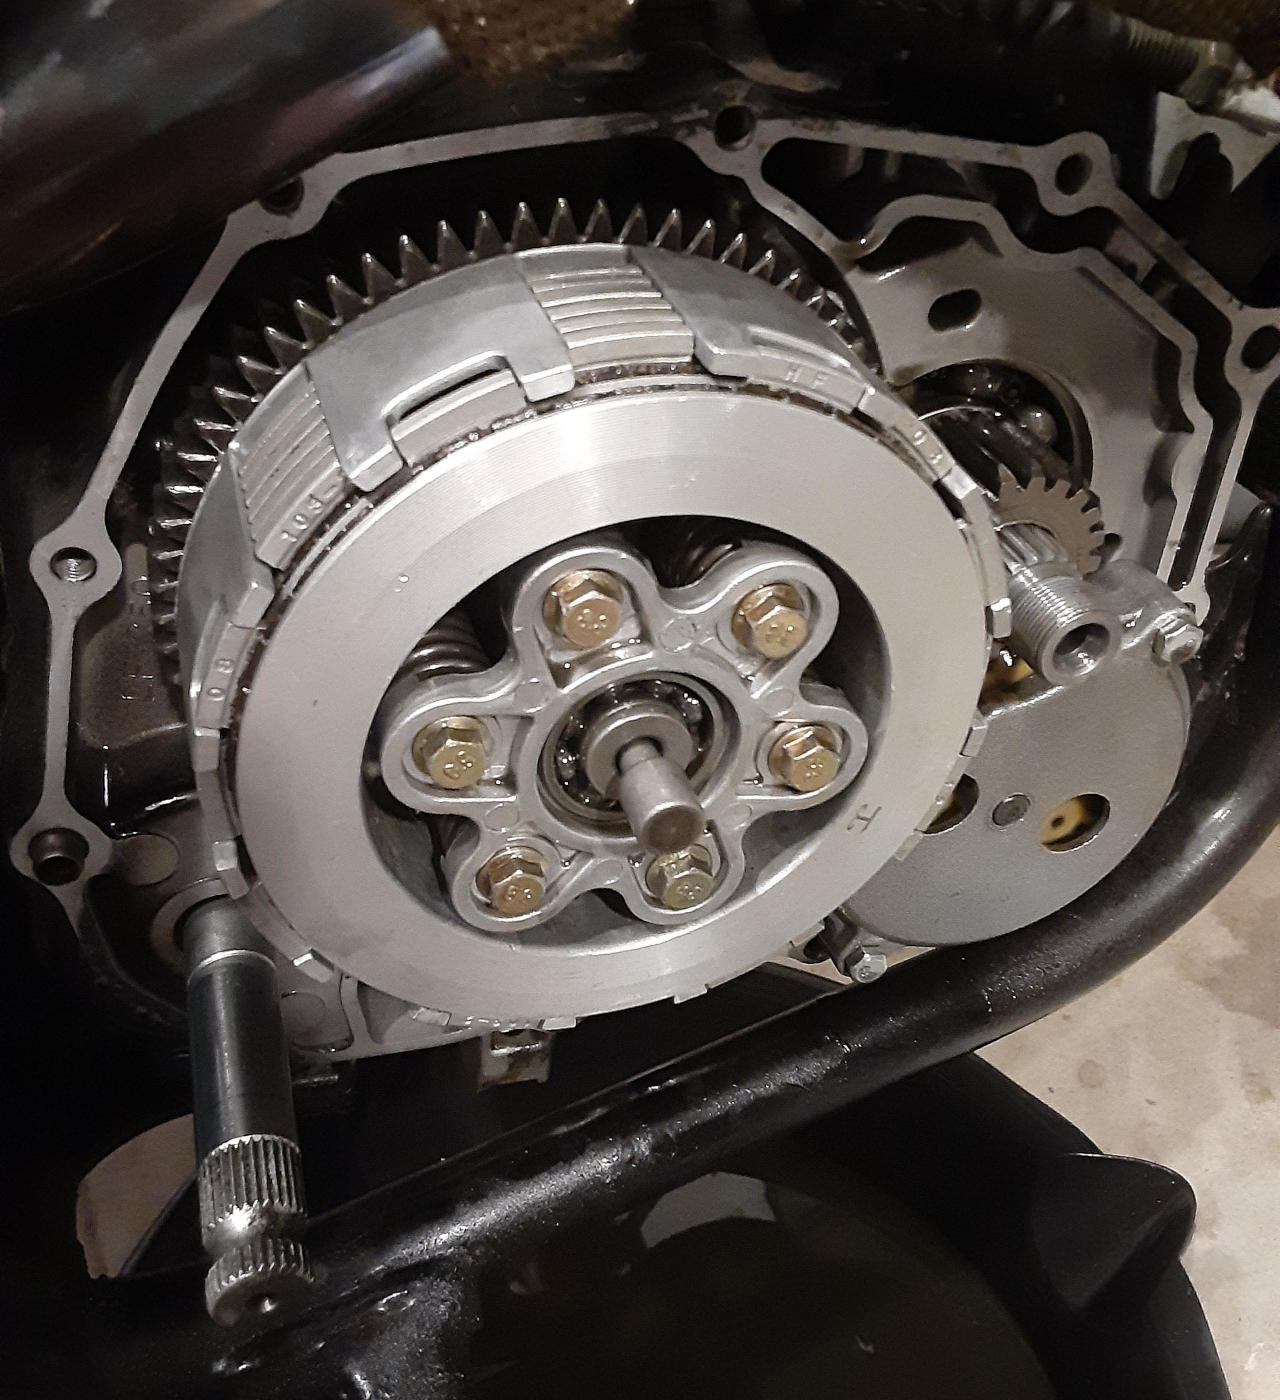
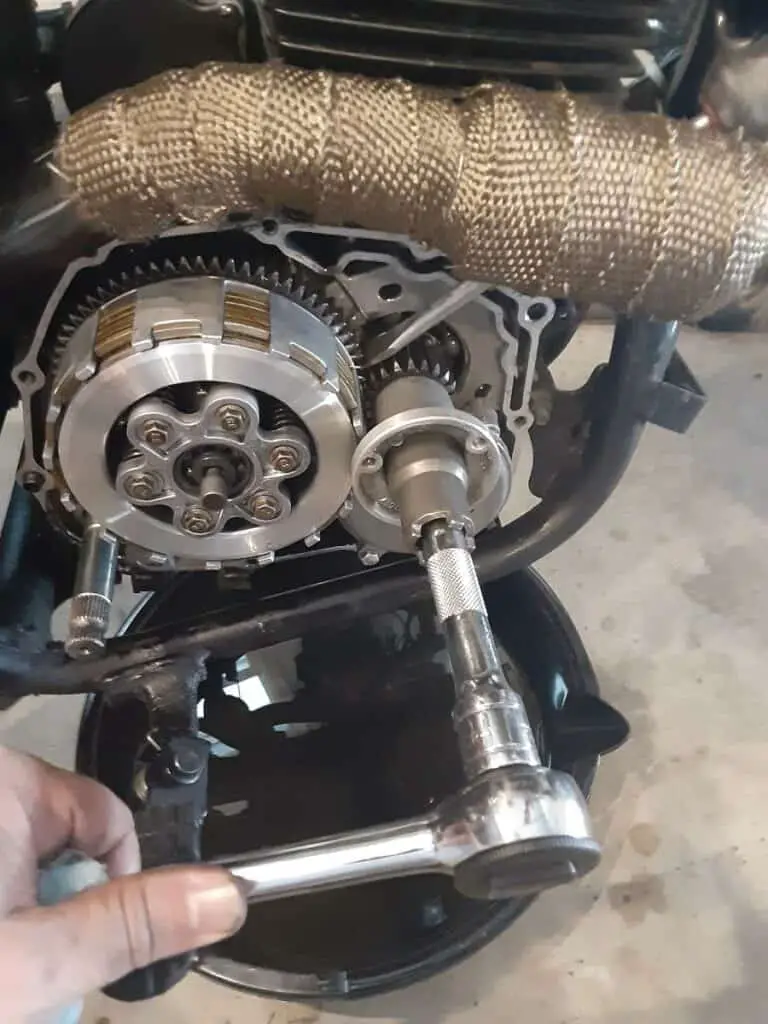
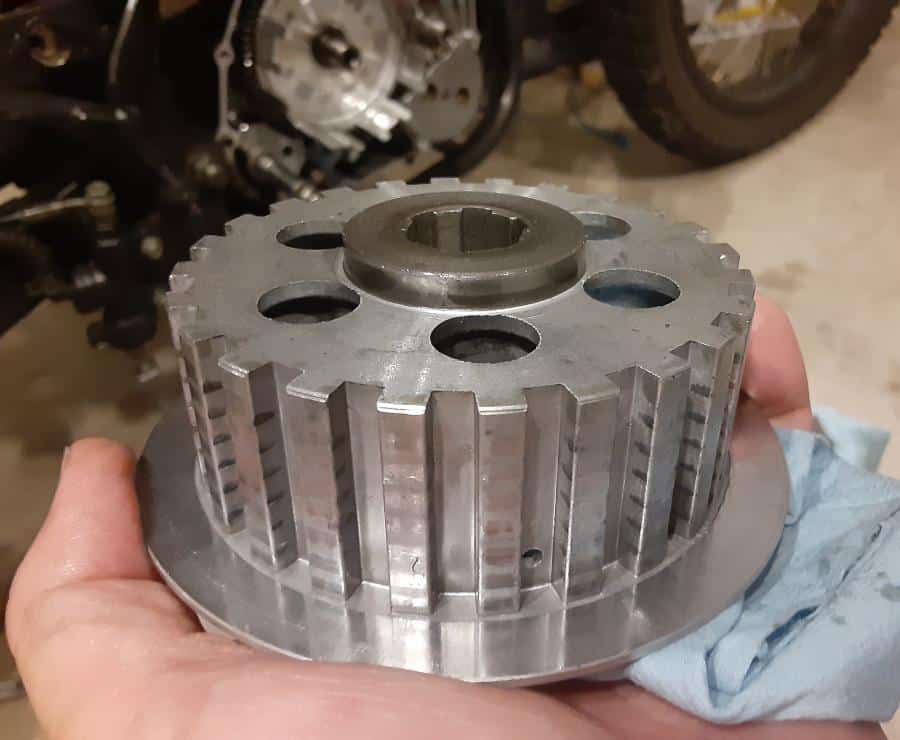
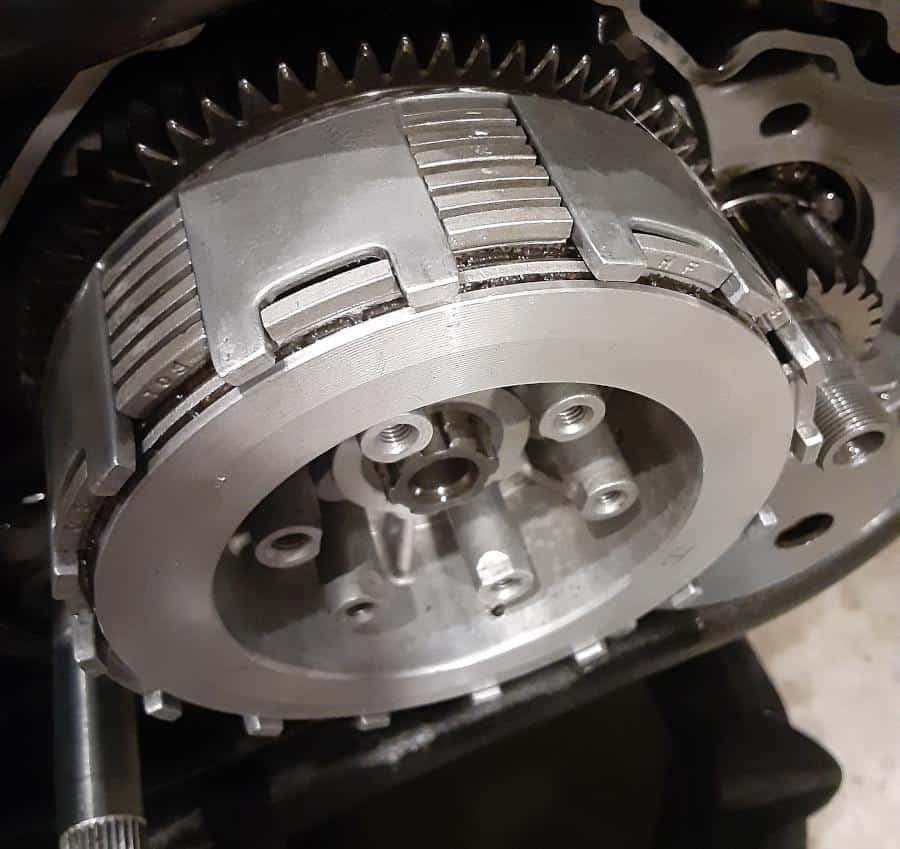
4.- Removed Clutch Plates
This process was easy for my bike, and I learned common for many motorcycles.
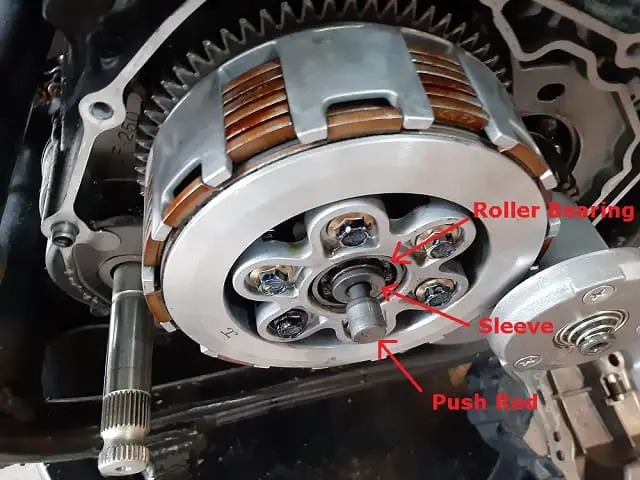
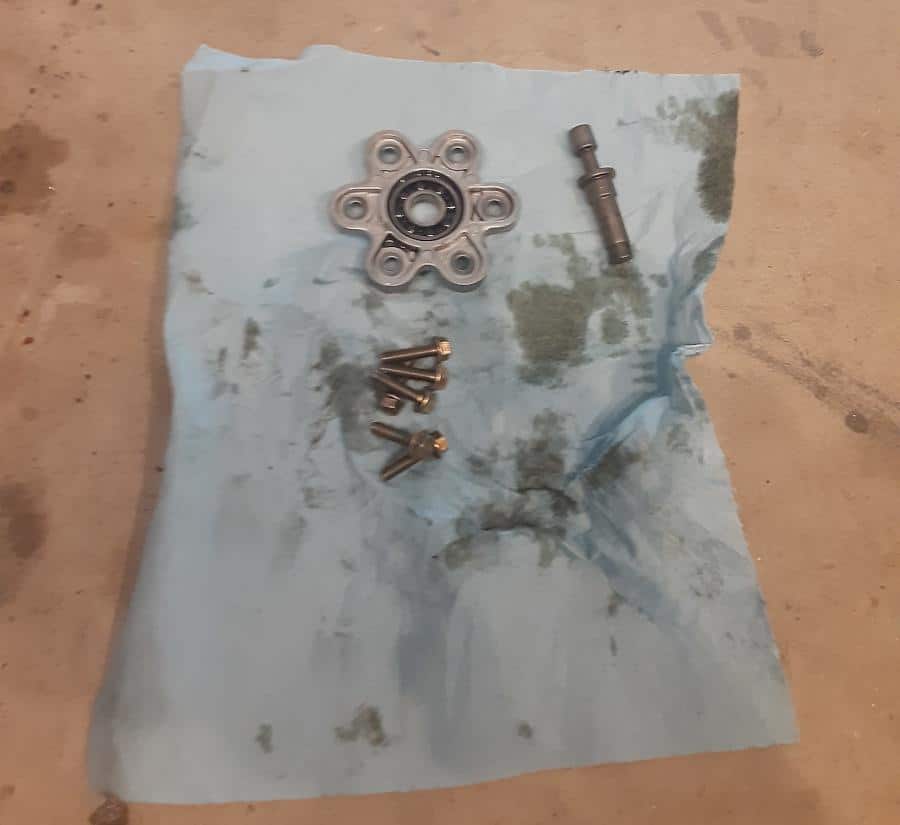
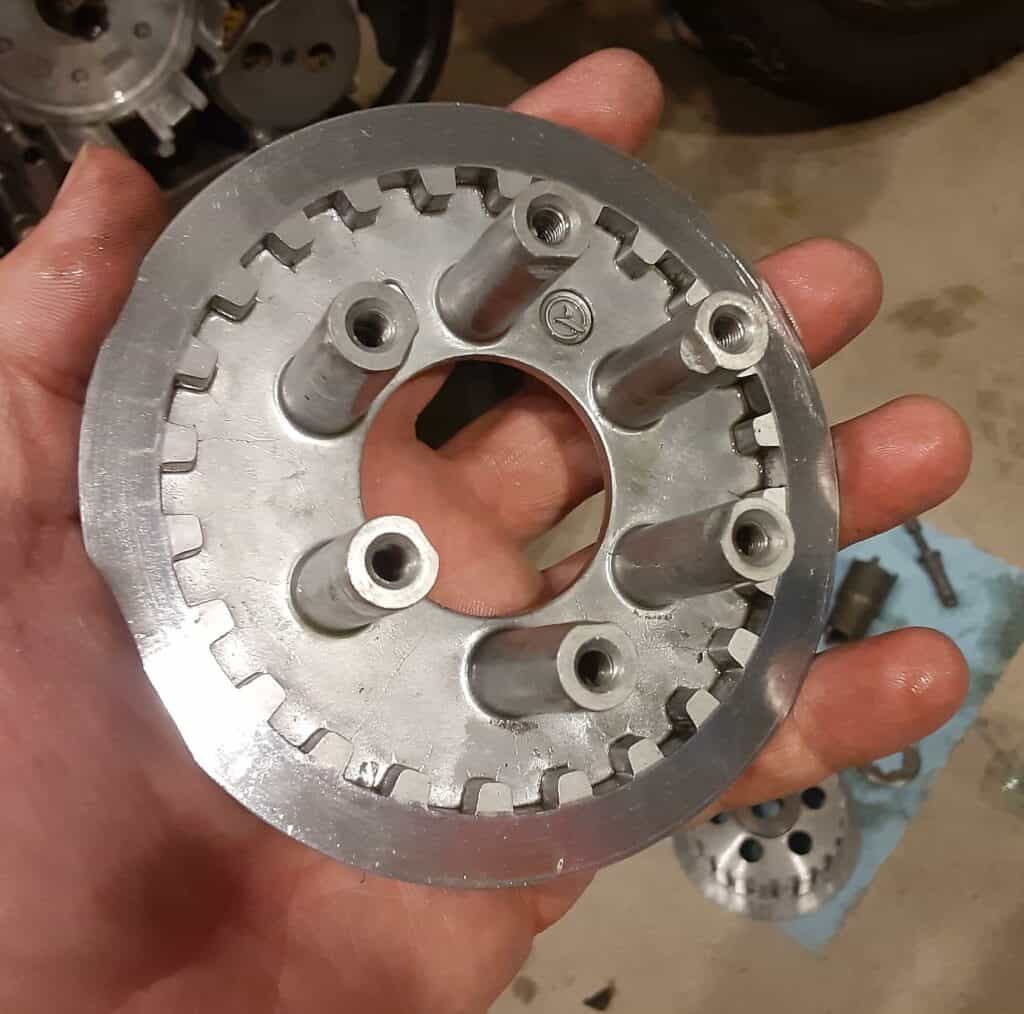
- Removed the center push rod and sleeve.
- Slowly and equally losing in a crisscross pattern, I loosened the pressure spring bolts on the clutch lifter plate.
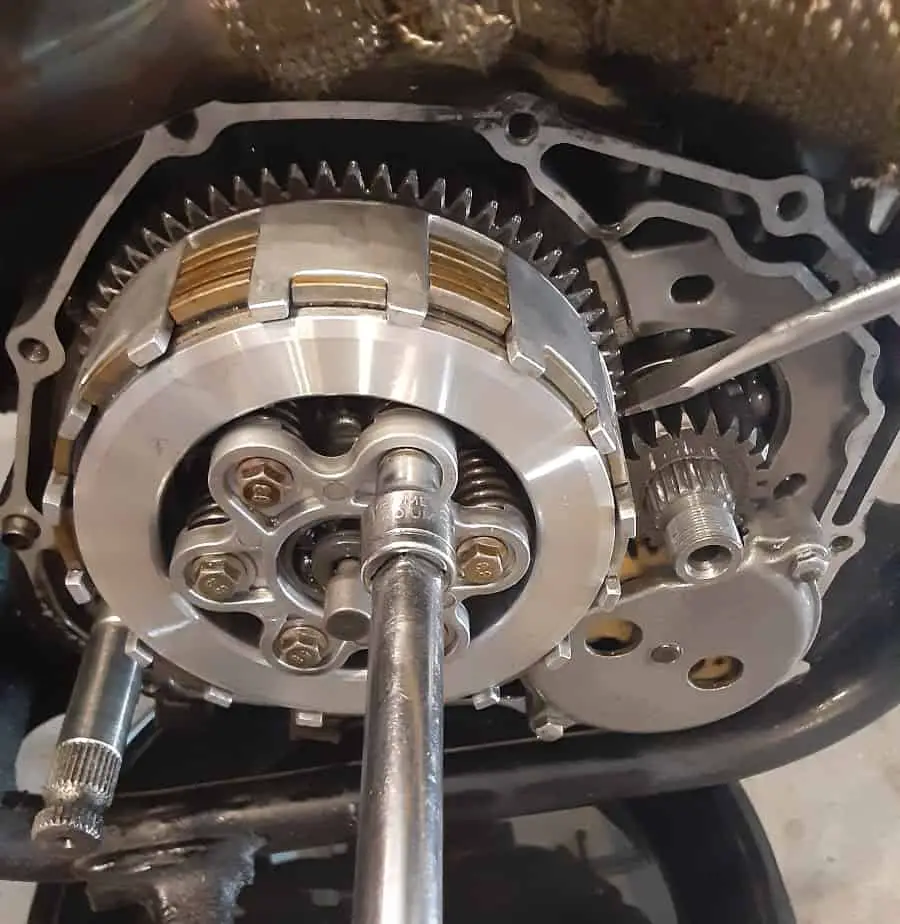
- Once the bolts were removed, I slowly removed the clutch lifter plate to prevent the clutch springs from falling and getting lost.
- Removed the clutch pressure springs.
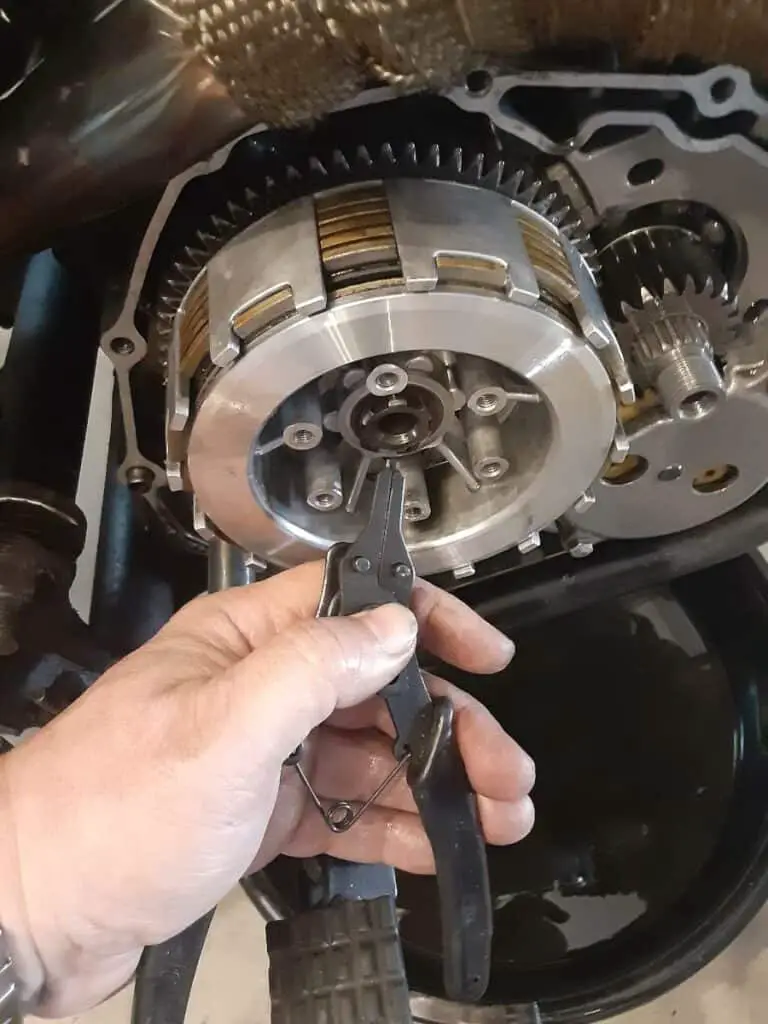
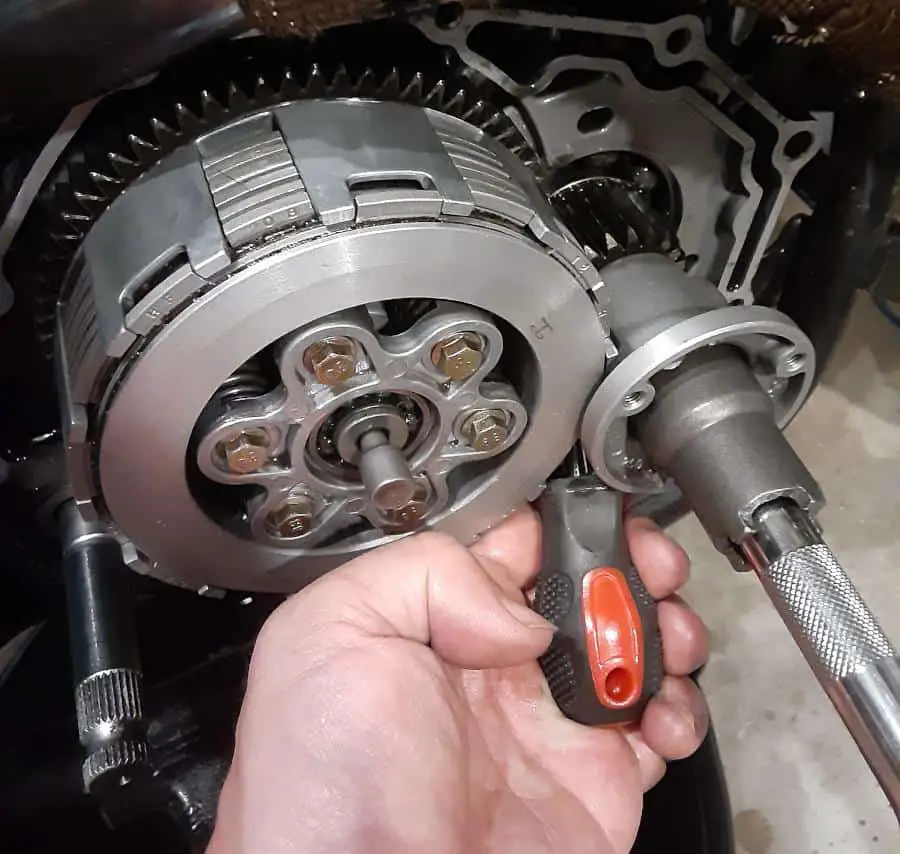
- Using snap ring pliers, I removed the snap ring. This step will unlock the clutch pack.
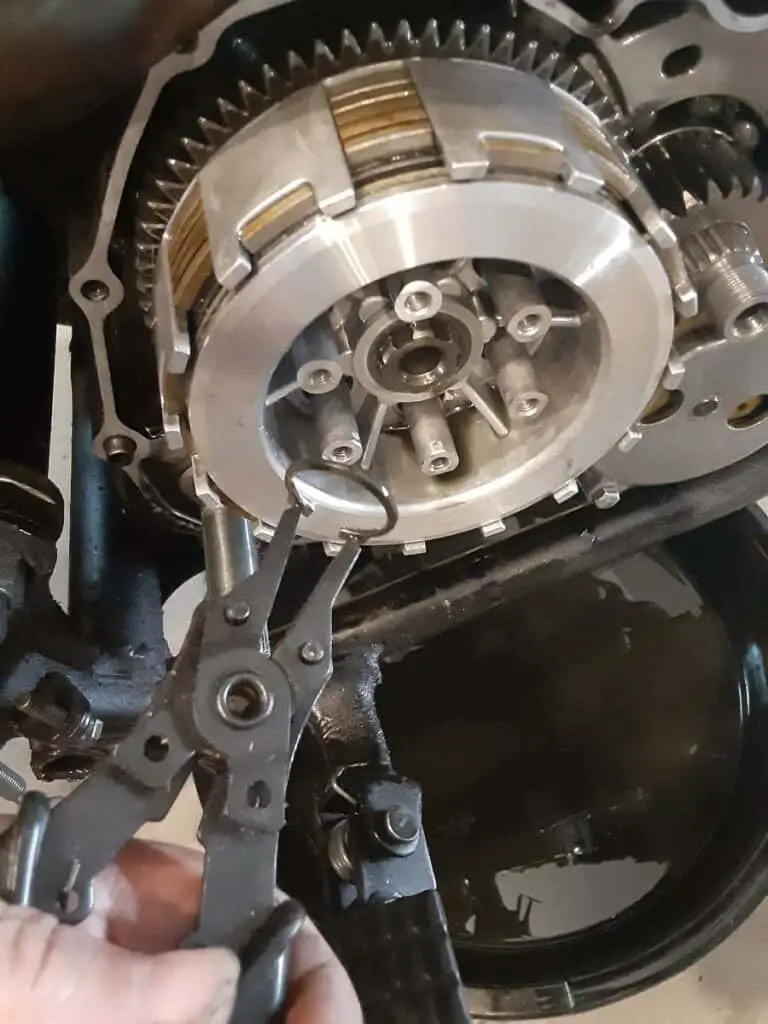
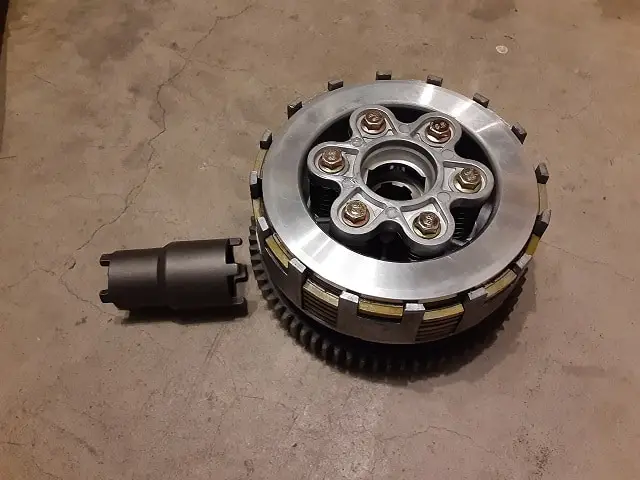
- I pulled out the clutch center hub and plates(friction and metal), setting those aside.
- Look in the basket; the remaining clutch pressure plate(or bottom of the clutch pack) is in the basket.
Remove this, and place it too aside.
5.- Inspect Areas And Clean.
For each item I cleaned/wiped down, I inspected for damage and examined what I was cleaning off. Is the material just old oil with typical wear products(like clutch material), or am I looking at burnt oil and metal shavings? Questions like this go through my head as I clean the clutch and its housing.
All oil filtration devices are cleaned; if you have an internal oil strainer; again, an excellent time to clean now.
- My bike’s centrifugal filter is lightly scrapped out. I used a flat-head screwdriver and wiped the inside of the filter out, and I was told brake cleaner speeds up cleaning out this filter.
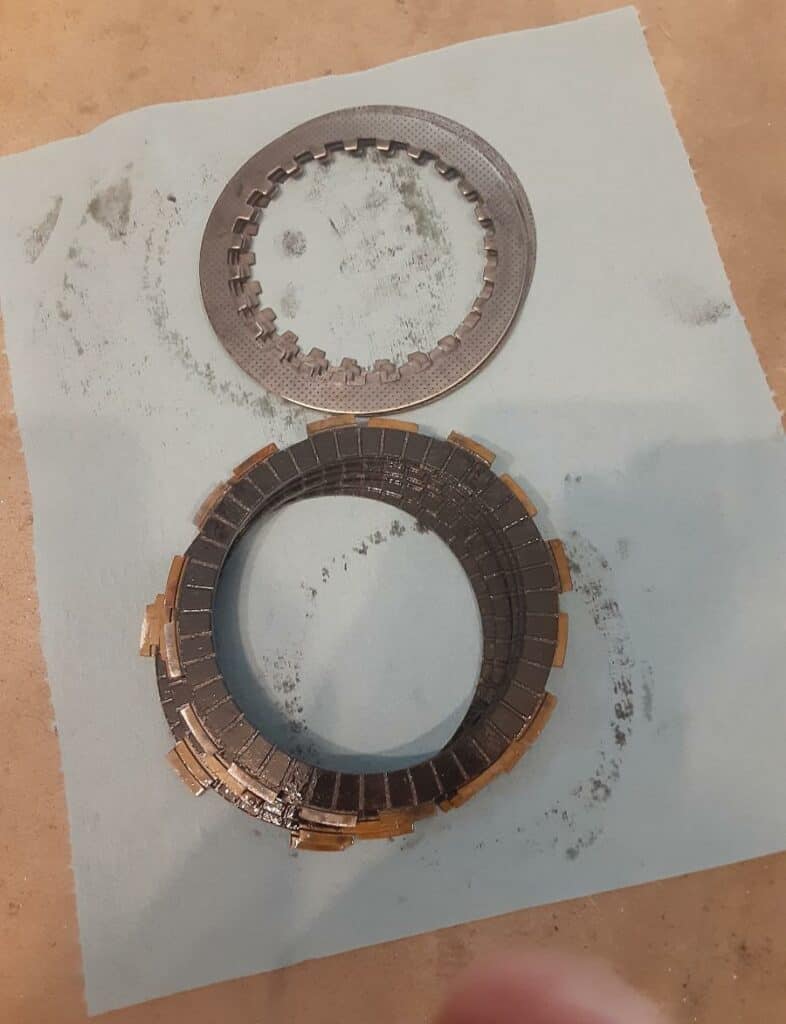
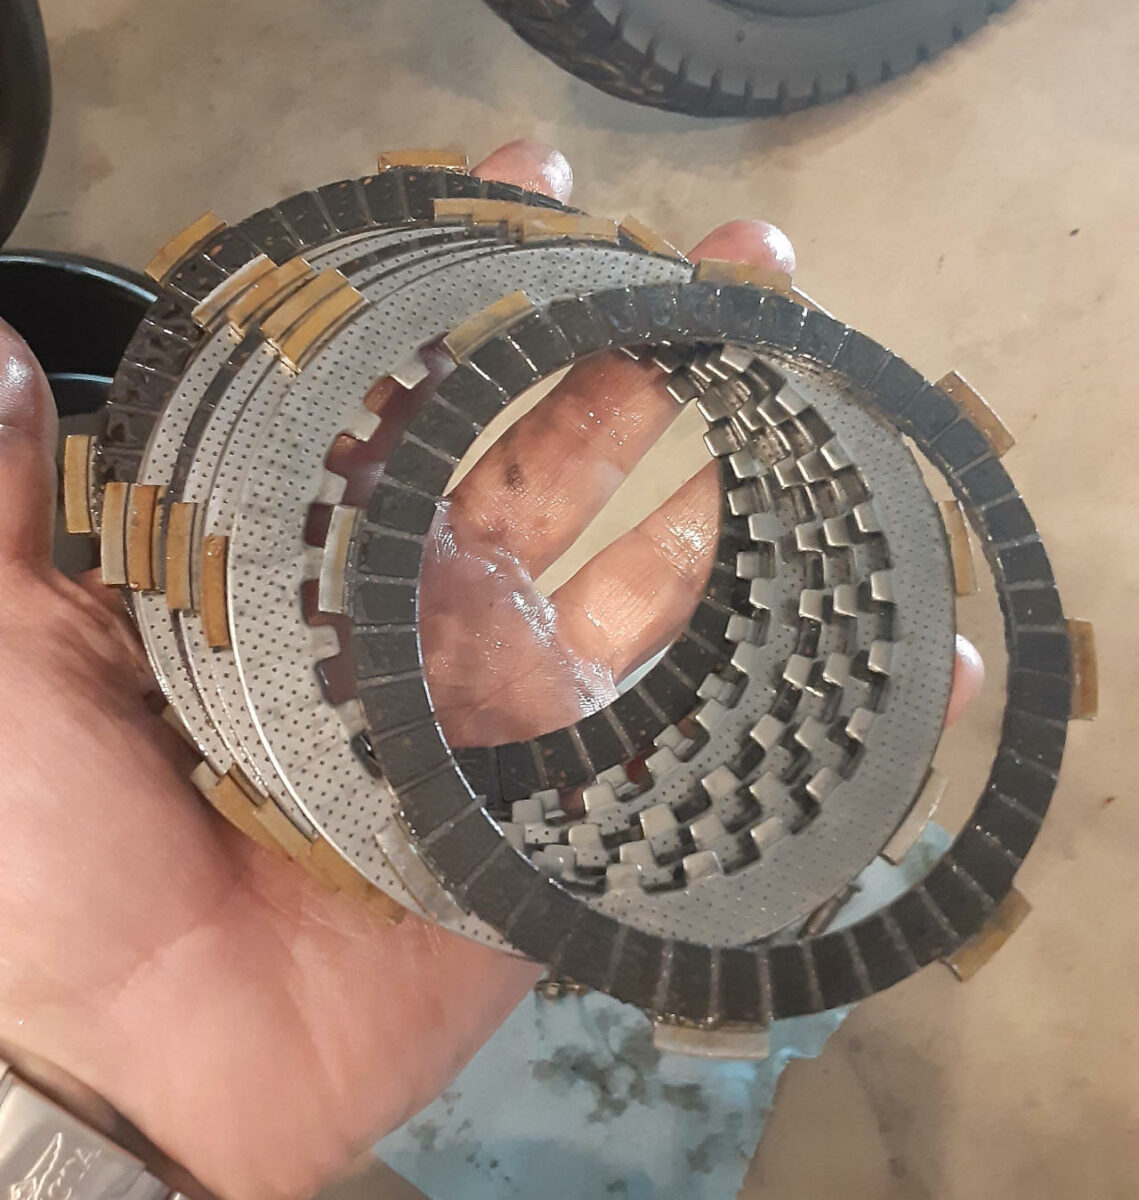
- The old clutch metal plates were wiped down and inspected, with the old clutch friction plates tossed after a quick look(looking for everyday wear), and friction plates are examined for damage.
- The rest of the clutch parts are wiped down and inspected, including the clutch basket. If necessary, the plan is to replace any parts as needed.
- The last step is I wipe down areas of the engine and clutch cover to get much oil out and any grim. Check the gasket for damage and ensure I have clean mating surfaces.
6.- Install New Motorcycle Clutch Plates.
I noticed a few people would lay their bikes down to do this step, but I kept my bike upright on the kickstand.
Just in case you wondered, I left the clutch basket in the bike, so reassembly of the motorcycle should be easy.
- I build the clutch pack on top of the clutch center hub.
- Friction clutch plate first, then metal clutch plate, friction clutch plate next, alternating till all seven friction plates are installed with six metal drive plates.
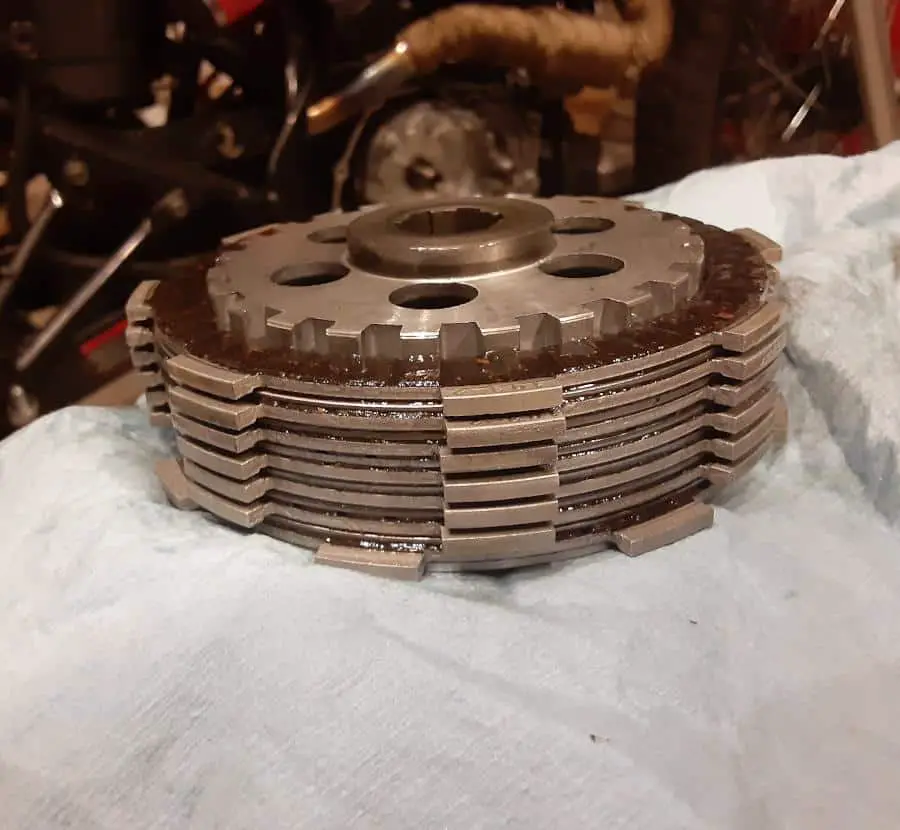
- Slide the bottom plate of the clutch pack in place.
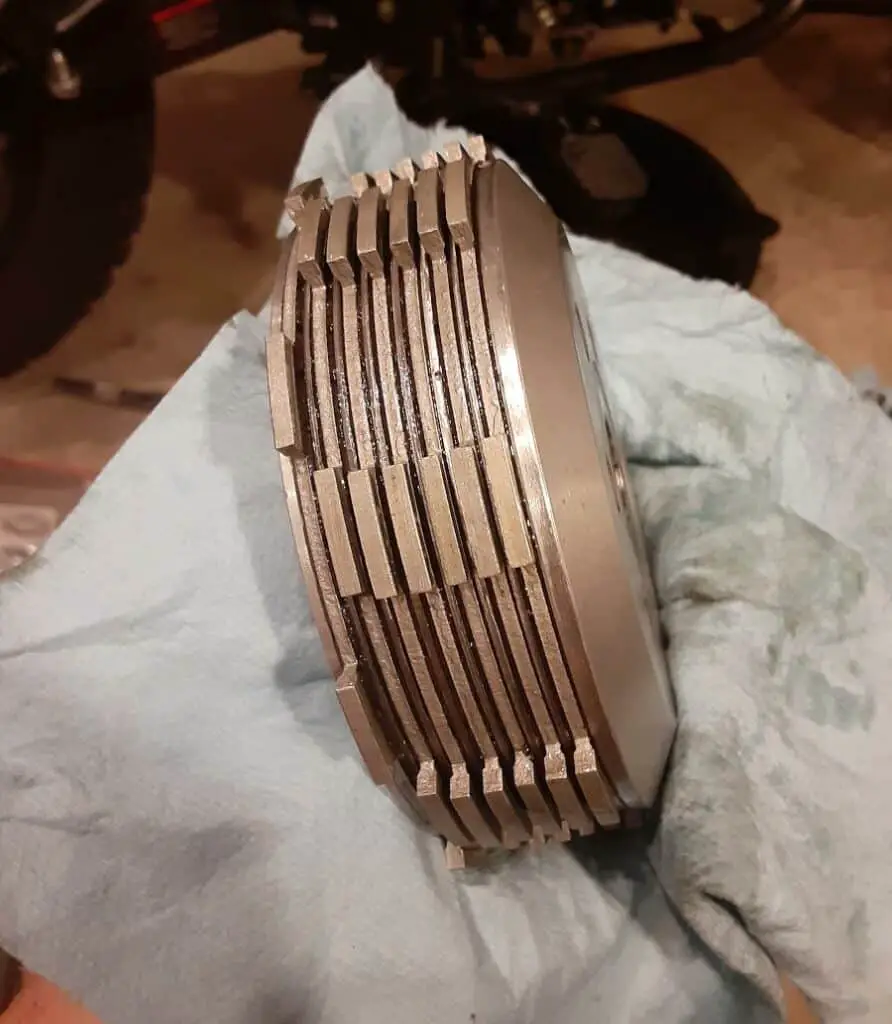
- I then slide the clutch pack into the clutch basket(still on the engine), lining up the first six clutch friction plates and alternating the last one into the shorter grove(how I found the original plates lined up).
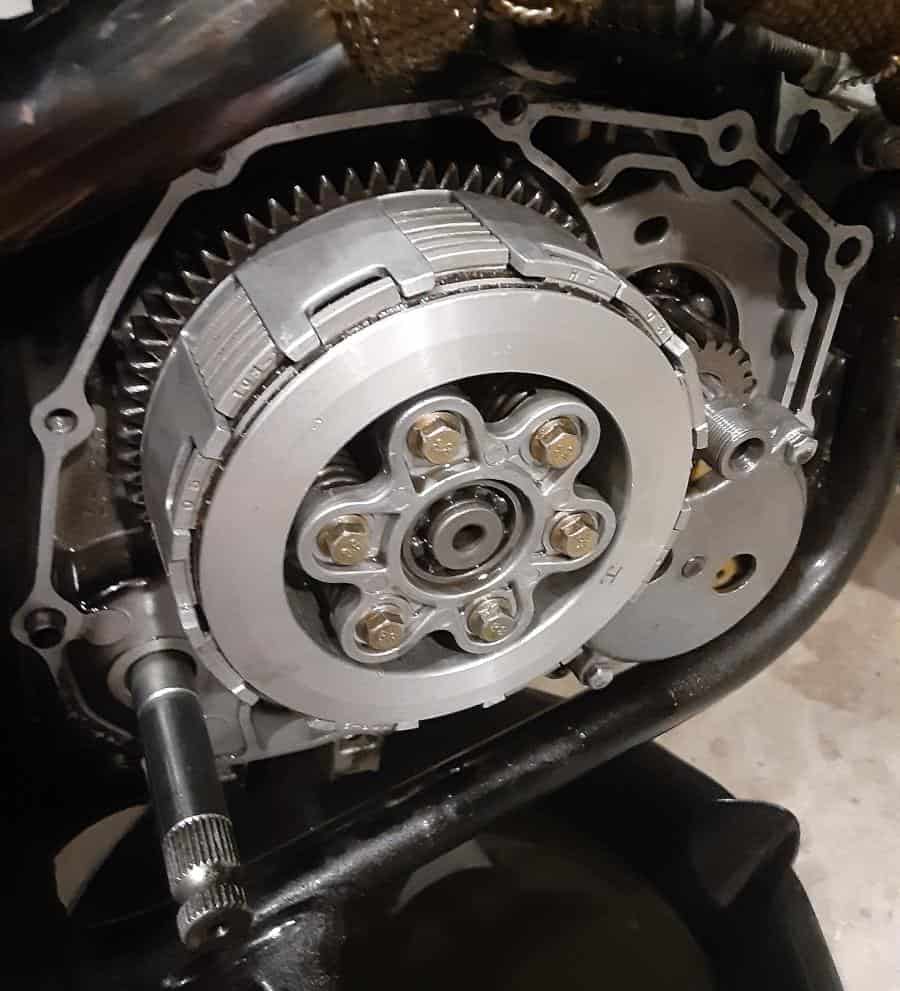
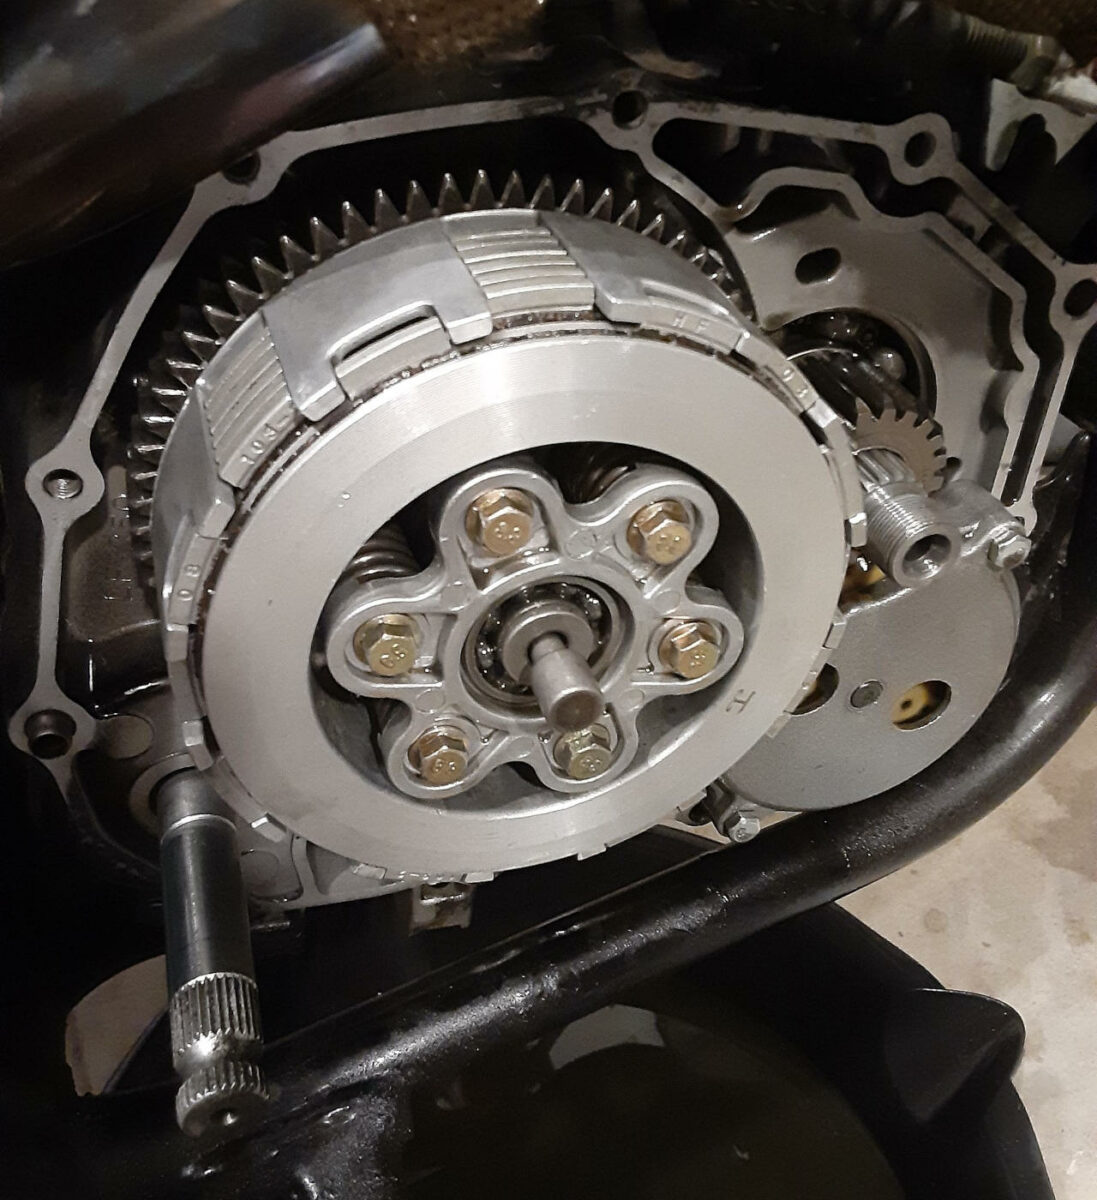
- After the clutch pack is in the clutch basket, re-install the snap ring.
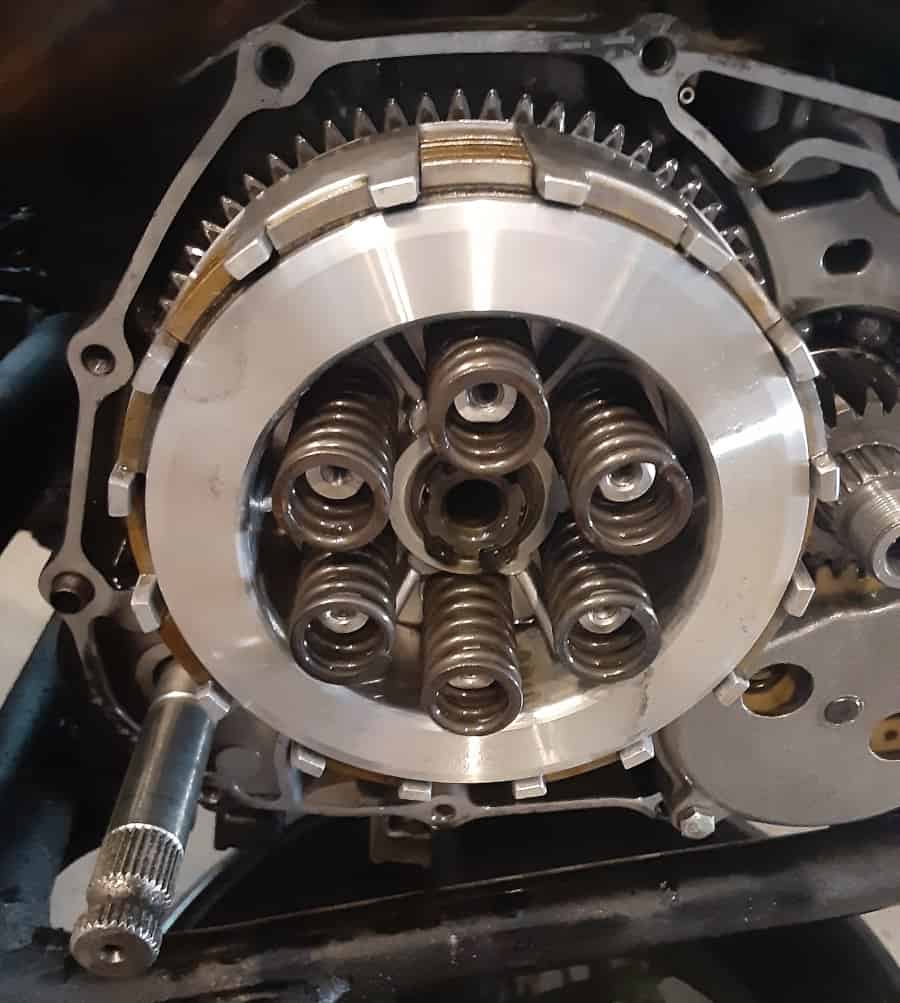
- Carefully re-install springs over the spring plate and thread the bolts with fingers. Using fingers(or socket and extension, or hand nut driver, but no wrenches or power tools), you can carefully prevent cross threading and ensure the springs line up correctly.
Note: You can upgrade the springs to heavy duty motorcycle clutch springs. I did so later.
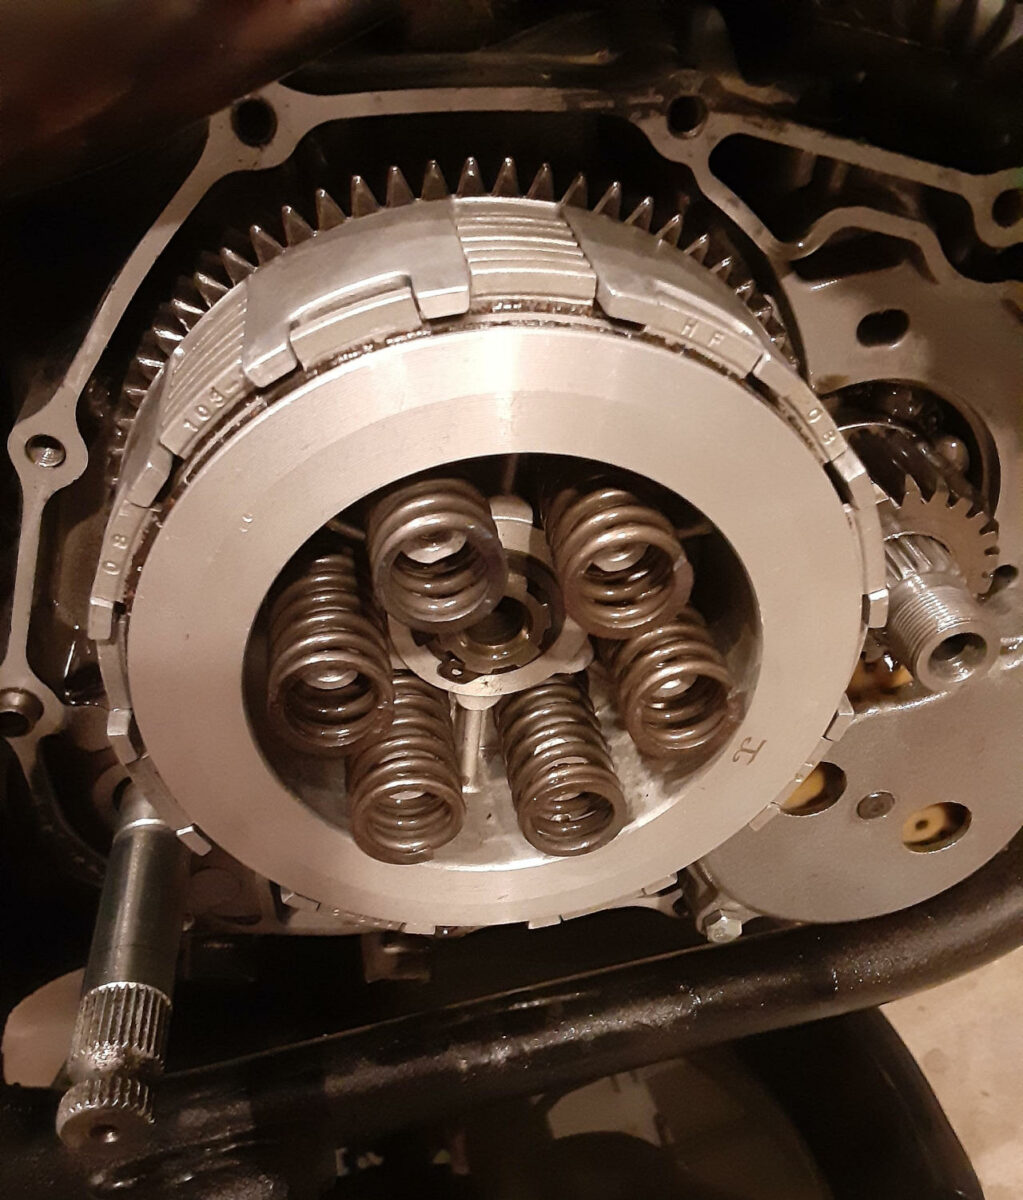
- Once the bolts are finger-tight, using a crisscross pattern, slowly tighten down each bolt, only turning a few turns before moving to the next. Slowly finger tightening prevents springs from misaligning or broken components. Properly torque down the plate per your Motorcycle Owners Manual or Shop Manual.
- Insert center slide and sleeve.
- If removed, re-install the centrifugal filter.
7.- Reinstall The Oil Centrifugal Filter(if removed/necessary)
- Filter housing goes on, washer with right side out(my washer has lettering on it(“side out”), and install the nut.
- I blocked main gears from turning with a flat-head screwdriver while torquing down the nut with my special adapter.
- Re-install centrifugal oil filter cover, ensuring gasket is installed and in good condition. Tighten the screws to proper torque.
- Do a final check for any missing or misaligned parts(for example, if you removed an internal oil strainer, ensure it’s appropriately re-installed).
8.- Re-install Clutch Cover.
This can be tricky, but this is how I did the clutch cover re-install.
The gasket is on the clutch cover, held on one end by a tiny sleeve and on end by a bolt inserted to align the gasket holes.
While pushing the clutch arm forward(of the bike) and sliding the clutch arm under the exhaust, I slid the clutch cover over the kickstarter pinion. I loosely threaded the bolt I inserted for alignment.
Check the continuity of the gasket all the way around. Look for proper seating between the clutch cover and the engine block. Adjust, or retry as necessary.
The next step is to finger thread all the bolts into place. Remember, the TBR7(sure, like the Hawk 250, etc.) has one longer clutch cover bolt and is in the 3:30 position(see photo).
Once all bolts finger threaded into position, tighten it in a crisscross method, a few turns at a time to evenly compress and tighten the cover and gasket. Tighten to proper torque.
9.- Reattaching The Clutch Cable.
Using a set of pliers, I wedged the head between the exhaust piping and the clutch arm, moving the clutch arm as far forward as possible. Once enough room is provided, using needle-nose pliers, grabbed the end of the clutch cable and re-hooked it onto the end of the clutch arm.
Removed pliers and checked for any gross clutch cable adjustments necessary. Fine-tuning the clutch cable is done at the lever for me.
Re-install Any Removed Items like the rear foot brake pedal( TBR7 Rear Brake Assembly ) and the kickstarter.
10.- Refill Motorcycle Oil.
Time to re-add oil to the motorcycle’s engine crankcase. Be sure the system is sealed up.
- Are all the clutch cover bolts tight?
- Is the clutch cover gasket look intact?
- Did you remember to put the motorcycle oil drain plug back installed?
Then correctly added the required oil amount( FAQ: What Is The TaoTao TBR7’s Oil Capacity?) and oil type ( What TBR7 Oil Type Do I Need? ).
11.- Test Your Work
Before going to ride on your motorcycle, check your work.
Areas of concern:
- Clutch engage and disengage?
- Are there any oil leaks?
- Can you shift into and out of gears?
- Can you shift into neutral?
- Any weird noises from the engine?
Some of these items you can check before starting the motorcycle engine, but the real test is with the engine running. I ensured I addressed every issue before going on to the next step.
Riding the motorcycle.
While riding, I noticed a few things after changing my clutch friction plates, the shifting was different, the clutch had to be adjusted a few times, and starting in first gear from a stop felt ‘different.’
I found out these are all typical items with a new clutch setup. The ‘feel’ of the motorcycle will be ‘off,’ and soon, the clutch friction plates will wear in and become smoother.
12.- Clean up, and recycle oil and materials.
As always, a clean garage is a safe garage.
Collect all materials, used oil, shop rags, and old clutch plates(friction and pressure) and dispose of them appropriately. Oil is typically recycled, and your motorcycle clutch pressure plates might be recyclable, also. Do your research and help conserve resources.
Replace Your Motorcycle Clutch Plates, All Done!
Click For Current Motorcycle Clutch Friction Plate Kit For Zongshen Prices.
Now I’ve only changed a motorcycle clutch two times. So I am very much a novice. Understand I am documenting my adventures not just for your reading enjoyment but for your review. If you have feedback or comments, please leave them below. In the meantime…
Ride Safe, Ride Fun!
Click To See My Recommended
TBR7 Upgrades
FYI: Post Motorcycle Clutch Plate Replacement Questions.

Hi I’m Tom, A New Motorcycle Rider and Blog Author.
I am a new rider(Pa Learners Permit at the end of 2020, and I received a Pa Motorcycle License in 2021 after passing a Motorcycle Safety Course).
I bought my first motorcycle, a TaoTao TBR7, at the beginning of 2021 and have been doing upgrades on that motorcycle since.
I added to my motorcycle collection by buying a Boom Vader Gen 2 in 2022, and that Grom-Clone motorcycle has been upgraded by me as well.
I continue to ride my Boom Vader Gen 2 motorcycle as well as my TaoTao TBR7 dual-sport bike.
Read more on my About Me page.
Fun Fact: I’ve only been on one group ride.

Not looking forward to this eventual maintenance, but this guide will certainly help lessen the intimidation factor.
By the way thank you so much for breaking this down. It saved me BuKu time. Thank You. I was wondering do you have to adjust the plates in a certain order when reinstalling new clutch plates or just put them on and they line up with the correct gear and everything by them selves
First I want to thank you for the detailed review because without it it would have took me forever to get it all figured out. But I would have eventually. I’ve installed everything but I haven’t took it out yet because I was wondering do the gears automatically line up after install or do I have to adjust and set anything to get 1st gear and so on to line up right after putting in a whole new clutch basket
Do you know the torque specs for the bolts for this repair?
Very good question Kyle, couldn’t find any specifics in the TBR7 book, so a good source is searching for standard torques based on bolt sizes. I would lean towards the lower specs since I’ve had a number of these fasteners round off and even break. https://mechanicology.com/sae-bolt-torque-chart-grade-2-grade-5-grade-8 might be a good source.
What I do, and would be considered a wet torque application it seems, I use blue thread locker on clean threads, and snug up the bolts. I also replaced many fasteners from my local hardware store so I feel more confident to add a little more “ummff” to the turns. Sorry not a specific answer to your great question, but it’s what I do.
If anyone has a good source of TBR7 motorcycle torque specs, would love it if you reply to this comment. Thank you!