
As I posted earlier ( Metal Shavings In The Motorcycle Oil!!! ), the last oil change revealed I have metal shavings in my motorcycle oil. I noticed with a simple wave of a magnet; these shavings were magnetic too.
With these findings, I did some web searches and found minimal information on the TBR7 clutch. I suspected the clutch since it was very ‘grabby’ and shifting was an issue. I did to searches for the Hawk 250 and found more information.
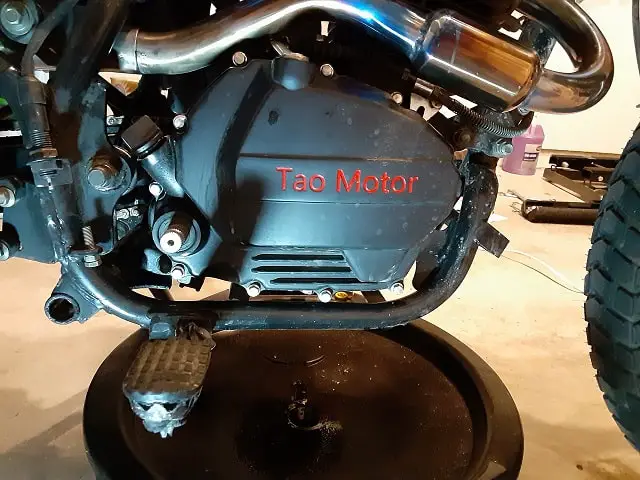
For those who don’t know, the TaoTao TBR7 and RPS Hawk 250 share very similar components ( Hawk 250 vs. TBR7 ). Which includes the TBR7 and Hawk 250’s engines are the same. So if you are looking for information about your RPS Hawk 250 clutch replacement, you are in a good place.
After spending too much time piecing together information for me to replace the clutch, I winged it, and it looked like a win! The TBR7 clutch replacement had some hangups, which I will cover later, but I will cover the steps I took for now. Hawk 250 bike owners, I hope this helps you.
Setup For The TaoTao TBR7 Clutch Replacement.
Warning: I overthink things and hate surprises. So getting ready before the job starts is critical to me. I never replaced a clutch before, motorcycle or car, so I wanted to be sure I did it right.
New Updated Post: Replace Your Motorcycle Clutch Plates.
Ordered My TBR7 Clutch Tool And The Clutch Tool.
Author’s Notice: This page contains affiliate links, for which I may earn a commission by their use. Also, as an Amazon Associate, I earn from qualifying Amazon purchases.
Additional Cost Information: Motorcycle Clutch Plate Replacement Cost.
The nice thing about the TBR7 and Hawk 250, much of their original design is off the old Honda CG-125/150. This engine background makes parts and supplies easy to get. Items I purchased:
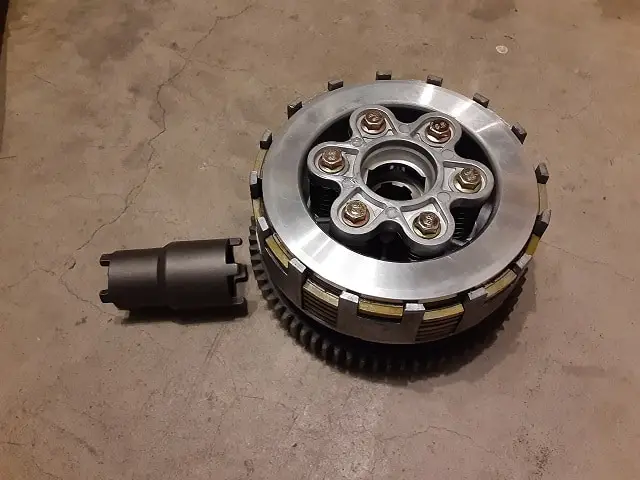
- New Clutch – I ordered just the clutch plates originally(Click for current prices: Motorcycle Clutch Friction Plate Kit For Zongshen CG), but then I figured I would order a new drop-in solution if the stock clutch basket was damaged. I used the drop-in solution since the plates and springs are already together. Buying a completed clutch setup saved a few steps in the replacement process. I ordered this: ( Clutch Assembly with 6 Plates for 200cc & 250cc ATVs & Dirt Bikes ).
- Clutch Tool. – The oil separator has a special notched nut holding in place, which you’ll see later in photos, and it required a tool to remove the nut. Click for current prices: Bipolar Clutch Tool Clutch Lock Nut Spanner Wrench.
Shop Supplies For My TBR7 Motorcycle Clutch Replacement.
As expected, the shop supplies are basic—basic tools, rags, and supplies for an oil change. You’ll see later in bloopers I had to buy items to undo my mistakes. But screwdrivers, wrenches, good oil, etc., will help through the replacement process for now.
Necessary New Motorcycle Clutch Plates Prep!!!
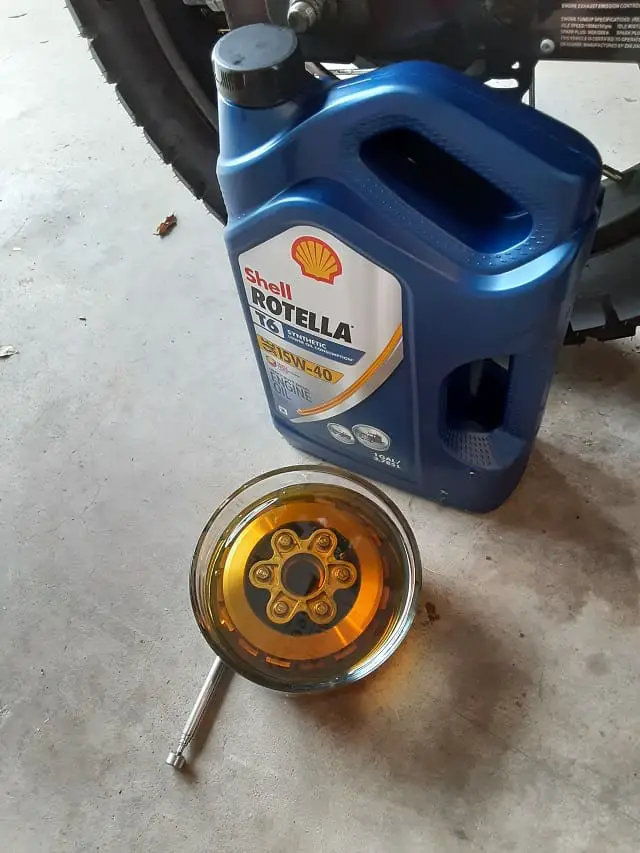
Soak your plates! Yes, get a small bowl of good clean motorcycle oil; I used T6, and soak your plates. Some sources say times as short as an hour to as long as a whole day. I soaked mine for a couple of hours, but in hindsight, setting it up to soak your clutch plates the night before isn’t a bad idea. Just soak your clutch plates!
Make The Motorcycle And Garage Safe.
- Ensure motorcycle is stable. I did the work with the motorcycle on its kickstand; however, if you feel more comfortable on a jack, it’s not a bad idea. I use a rolling stool, and raising the work surface would have helped. Also, my favorite motorcycle lift jack (My Motorcycle Floor Lift Here: Best Motorcycle Lift Jack.) has brakes that will come in handy for the next step.
- Have the motorcycle on a level surface. You are disassembling the transmission, and this will take the motorcycle out of gear, and the motorcycle might roll. I read how some people rigged a clamp on the front brake lever or tied it down; I didn’t do this. I just worked on a level surface and tested to see if the motorcycle rolled in neutral. Please be safe.
- General motorcycle safety. Ensure the motorcycle, and engine, cannot be turned on, key out, battery disconnected, etc. Your hands will be inside a piece of equipment, and if somehow something moves, it cost you dearly. Be safe by making the motorcycle safe first.
- Let’s not forget safety glasses for your safety.
Use Common Sense Rules I Use: Motorcycle Garage Safety Rules.
Steps For My TBR7 Motorcycle Clutch Replacement.
There are many steps since I wanted to keep this post very easy to follow. First will address disassembly of the TBR7’s engine and clutch, inspection and cleaning of the engine, and reassembly. Sorry for the long post, but I wanted to write this out as if I was using it for the first time. Thank you.
Open The TBR7 And Remove The Engine Clutch.
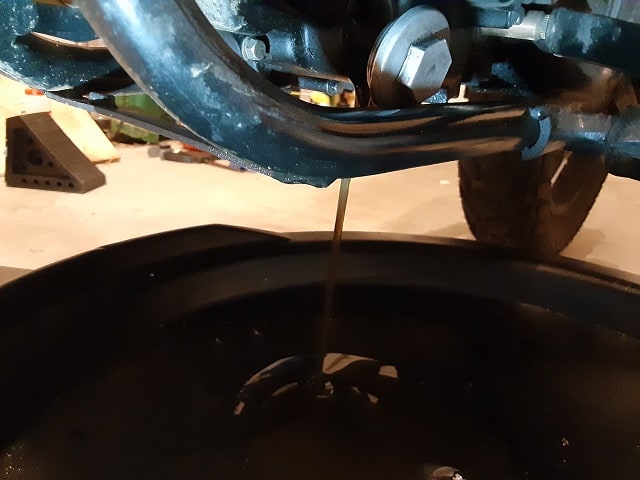
Step 1: Drain The Motorcycle Engine Oil.
Draining the oil helped flush more metal shavings off the engine oil and forced me to put clean oil in after the clutch replacement.
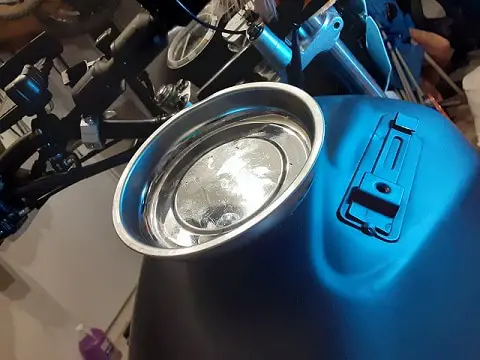
Step 2: Remove The Motorcycle’s Kickstarter.
You cannot remove the engine cover with the kickstarter still attached. There is a single bolt holding the kickstarter on; the bole is accessible from behind/under the kickstarter. This bolt rides in a grove on the shaft, so only a few threads hold this bolt in place.
Tip: Some people keep the kickstarter off permanently and just wire tie it to the carry rack for emergencies. For me, I don’t like how I feel the Kickstarter poking my leg when I ride, so I will be doing this myself.
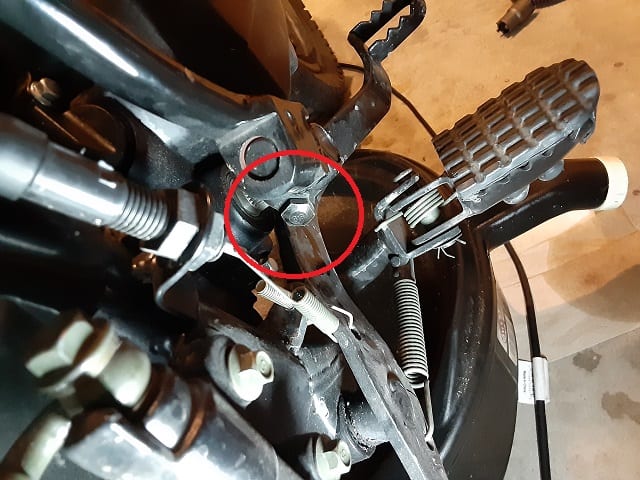
Step 3: Remove The Motorcycle’s Rear Brake Pedal.
This step clears your workspace, and reinstallation of the rear brake pedal is fairly easy for the TBR7 and Hawk 250 (Read My Post Here for reinstallation: TBR7 Rear Brake Assembly. (Hawk 250)).
Tip: You are starting to collect small parts; use a magnetic parts tray. This tray has saved me from losing parts many time. Once kicked it, why it’s not on floor anymore, and it held the parts. Wow.
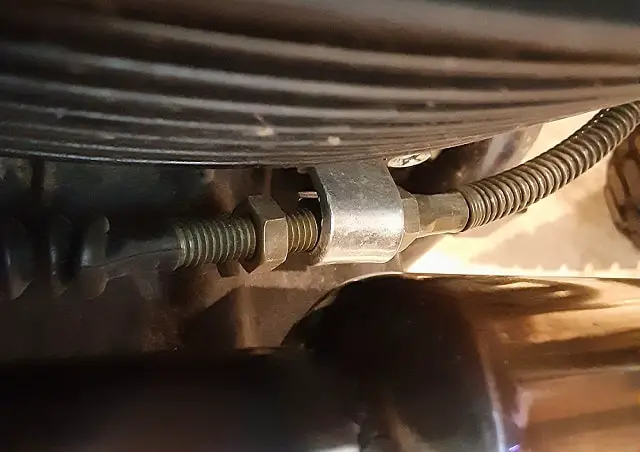
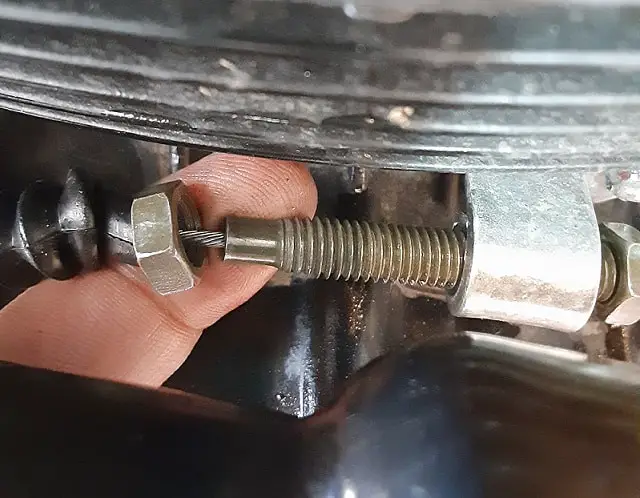
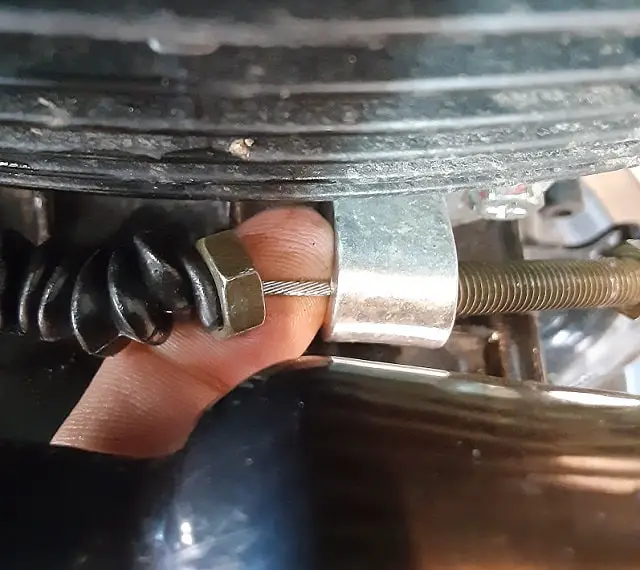
Step 4: Loosen The Motorcycle Clutch Cable.
I loosen the clutch adjusting nut on the engine housing, which allowed the rearmost nut to slide back. This process exposed the wire cable, and I slid the wire cable through the small opening of the engine mount and completely removed the cable from the engine. Now the clutch cable is only attached to the clutch arm on the engine cover.
Step 5: Remove Right Side Engine Cover Bolts.
As you remove the bolts, be careful since the bolt’s metal is very soft, and rounding the heads is very easy. To avoid this, use a six-sided socket wrench and ensure the socket is fully engaged with the bolt head before turning. Please keep track of these bolts; they are small so put them in your magnetic parts tray. Also, observe that two of the bolts are longer than the others; this will be important for the reassembly of the engine cover.
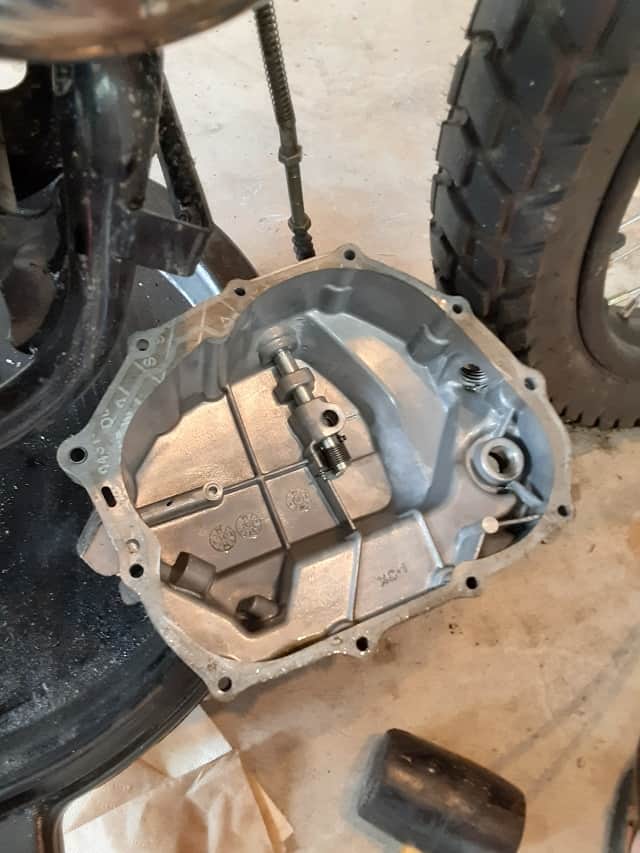
Step 6: Remove Engine Clutch Cover.
I know I say this too often, but be careful with the removal of the engine cover. There is a gasket attached, and if careful enough, you can reuse the gasket. I did since I didn’t buy a replacement.
Tap the engine cover with a soft-faced mallet till contact is broken, and slowly remove the engine over. Much of the gasket stuck to the engine cover, but I slowly applied finger pressure to remove the gasket where it attached to the engine. This way, the gasket remained with the engine cover.
Step 7: Inspect Engine Internals.
This step was the first chance I got to look and see the source of the metal shavings in my oil. I was looking for shiny spots, missing teeth on gears, etc. Luckily I did not see anything other than the clutch that could have been the source of those metal shavings.
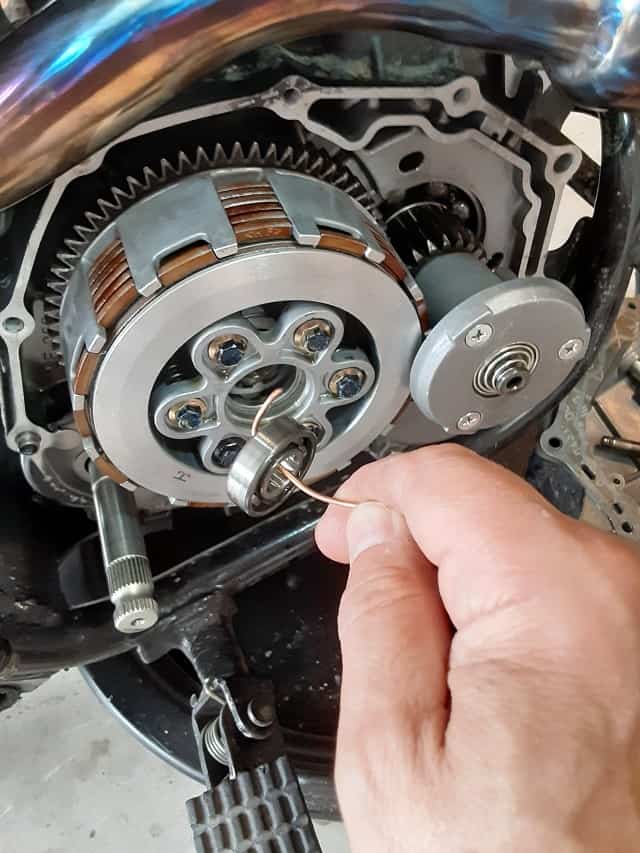
Step 8: Remove Clutch Push Rod, Sleeve, And Roller Bearing.
The clutch rod comes out reasonably easy. These parts are coated in oil and didn’t want to make a mess, so I used the open engine cover as a holding spot for these and other internal parts.
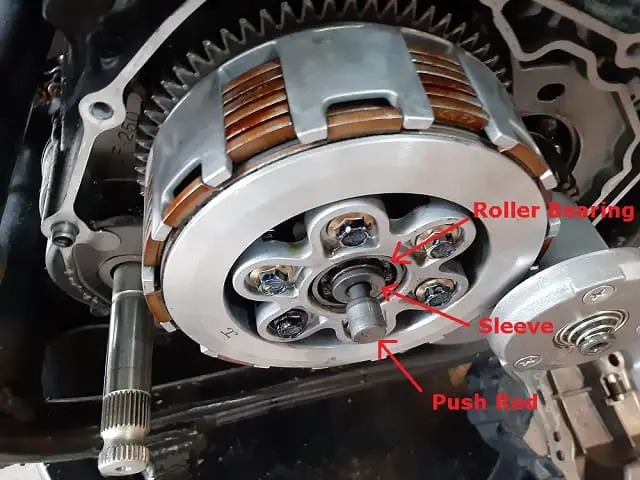
I used a copper wire to remove the bearing since it is both soft and flexible enough to bend around the backside of the bearing. This bearing, too, went into the engine cover.
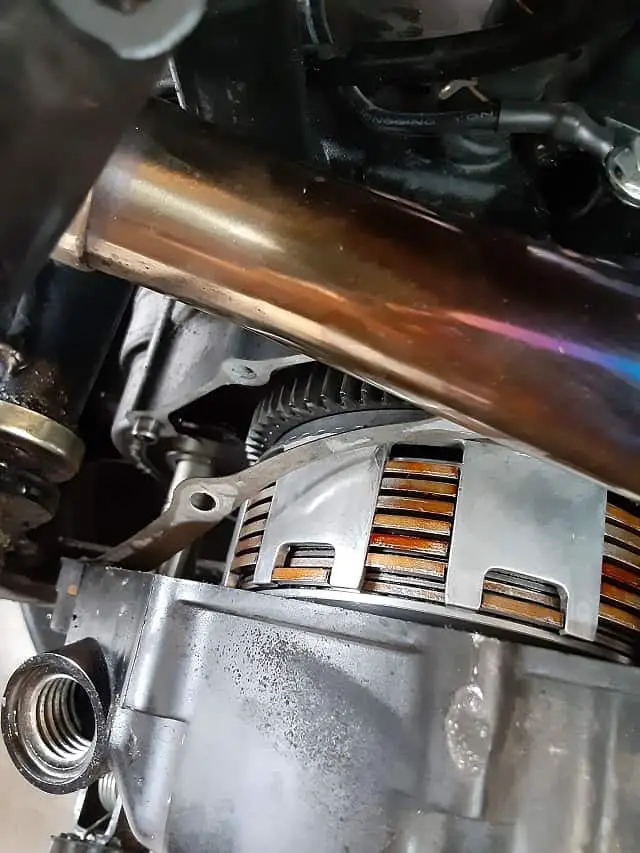
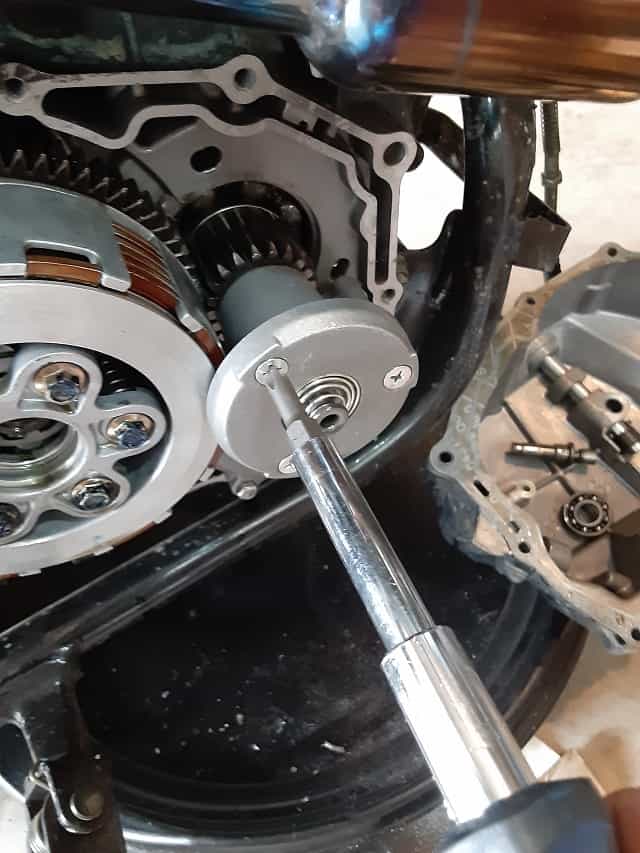
Step 9: Remove Motorcycle’s Centrifugal Oil Filter.
These are the small steps I took to remove the filter:
Step 9a: Remove Centrifugal Cover Screws.
Three screws hold the cover on. They are not very tight, but to prevent stripping the screws, use a properly sized Phillips screwdriver.
Step 9b: Remove Oil Filter Cover And Gasket.
Once the screws are removed, slowly remove the cover. There is a gasket that you should be careful of to prevent damage to it.
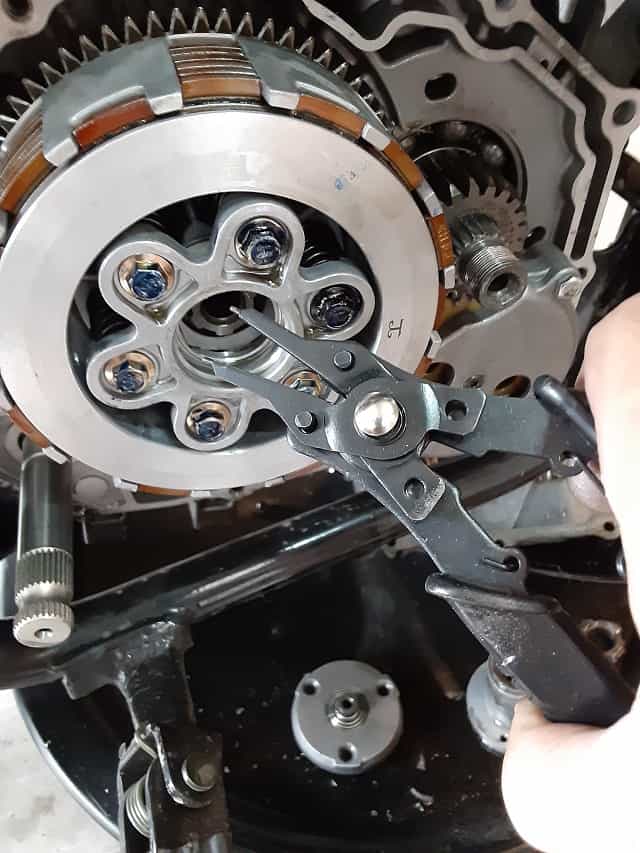
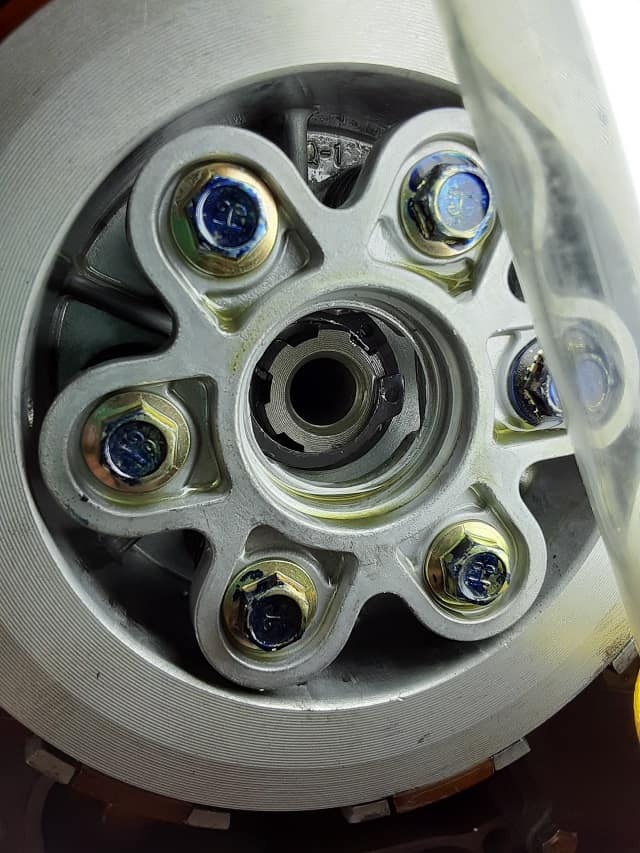
Step 9c: Remove Centrifugal Oil Filter Retaining Nut.
Removal of the retaining nut can be a little of a challenge. As you try to turn the retaining nut, the gears want to rotate. I used a flat head screwdriver to “jam” the gears allowing me to use the four-leg socket with some force. I used a regular-sized ratchet wrench, and a slight tap on end unseated the nut.
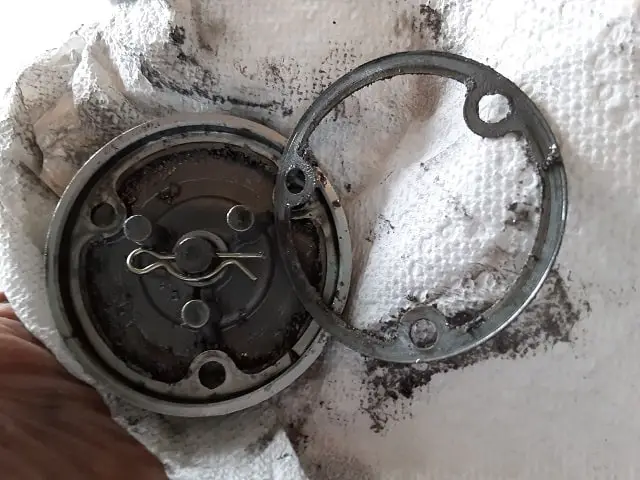
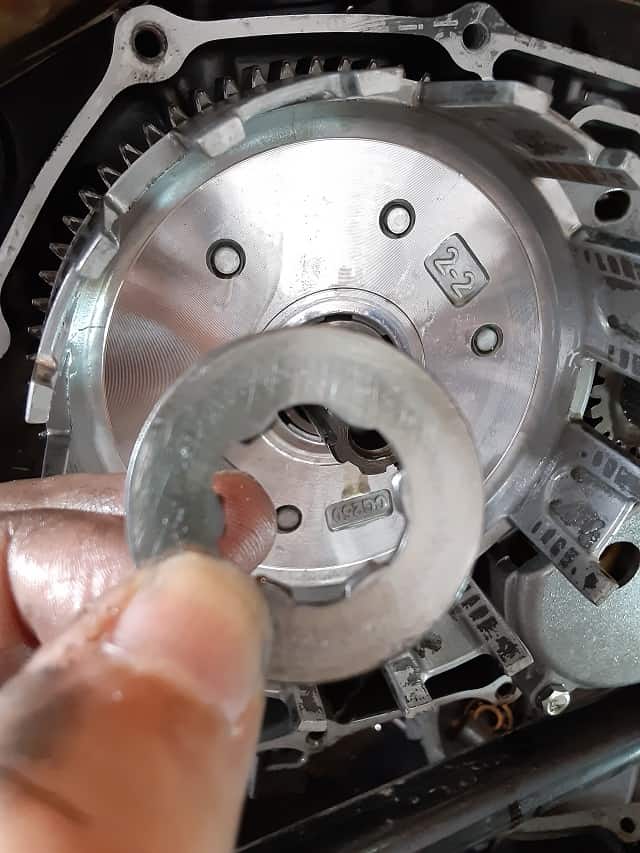
Step 9d: Removal Of The Centrifugal Oil Filter.
Once the retaining nut is removed, the filter comes off. Inside the filter is a washer with engravings on it. Protect this washer from becoming dropped and lost. Now the centrifugal oil filter is removed, the clutch basket is fully accessible.
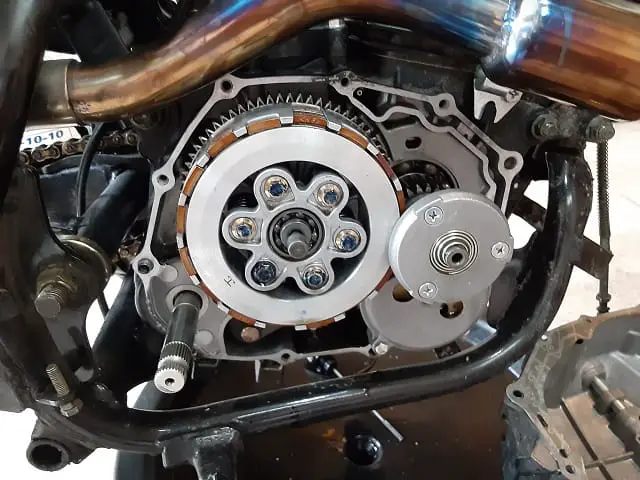
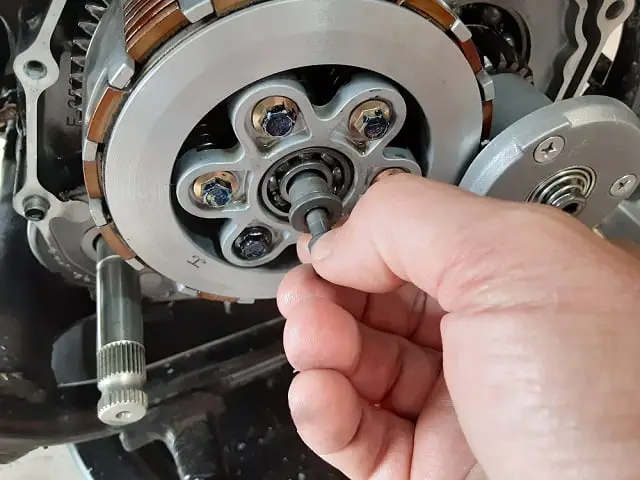
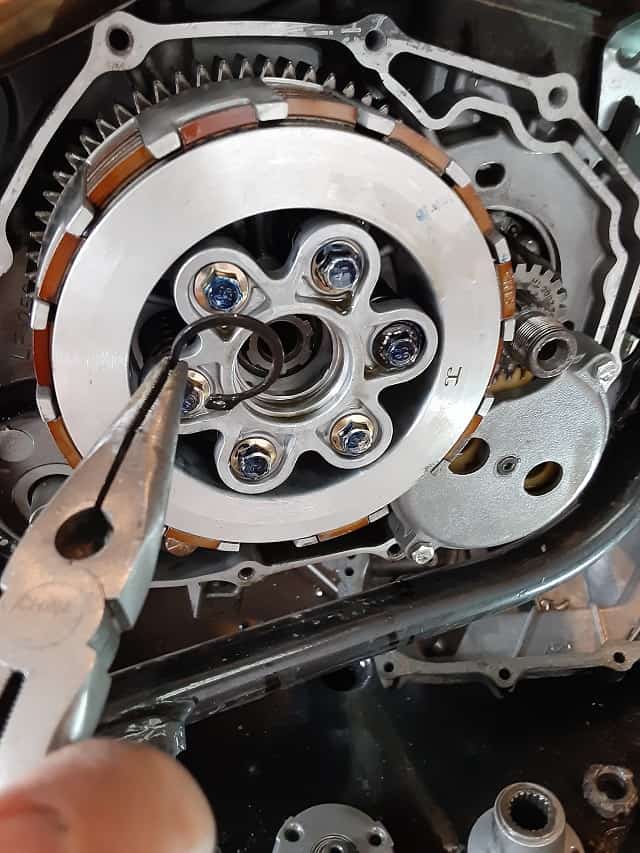
Step 10: Remove Clutch Basket Snap Ring.
Inside the roller bearing housing, the roller bearing removed in step 7 is a snap ring. This ring was a little of a challenge to remove. I used snap ring pliers to reach in and expanded the ends. Once expanded, I worked on only lifting one end over the shaft. After one end is over the shaft and, of course, out of the groove, I used needle-nose pliers on the loose end and pulled the snap ring out. It worked, safe this ring.
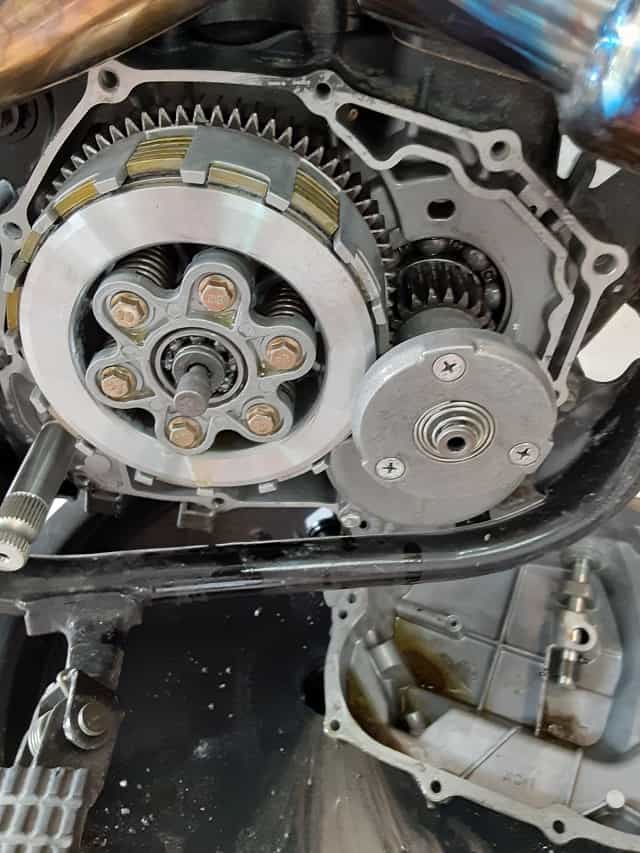
Step 11: Remove Clutch Plate and Friction Plate Assembly.
With the snap ring out, you can now pull the whole clutch plate and pressure plate assembly. Reach and pull it out by hand.
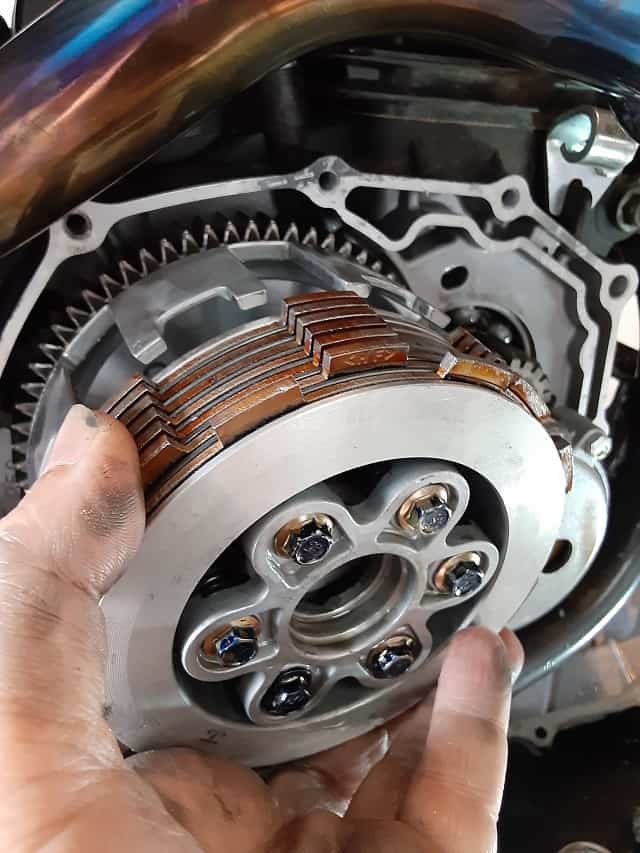
Since I bought a drop-in solution, I did not disassemble the plates. Now you can continue disassembling the clutch plate and friction plate assembly, but I did not today. I have clutch plates on order, and in the future, I plan to replace individual plates. I used the assembly that came with my drop-in solution.
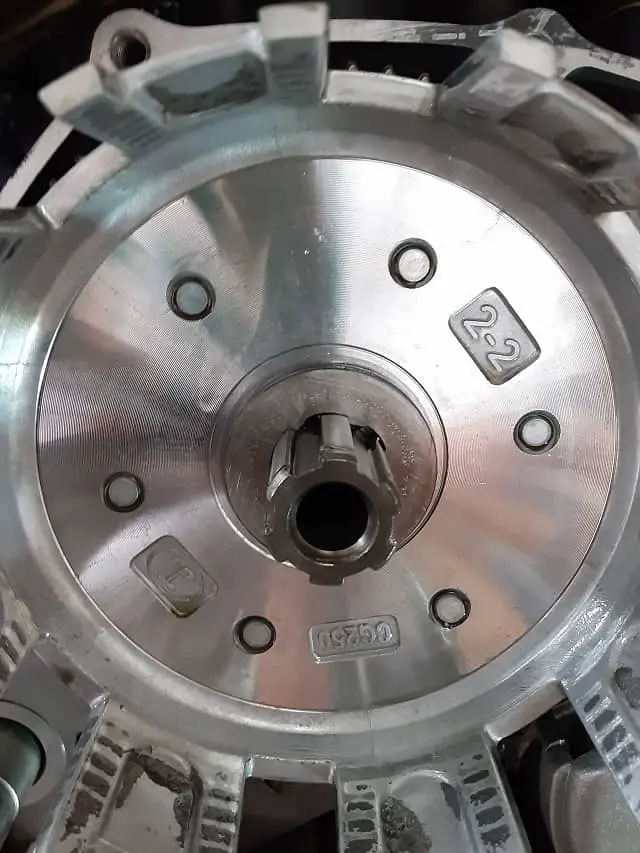
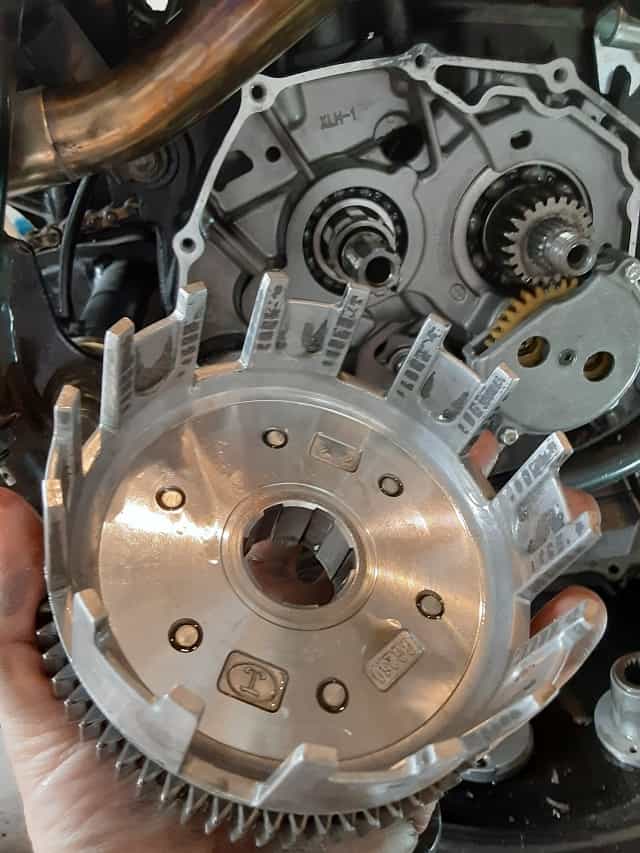
Step 12: Remove The Retention Ring and Clutch Basket.
Once the plate assembly is removed, you will see on the shaft a locking washer. The washer is grooved, and if you spin it by hand and line up the grooves with the splines on the shaft, it can be removed. Once this locking washer is moved, the clutch basket comes out by hand.
Inspect (And Clean) The Engine Internals And Parts.
I will cover in a later post the amount of gunk I found and how I took steps to remove metal shavings from the oil further. For right now, let’s assume you were more careful with your motorcycle, and this was a normal worn clutch replacement process, and carry on.
Clean the usual dirt and grime that might collect in the centrifugal filter, and wipe down all gasket seating surfaces while inspecting all the areas for any damage or abnormal wear.
Once you are satisfied, you can start the reassembly process.
Most of the steps for reassembly are easy, just disassembly in reverse, but I will cover the steps briefly.
Step 1: Reinstall Clutch Basket and Retention Ring.
My clutch basket looked good, so I reused it. The basket slid down the shaft to its resting place very quickly. Next, I lined up the locking washing grooves with the shaft and pushed it down all the way. I gave it a spin to miss-aligned the grooves.
Step 2: Insert Clutch Plate and Friction Plate Assembly.
Lined up the ears with the open spaces on the (pre-oil soaked) clutch plate assembly, springs/bolt side out, and push firmly into the basket fully.
Step 3: Reinstall The Clutch Basket Snap Ring.
There were two flat sides to the snap ring. I found a smooth side and a rough side. I placed the smooth side down towards the engine and used snap pliers to expand the ends. As soon as I got most of the ring onto the shaft, I removed the pliers and used a screwdriver to gently push back the snap ring till it popped into its groove.
Step 4: Reinstall The Centrifugal Oil Filter(removal in reverse).
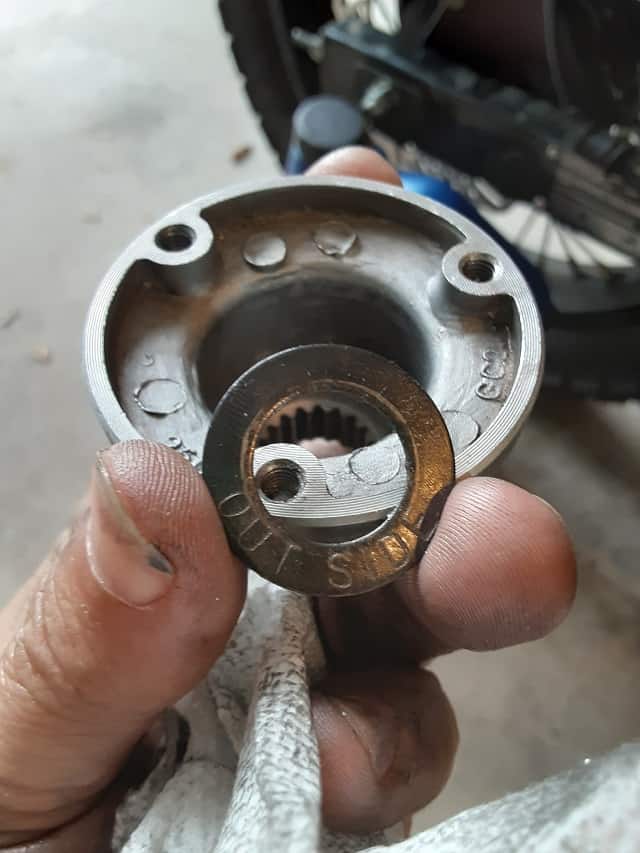
Step 4a: Slip the oil filter down its shaft.
Step 4b: Slip in its washer, with the label facing you(“out side” visible).
Step 4c: Thread on the lock nut, using four-leg socket, and tighten.
I could not find actual torque specs for this retaining nut, so go forward, assume all the torques I used were “snug.”
Step 4d. Line up centrifugal filter cover wholes with gasket wholes and re-screw it all together.
The three screws removed are now again used to rescue the cover. I reused the gasket since I was cautious with its removal. However, I feel I will be ordering new gaskets for the next clutch replacement in the future.
Step 5: Re-install Clutch Push Rod, Sleeve, And The Roller Bearing.
I dipped these parts in clean motorcycle oil for easier insertion. First, the roller bearing was fully seated, by hand, into its housing. Followed by the push rod and sleeve. All by hand.
Step 6: Reinstall The Motorcycle Engine Clutch Cover.
I used a little oil on the surfaces to create a tacky surface for the gasket to the engine over. There is a ‘raised’ bolthole to help align the gasket while installing the cover; use it. I even inserted a bolt to help keep the gasket aligned. Once the engine cover is on, start adding bolts finger tight.
Note two of the bolts are longer than the rest. You will find two bolt holes that are ‘raise’ or ‘thicker,’ hard to describe, but you will see them, one front and the other one back directions of the engine.
Using a cross pattern, torque the bolts in steps, about 1 kg/m per engine manual, I found. Again, I used “snug” as my torque rating. I didn’t have a torque wrench that went down that low setting correctly.
Step 7: Remount Motorcycle Clutch Cable To Engine.
Slide the boot and bolt to the left, exposing the wire clutch cable. Slide this wire portion through the small opening on the clutch cable mount. Once mounted, now move the parts around to their appropriate position. You can now or at the end readjust the clutch cable for proper operation.
Step 8: Reinstall The Motorcycle Rear Brake Pedal.
I have an earlier post to help you with the Rear Brake Pedal Assembly (TBR7 Rear Brake Assembly).
Step 9: Reinstall The Kickstarter.
Note, I did not do this. I am keeping the kick starter off and wire tiring it to my carry rack for emergency purposes. However, if you want to, insert the kick starter pointing upward and reinsert the bolt. The bolt moves over a groove in the kick starter shaft. Therefore you might have to insert the bolt while moving the kick starter on/off the shaft to line up the groove. Once the bolt is in the groove, you continue to insert it until it meets the other side’s threads. Tighten. I still recommend adding a thread locker where you can; this might be an excellent place to use it as well.
The Clutch Is Replaced And The Engine Cover Is Reinstalled.
If you didn’t adjust the clutch/clutch level earlier, this is a good time.
Complete your oil change by cleaning the filter, reinstalling the drain, and refilling the sump before your test run.
I was not ready to ride the motorcycle till I tested stationary. I started the engine in neutral and allowed it to run for a minute, getting the oil flowing and the clutch plates prepared for transmission going into gear. Carefully shifted gears testing and adjusting the clutch cable as needed. It seemed that the clutch required more tension on the cable than expected, so make your adjustments now.
Once the motorcycle appears to be operating stationary, go for a slow and easy test ride. The shifting behavior of my TBR7 was very different after the clutch was changed. I suspect this will be the same with the Hawk 250, so be ready.
Good luck and ride safe. This is the first time replacing a motorcycle clutch, and I advise you seek assistance from a professional before doing so yourself. I will be updating this post as I have better information and get more experience with future clutch replacements. If you have suggestions or feedback, please leave a comment below.
Further Reading:
CSC Motorcycles( https://cscmotorcycles.com/ ) has a decent manual for their TT250, a nicer version of the Hawk 250, and similar to many components of the TaoTao TBR7. Check out their website for tips and information that might apply to your motorcycle.
Click To See My Recommended
TBR7 Upgrades
Author’s Notice: This page contains affiliate links, for which I may earn a commission by their use. Also, as an Amazon Associate, I earn from qualifying Amazon purchases.
My TBR7 Motorcycle Clutch Parts Shopping List:
- If you want just the new motorcycle clutch plates: Motorcycle Clutch Friction Plate Kit For Zongshen CG.
- Or, If you want the complete clutch basket and plates: Clutch Assembly with 6 Plates.
- And, Bipolar Clutch Tool Clutch Lock Nut Spanner Wrench.

Hi I’m Tom, A New Motorcycle Rider and Blog Author.
I am a new rider(Pa Learners Permit at the end of 2020, and I received a Pa Motorcycle License in 2021 after passing a Motorcycle Safety Course).
I bought my first motorcycle, a TaoTao TBR7, at the beginning of 2021 and have been doing upgrades on that motorcycle since.
I added to my motorcycle collection by buying a Boom Vader Gen 2 in 2022, and that Grom-Clone motorcycle has been upgraded by me as well.
I continue to ride my Boom Vader Gen 2 motorcycle as well as my TaoTao TBR7 dual-sport bike.
Read more on my About Me page.
Fun Fact: I’ve only been on one group ride.
Hey man! This is super helpful, as I plan on replacing my clutch sooner than later. Could you send me a link to the drop-I’m solution you found? I’d rather work with that than the individual plates
Hi Dom,
I updated the post with Amazon links to the clutch tools and equipment. I hope this helps. I plan on doing another TBR7 clutch change, this time using the spare clutch plates I have. I will share my experience replacing the clutch plates versus the clutch kit when I get around to it.
Glad you like the blog! It’s just documentation of the craziness I got into when I started trying out motorcycles. Who would have thought a cheap Chinese bike loaded with flaws would be so much fun.
Ride Safe, Ride Fun!
Hello and thank you for the write up. I am doing this same repair on my Hawk 250 right now. My clutch basket has 7 plates and in the first picture on yours it looks like it too has 7 plates. The replacement you purchased only has 6 plates…is that a typo or does the 6 plate setup work? Is there any reason for not using the 7 plate setup from Amazon? Thank you for any insight you can provide
Yes, you are correct.
When I ordered my TBR7 motorcycle’s replacement clutch basket kit, I was following some advice from a Hawk 250 owner.
When I pulled the stock clutch out, I found it had seven plates, and the replacement had 6. I installed it anyway. It worked well, and I was happy. Felt it was good advice.
Later, I just replaced the friction plates and upped the number of plates from 6 to 7. I felt a change like there was more clutch bite(wider fiction zone).
This wider friction zone felt weird to me, and I later upgraded my clutch plate springs(https://mymotorcycleblog.com/heavy-duty-motorcycle-clutch-springs-replacement-tbr7/). Now back got the clutch to how I like it.
The point is, the motorcycle clutch basket kit I ordered worked, So it didn’t give any bother. But, I must have been drunk-ordering. I picked up another Amazon Clutch Basket Kit with seven plates now(#AD https://amzn.to/45gKo0J), but it’s still sitting on my kitchen table.
When I need to, I will cover that motorcycle clutch kit, but in the meantime, I hope this reply helps explain what I did.
Yes you have helped a ton! Thank you for the awesome write up. Ride safe man!