
There are many steps I had to do with upgrading my TBR7’s carburetor.
I broke these upgrade steps into the planning and safety concerns, (TaoTao TBR7 Carburetor Upgrade – Planned), and this post will have the actual TBR7 carburetor upgrade steps for my new Mikuni carb.
Let me repeat, there are some serious safety concerns with this motorcycle upgrade, and for your safety and your motorcycle’s, please read the earlier post. Then get busy with reading about my TBR7’s carburetor upgrade project.
I addressed the carburetor upgrade concerns I made in an earlier post. I made my TBR7 safe to work on by allowing the engine to cool, disabling the engine’s ability to crank/start, and keeping the TBR7 on a level surface and unable to roll away.
The TaoTao TBR7 is in gear and unable to roll away. I am working in a ventilated space while wearing my safety glasses. Also, have a fire extinguisher within reach.
A safety note: The installed carburetor might have fuel left in the fuel bowl. Take steps against spilling gasoline and exposure. There is a drain hanging under the carburetor you can direct to a bowl and open the drain screw. Direct remaining gasoline into approved container.
FAQ: Motorcycle Garage Safety Rules.
My TaoTao TBR7 Carb Upgrade Steps! (Mikuni)
Author’s Notice: This page contains affiliate links, for which I may earn a commission by their use. Also, as an Amazon Associate, I earn from qualifying Amazon purchases.
New Mikuni Carburetor Parts I Received In The Mail:
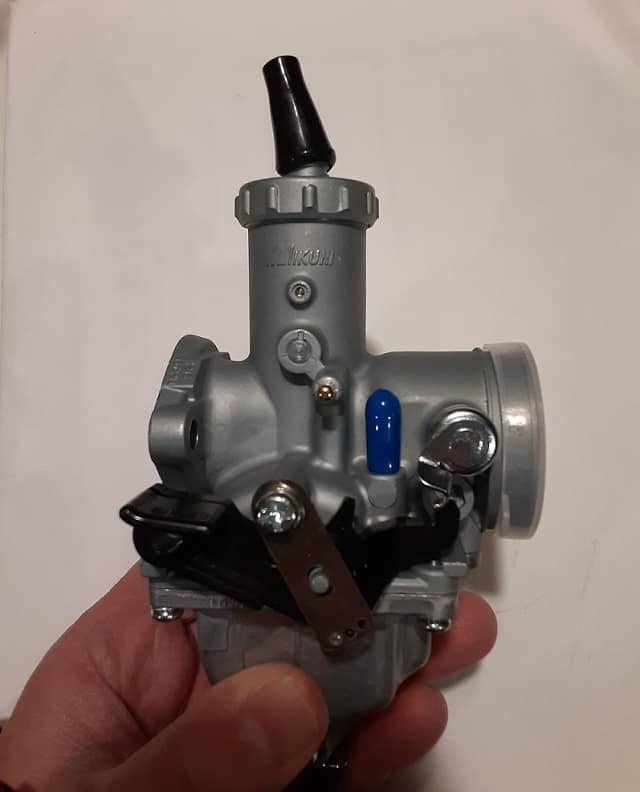
- The New Carburetor: MIKUNI VM26 Carburetor 30MM (Check For Current Prices: VM26 Carburetor )
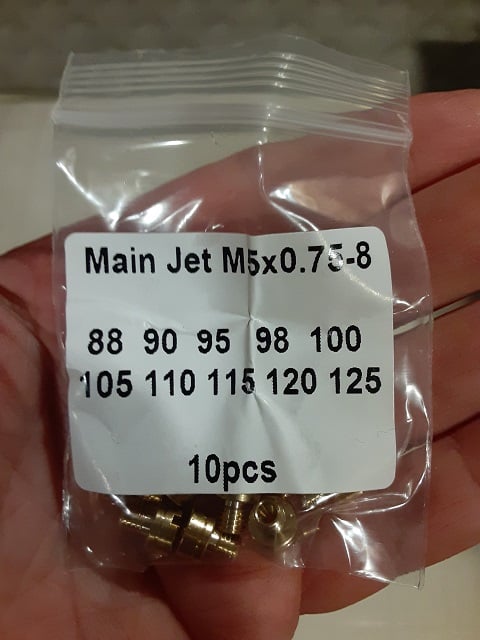
- Jets for the Carburetor: Various Mikuni VM26 compatible jets. (Check For Current Prices: Carburetor Main Jet Kit Replace for Mikuni )
I will cover tools as we use them for this process and understand some steps are optional. Some actions are optional, like creating better access to the carburetor, but will make it easier and don’t add much time to upgrading/changing the carburetor.
FYI: Building My List of Must-Have Tools For Motorcycle Owners
Hawk 250 friends, the steps here were based on much information I could find about upgrading the Hawk 250. I used several Hawk 250 sources to get to upgrading my TBR7’s carburetor. So if A=B and B=C, therefore A=C. What does that mean really dirt bikes?
I don’t know, but I wanted to say feel free to follow along with the information if you are interested in upgrading your RPS Hawk 250’s carburetor.
See My Recommended TBR7 Upgrades Page
Preparing The New Mikuni VM-26 Carburetor For TBR7 Installation.
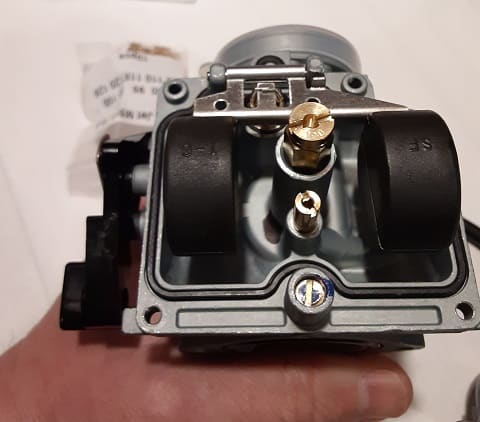
1.- Unscrew the carb’s fuel bowl, the bottom section of the carburetor.
2.- Carefully remove the fuel bowl. Best to keep the carburetor inverted(float hinge pin horizontal) the whole time. If you turn the carburetor sideways, the float hinge pin might fall out, and that is a very tiny metal rod. Losing it and trying to find the lost pin will be very difficult. You have been warned.
3.- Look at the Main jet size. Will the size of the main jet satisfy your needs? Consider if you did any air box mods that were performed and the altitude you will be operating the motorcycle.
4.- If you want to change the Main Jet size, remove the installed main jet; the flat-head screwdriver worked well. And put in your new Main Jet. The carburetor and jets are made of soft material; take extra care not to cross-thread them—carefully snug down the new jet.
5.- Replace the fuel bowl cover. Ensure the gasket is lined up in its recess. Also, again, the carburetor is made of soft material; carefully reinstall the fuel bowl screws.
6. Adjust the air/fuel mixture screw. Close the valve/screw very lightly, and then open it 1 and 1/2 turns open it. 1 and 1/2 seem to be everyone’s starting point for the air/fuel mixture.
Remove The Old Stock TBR7 Carburetor:
1.- Removed TBR7’s front and rear side plastic panels.
2.- Remove the Motorcycle Seat.
3.- Remove the Motorcycle Fuel Tank.
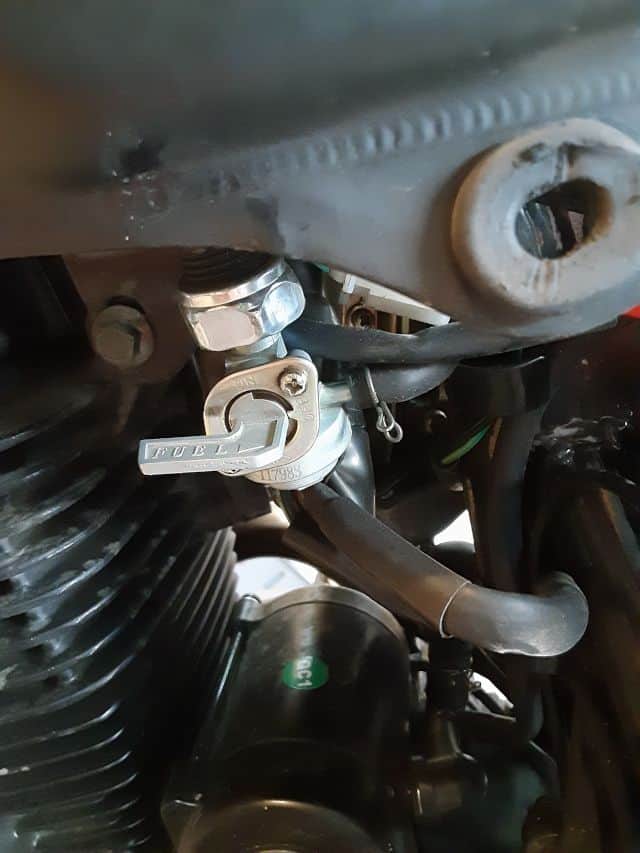
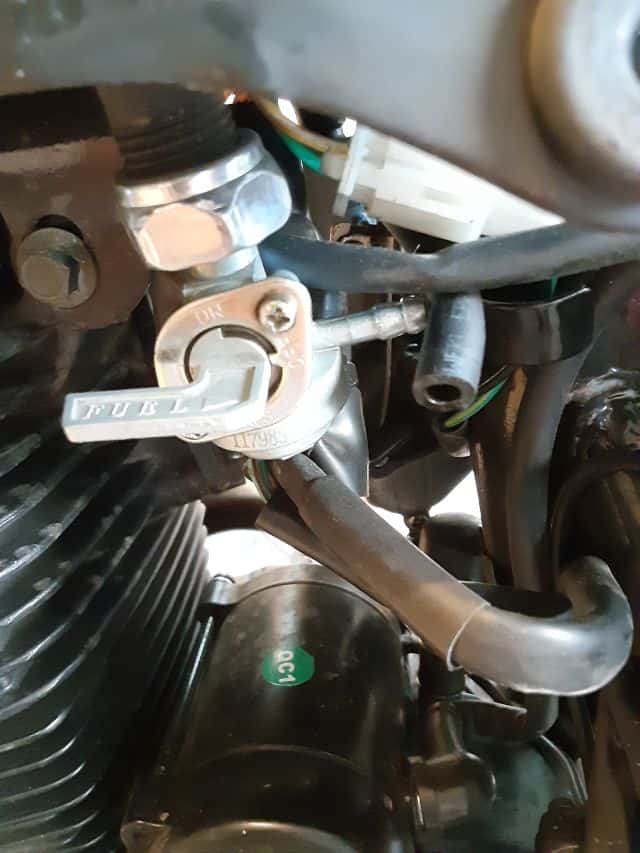
3a.- Ensure the tank fuel valve is closed.
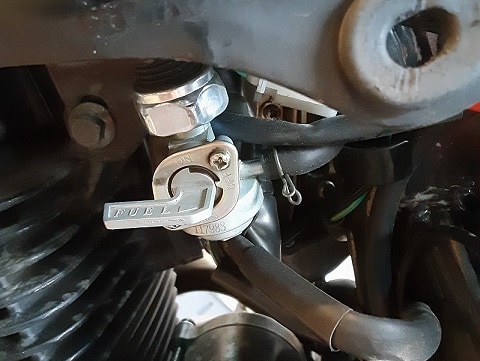
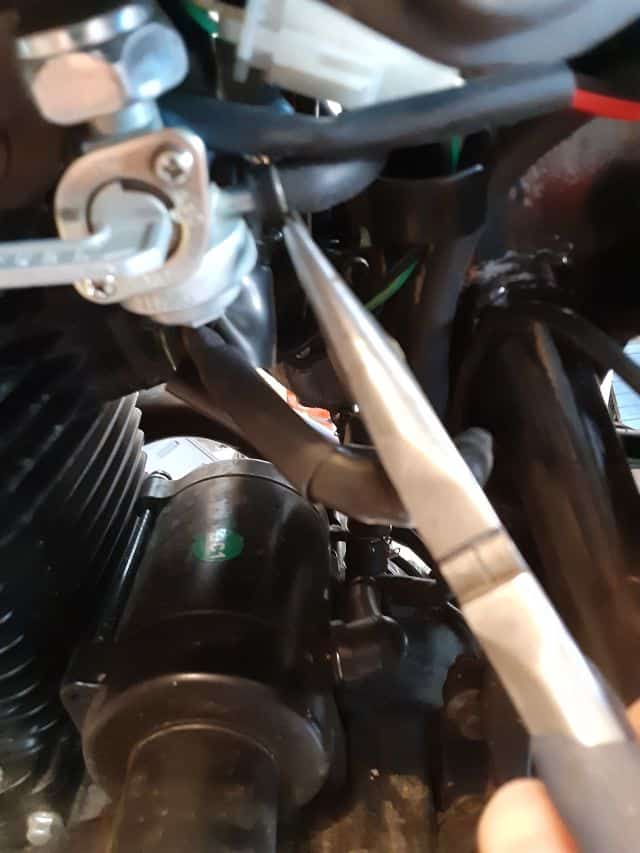
3b.- Using needle-nose pliers, move the fuel hose clamp away from eh valve, and disconnect the fuel line.
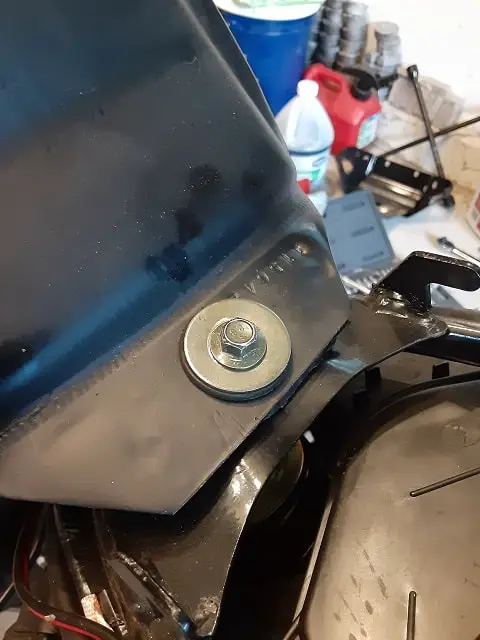
3c.- Unbolt the motorcycle fuel tank.
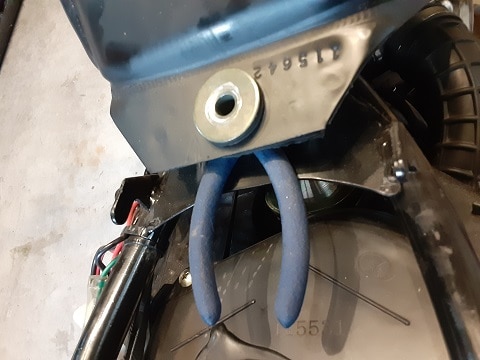
3d.- Lift the motorcycle fuel tank, exposing connection for fuel level sensor and disconnect the connection.
3e.- Remove the fuel tank. Keep upright; the fuel cap is not liquid tight and be careful; weight is dependent on how much fuel you have in the tank. Place the fuel tank in a safe area.
4.- Loosen, remove the hose clamp from the air box outlet and carburetor inlet. This clamp should be completely unscrewed and placed in your parts container for safekeeping. I like my magnetic parts tray.
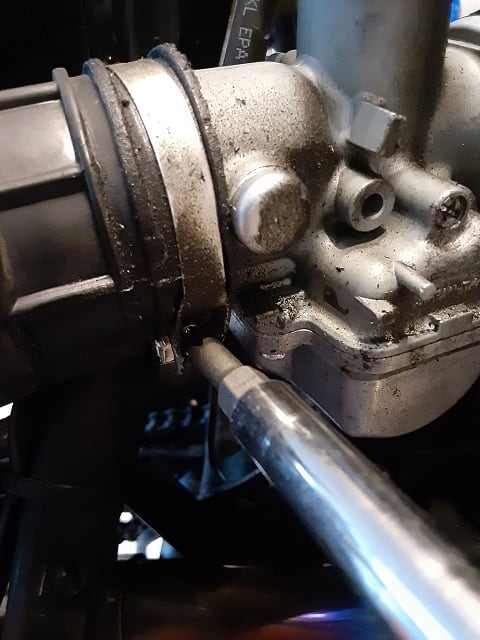
5.- For ease, gently pull the air box outlet off the carburetor inline. It’s a tight space, but having the air hose off allows you to remove the carburetor easier later.
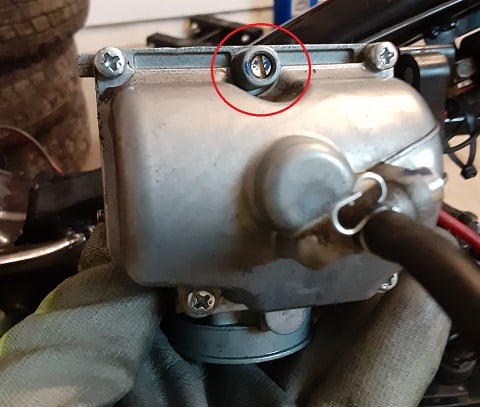
6.- Using a 10mm combination wrench, I removed the carburetor’s mounting bolts. The nut on the left side of the motorcycle is difficult, and here you will find that removing the fuel tank opens the space up a little to see. Again, place these small parts to the side for safekeeping. Note, there might still fuel in the fuel bowl. Prevent spillage.
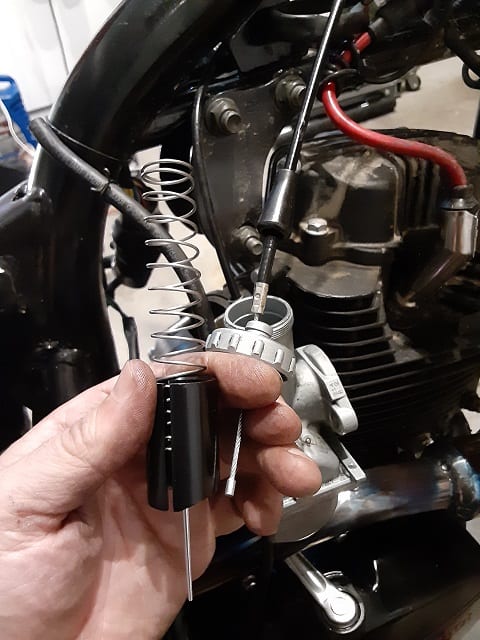
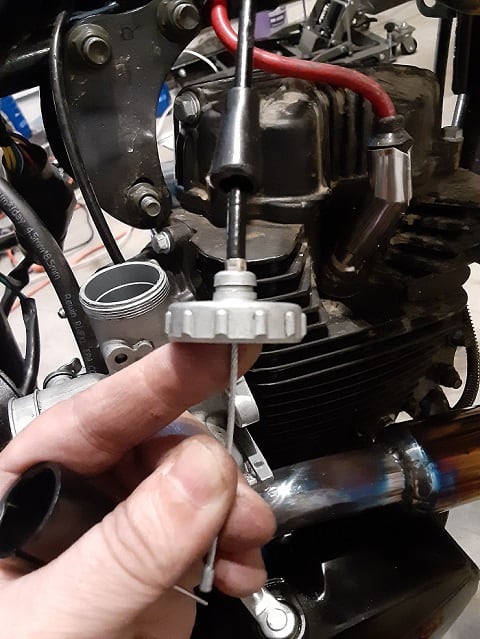
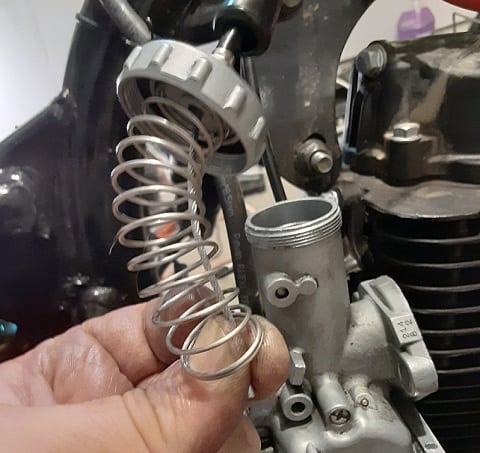
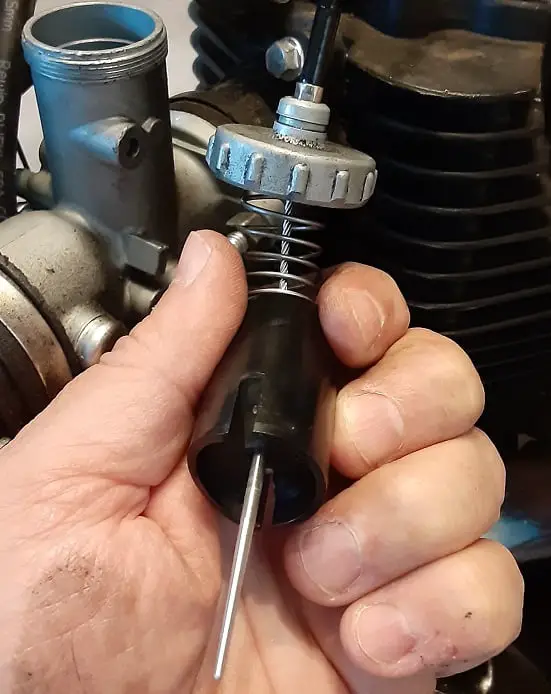
7.- Slide the dust shield up and unscrew the top cap of the carburetor. This step allows you to pull out the throttle body and needle valve.
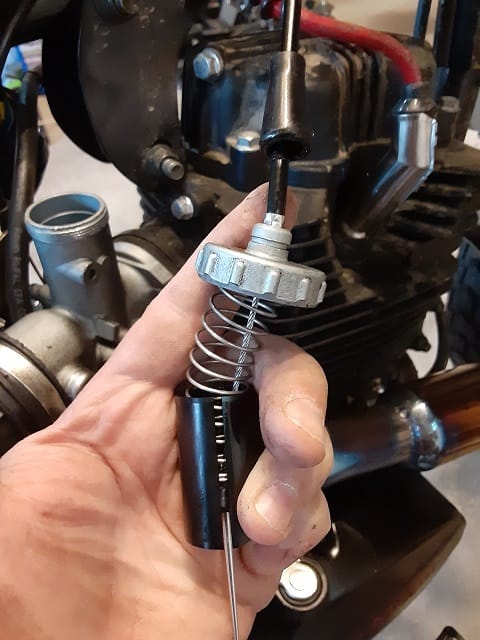
8.- Some sources say the carburetors are so similar, you can skip this step and save yourself some pain.
I didn’t, so I removed the cable from the throttle by compressing the spring and fishing the cable out from the groove on the side of the throttle. This disassembly will create several separate pieces. The need valve, the throttle body, the return spring, and the cap. Don’t lose these pieces; they can be kept with the original carburetor or become spare parts.
7.- Remove the fuel line from the old carburetor.
Remote Carb Choke Removal And Installation.
The TBR7’s Carburetor Remote Choke Cable Removal:
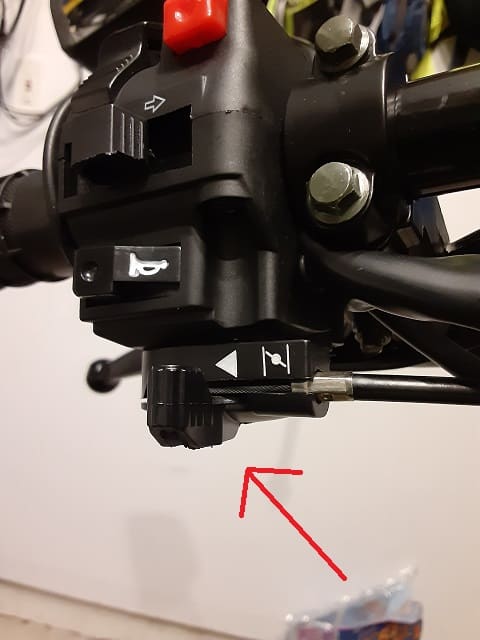
This section is only for remotely operated chokes, like the Mikuni Carb and Mikuni Carb clones like the stock carburetor the TBR7 motorcycle came with. My TaoTao TBR7 came with a remote choke slide under the horn on the left handlebar area. So I will be covering this process for those who want to keep the remote choke option. Skip this step if you only have a locally(on the carburetor) operated choke.
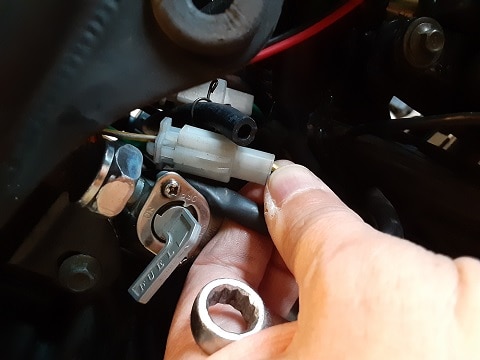
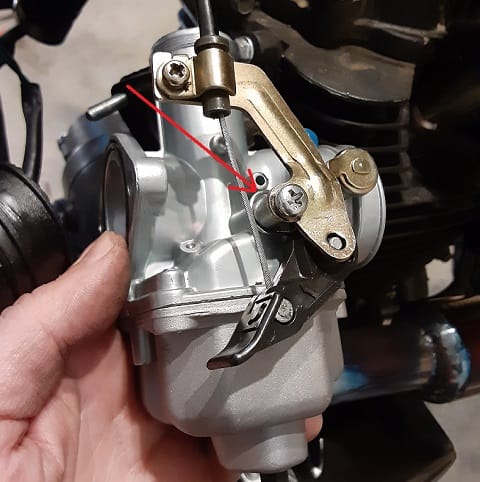
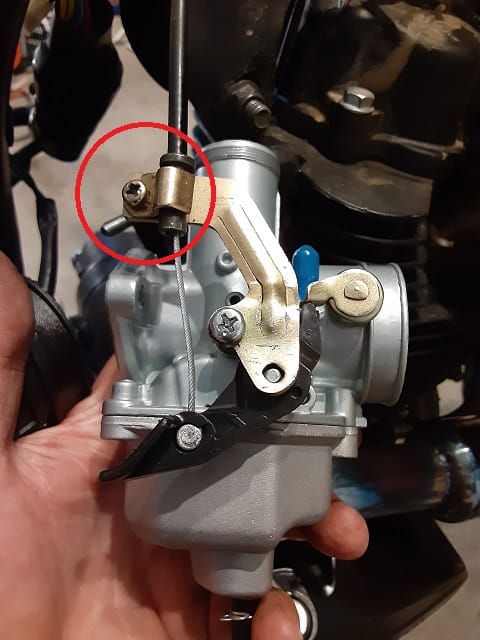
1.- Look at how the spring and brass mount are installed; take a photo to help you remember when installing the new carburetor choke lever.
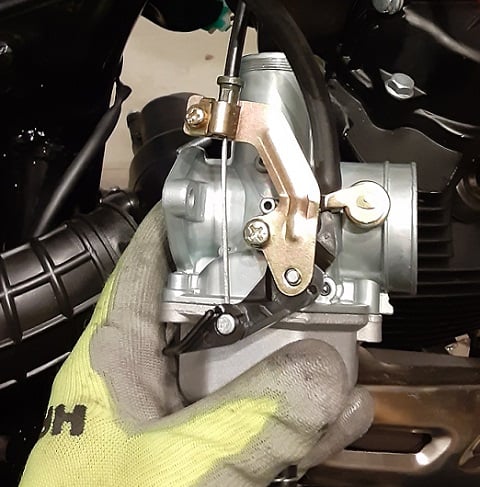
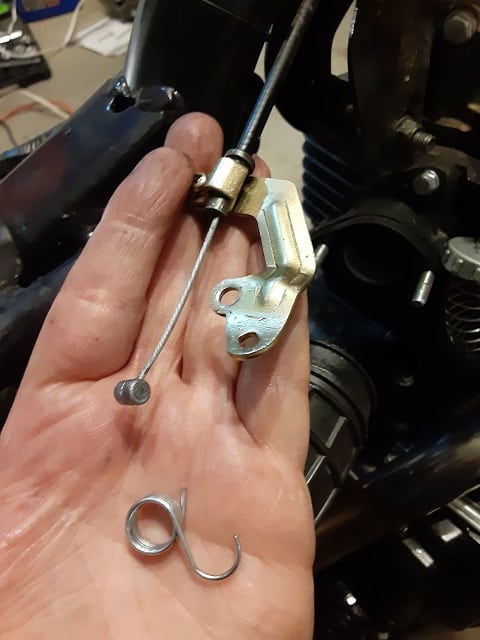
3.- Remove the screw holding on the brass mount. Careful; there is a spring under the choke lever.
4.- Store the spring, and leave the brass mount on the end of the choke cable housing. Put the old carburetor, its screw, and its choke lever to the side.
5.- With the new Mikuni carburetor, remove the metal bracket holding the choke lever in place by removing its associated screw. This metal bracket can be placed to the side and stored with the old carburetor. The choke lever that came with the new carburetor will be reused.
The TBR7’s New Mikuni Carburetor Remote Choke Cable Installation:
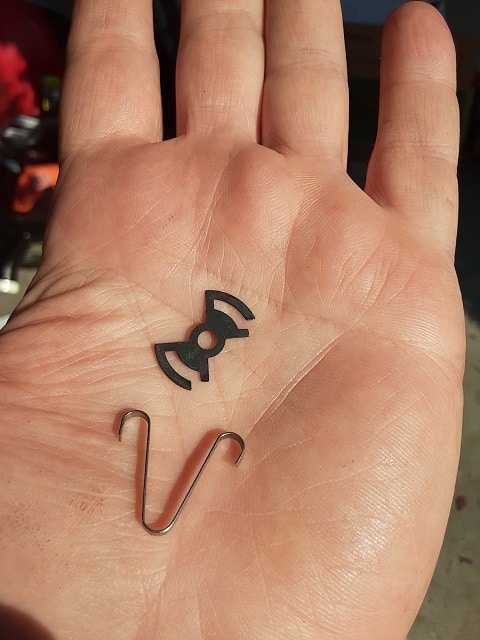
First, the spring installation can be tricky, I did a few times to try and see if I could find an easy way, but it comes down to just doing it. Ensure the remote choke cable is slack as possible; look at the lever/slide on the handlebar.
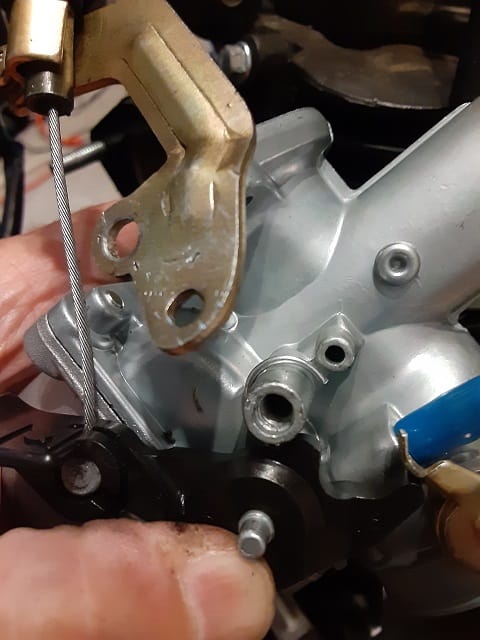
1.- Install the spring. The hooked end does around the screw mounting hole. While facing the carburetor, the opening of the spring faces to the right.
Tip: What kind of work for me? I placed the spring into the groves on the backside of the lever. The hook end will be forward(to the right), overturning the choke lever counterclockwise (while holding the spring in place), hook the screw mount, and turn clockwise until the choke lever falls into its mounting hole.
2.- While holding on to the choke lever with one hand, take the other and pop the end of the choke cable(big round metal blob) into the end of the choke lever.
3.- Screw the brass mount into place.

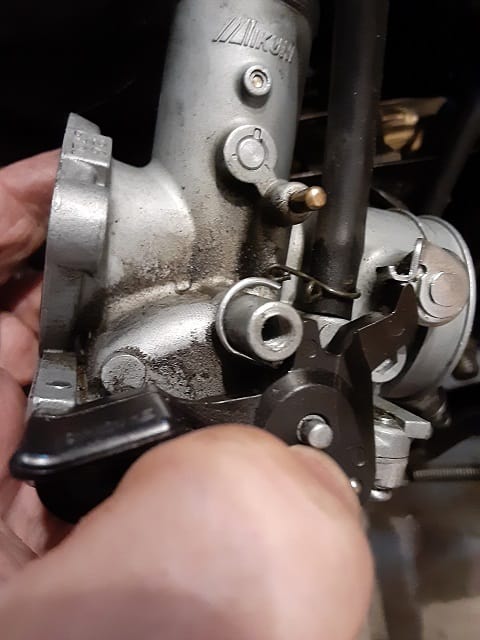
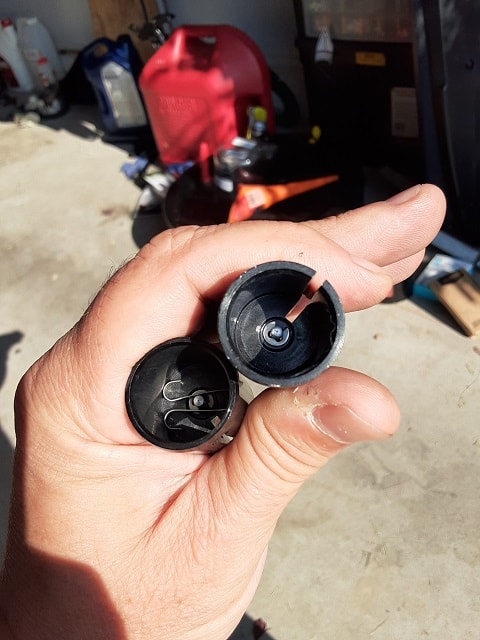
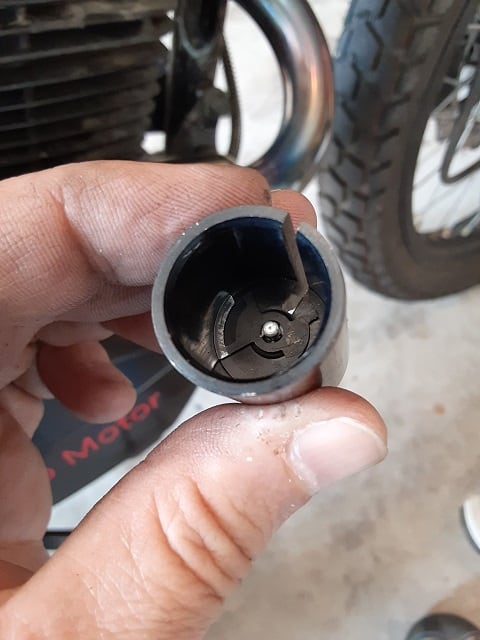
4.- Once the mount is in place, check for free movement of the choke lever and look inside the carburetor for the proper operation of the choke plate. Check for remote operation of the choke. Slide the remote lever to the left, did the choke close? Slide lever to the right did the choke return to the open position. If necessary, adjust the choke by adjusting the choke cable housing length with the choke cable clamp at the top of the brass choke mount.
If you are satisfied with the choke operation, locally and remotely, move on to the carburetor re-installation.
Install The New Carburetor Into The TaoTao TBR7.
1.- Skip all of step 1 if you didn’t disassemble the stock throttle body.
1a.- Ensure the needle valve is fully inserted into the throttle body, with it’s retention clip in place.
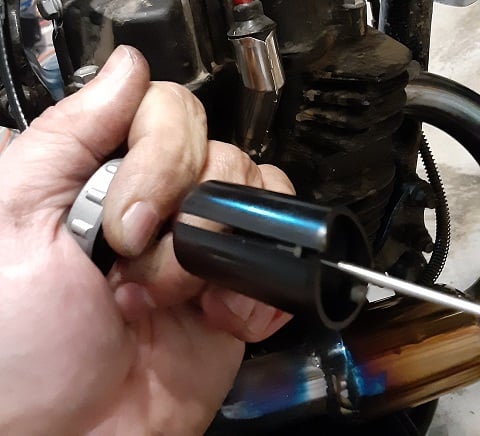
1b.- Slide the throttle cable dust cover over the throttle cable jacket.
1c.- Slide on the carburetor cap over the throttle cable.
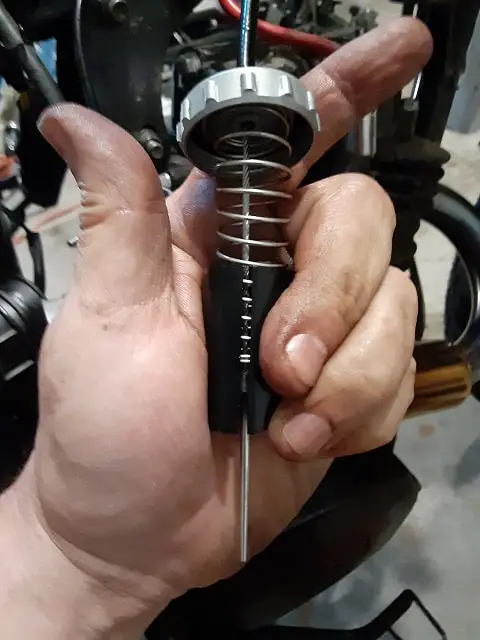
1d.- Slide throttle closing spring over the cable, and compress the spring while holding on to the carburetor cap.

1e.- With the free end of the throttle cable, slide the line down the groove that runs the full length of the throttle body.
1f.- Ensure the anchor end(metal bulb at the end) of the throttle cable is seated in its recess, then slowly release the spring, allowing it to sit into the throttle body.
2.- There are two grooves on the throttle body. One runs the entire length, the other only partially from the bottom. The partial length groove lines up with the idle screw side. Insert the throttle body into the carburetor, and screw down the cap. The throttle body will insert completely and should close off the airflow channel almost all the way. If the throttle appears mostly open(very upward and a lot of air flow) or fully closed(no airflow), there is something wrong with the throttle valve insertion. Please recheck your work.
Twist the throttle. Did the throttle body slide move upward and fully open the airflow channel? Release the throttle, did the throttle body return to fully closed(fully inserted into airflow channel)? If so, you are good to proceed.
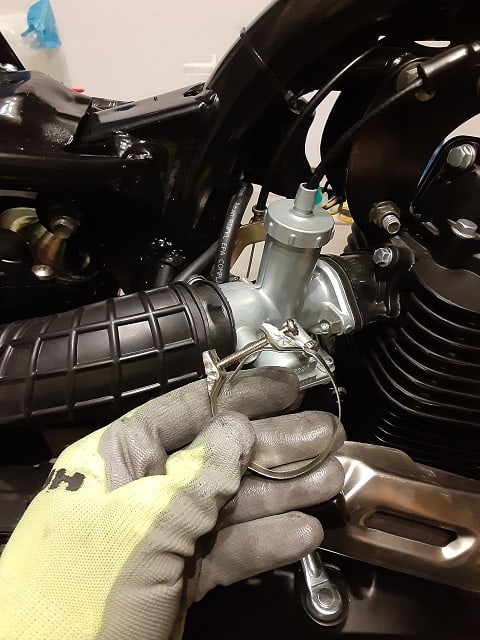
3.- Add fuel line hose. Should slide over the fuel inlet of the carburetor pretty easily. You should find a spring clamp to help secure fuel line to carburetor, slide the clamp to help secure the fuel line.
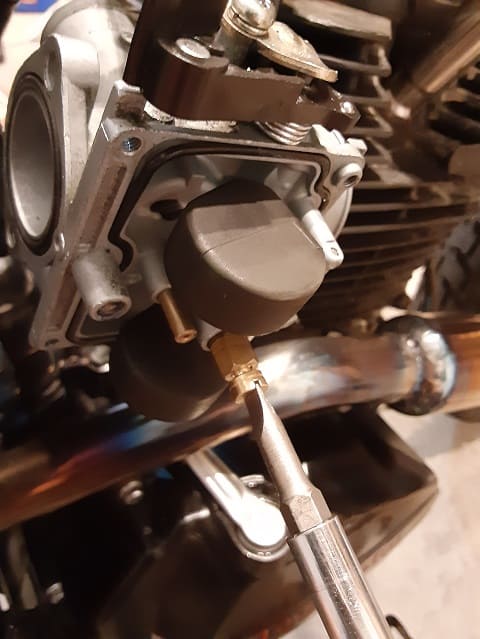
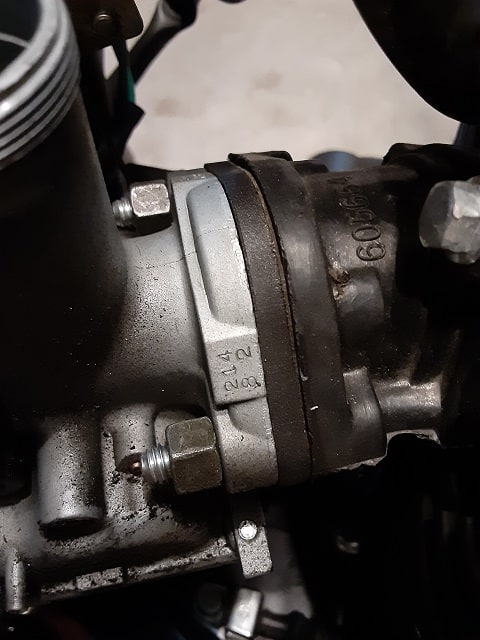
4.- Ensure the o-ring is present and seated on the carburetor’s engine side(flange side) and mount the carburetor to the engine. The left side nut will be tricky; take your time. Inspect the seams between the carburetor and all the flanges to the motor for gaps. Air should only get into the engine through the carburetor.
5.- Fish the fuel line to the left side of the motorcycle. Leave the fuel line where you can find it later after you reinstall the fuel tank.
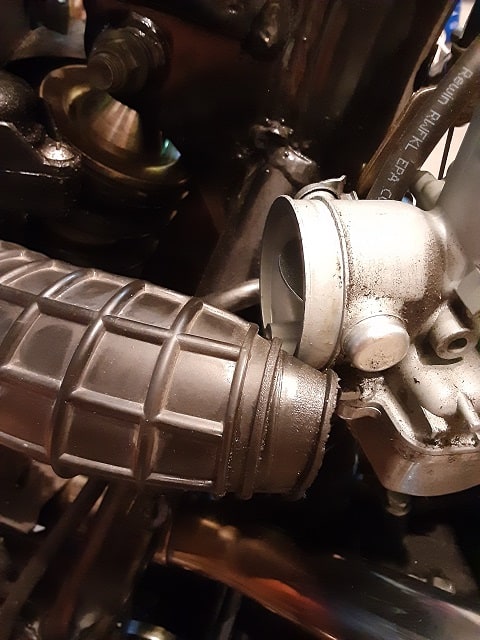
6.- Reconnect the air box outlet tube to the carburetor inlet. The hose clamp is used to secure the air hose, and be careful tightening the clamp. Just snug it up.
7.- Reinstall the fuel tank. Connected the fuel sensor, disconnect, and reinstall the bolt. Careful tightening down on the bold, people had reported cracking their fuel tanks when the bolt was over tightened. Over-tightening this bolt has lead to many TBR7 motorcycle gas tank leaks. So be careful.
8.- Retrieve the fuel line, reconnected the fuel line to the fuel stop outlet, and slip over the sprint clamp to hold it in place.
9.- Reinstall any body panels you want to reinstall. I have been riding without front panels. Looks better to me, IMHO.
Testing The New Mikuni Carburetor Upgrade.
Now the intentions are to do a basic startup of the TBR7, and testing the responsiveness of the throttle, and leading up to a test ride. That is normal, however, caution. the fuel system was technically disassembled, so DO NOT start the engine yet.
1.- Open the Fuel Stop / valve. Look for leaks in the whole fuel system, including the carb.
2.- Operate the throttle, does it move smoothly and snap back when released?
3.- If you have a remote choke, operate the remote slide and inspect the local slide, do they move together?
4.- Again, look for leaks!
If all is well, cautiously start the motorcycle and go through the normal steps to test out a new modification on your TBR7.
Hope this inspired you to also do a carburetor upgrade, and try to extract as much fun out of the TBR7. The horsepower is very low, and might not notice any change, but the real change I noticed was responsiveness. Now I don’t bog down when I open the throttle fully, and the idle is more stable when I release the throttle. Be sure to inspect your plug later, and size up or down your jets as needed.
Note: To do this project, I was working on items that contained flammable liquids. Motorcycle maintenance, upgrades, and operation can be very dangerous, please seek professional assistance for any of your projects. FAQ: My 7 Motorcycle Garage Safety Rules.
Click To See My Recommended
TBR7 Upgrades
Extra Reading Material: Wikipedia’s Carburetor Page
Another TBR7 Carb Upgrade To My Motorcycle!
I have had fun with the Mikuni Carburetor on my TaoTao TBR7 motorcycle. Still, after reading some online posts, yes many by our Chonda-Cousins the Hawk 250 motorcycle owners, there are some benefits to not using the Mikuni Carburetor but getting a “Racing” Nibbi Carburetor (A “racing’ carburetor” the PE30mm).
The Mikuni Carburetor Upgrade was a drop-in upgrade for my TBR7(and understand the Mikuni Carb is a good carb!), but I felt the Nibbi carburetor will be worth the extra work getting it installed. Still early, only did the unboxing step (TBR7 Motorcycle Nibbi Carburetor, Unboxing!), but read along with my latest Chonda adventure: My TBR7 Nibbi Carburetor Installation Instructions (With Hawk 250 info).
Ride Safe, Ride Fun!

Hi I’m Tom, A New Motorcycle Rider and Blog Author.
I am a new rider(Pa Learners Permit at the end of 2020, and I received a Pa Motorcycle License in 2021 after passing a Motorcycle Safety Course).
I bought my first motorcycle, a TaoTao TBR7, at the beginning of 2021 and have been doing upgrades on that motorcycle since.
I added to my motorcycle collection by buying a Boom Vader Gen 2 in 2022, and that Grom-Clone motorcycle has been upgraded by me as well.
I continue to ride my Boom Vader Gen 2 motorcycle as well as my TaoTao TBR7 dual-sport bike.
Read more on my About Me page.
Fun Fact: I’ve only been on one group ride.