
One of the first upgrades a new owner of a TBR7 motorcycle does is the front sprocket. This step goes the same for the TBR7’s Chonda cousin, the Hawk 250. These motorcycles are geared low, which means they are out of the box and designed to climb. They are street-legal dirt bikes and dual-sport motorcycles, so climbing hills makes sense.
This climbing skill lowers the max speed ( FAQ: TaoTao TBR7 Top Speed ) of these motorcycles and limits how much of the first gear is usable.
Since I’m interested in street riding, a new TBR7 motorcycle front sprocket upgrade is one of my first steps. Follow along Hawk 250 owners; the steps are the same for both motorcycles.
Follow alone Hawk 250 owners; the steps are the same for both motorcycles.
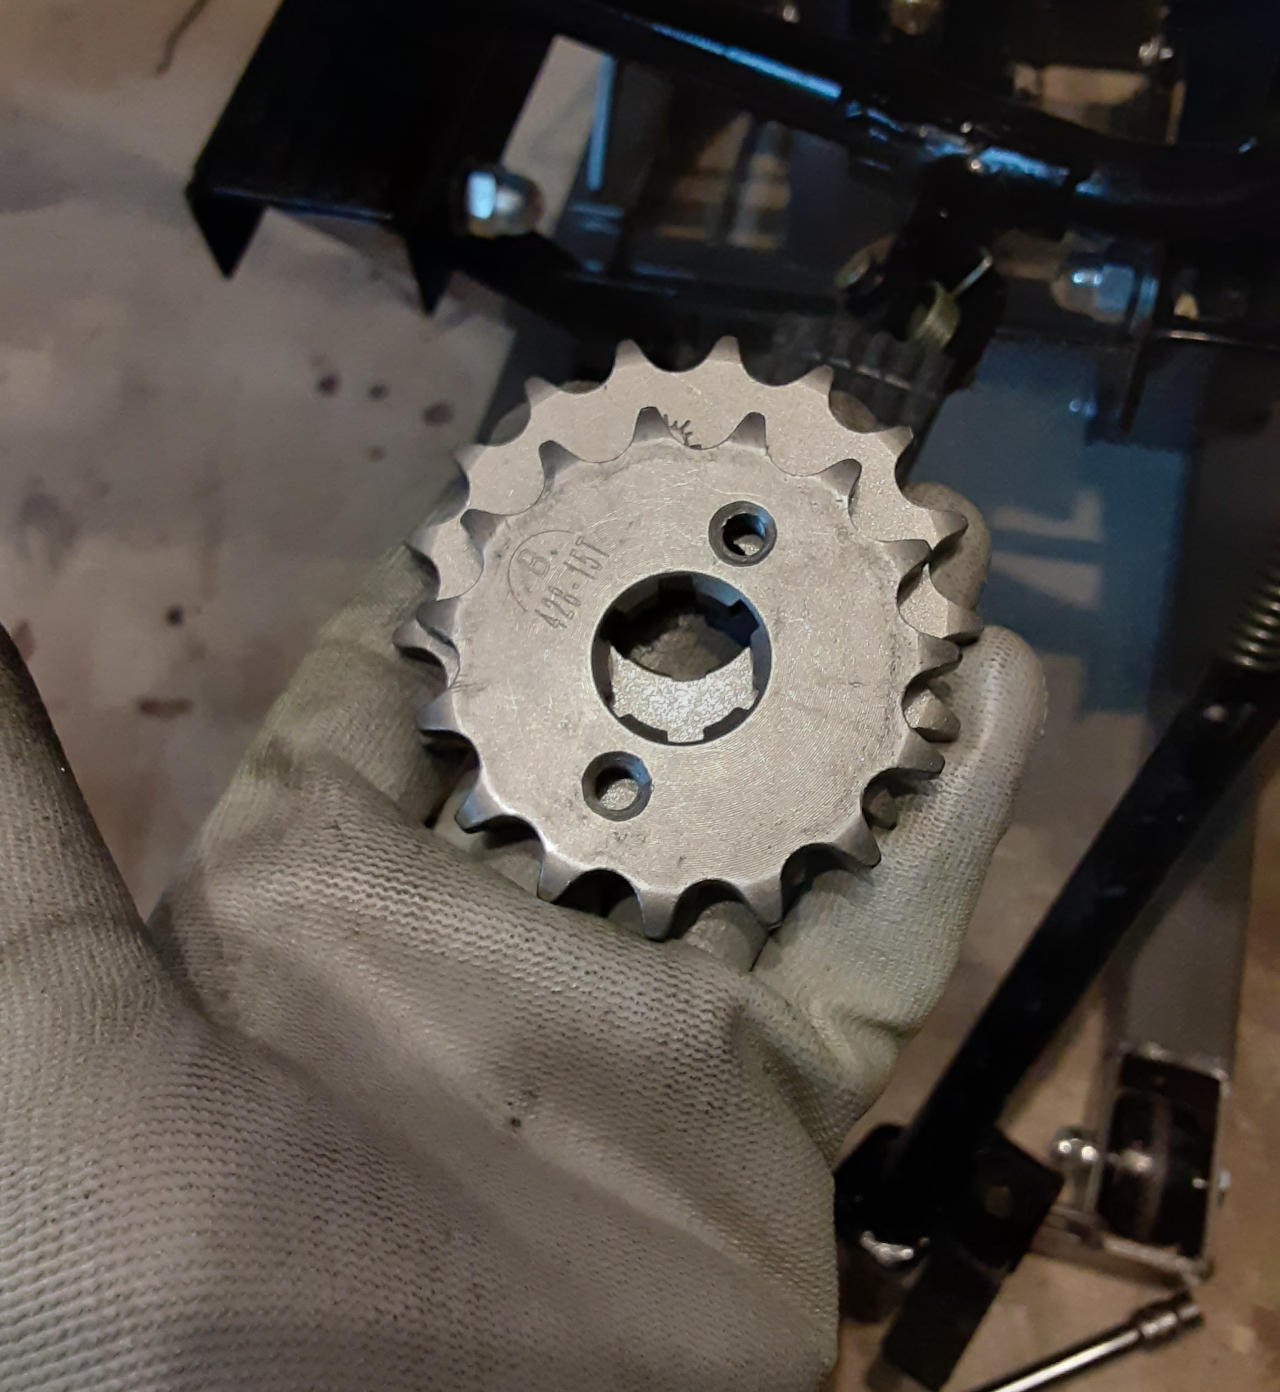
The Larger Front Sprocket I Ordered For My TBR7
Author’s Notice: This page contains affiliate links, for which I may earn a commission by their use. Also, as an Amazon Associate, I earn from qualifying Amazon purchases.
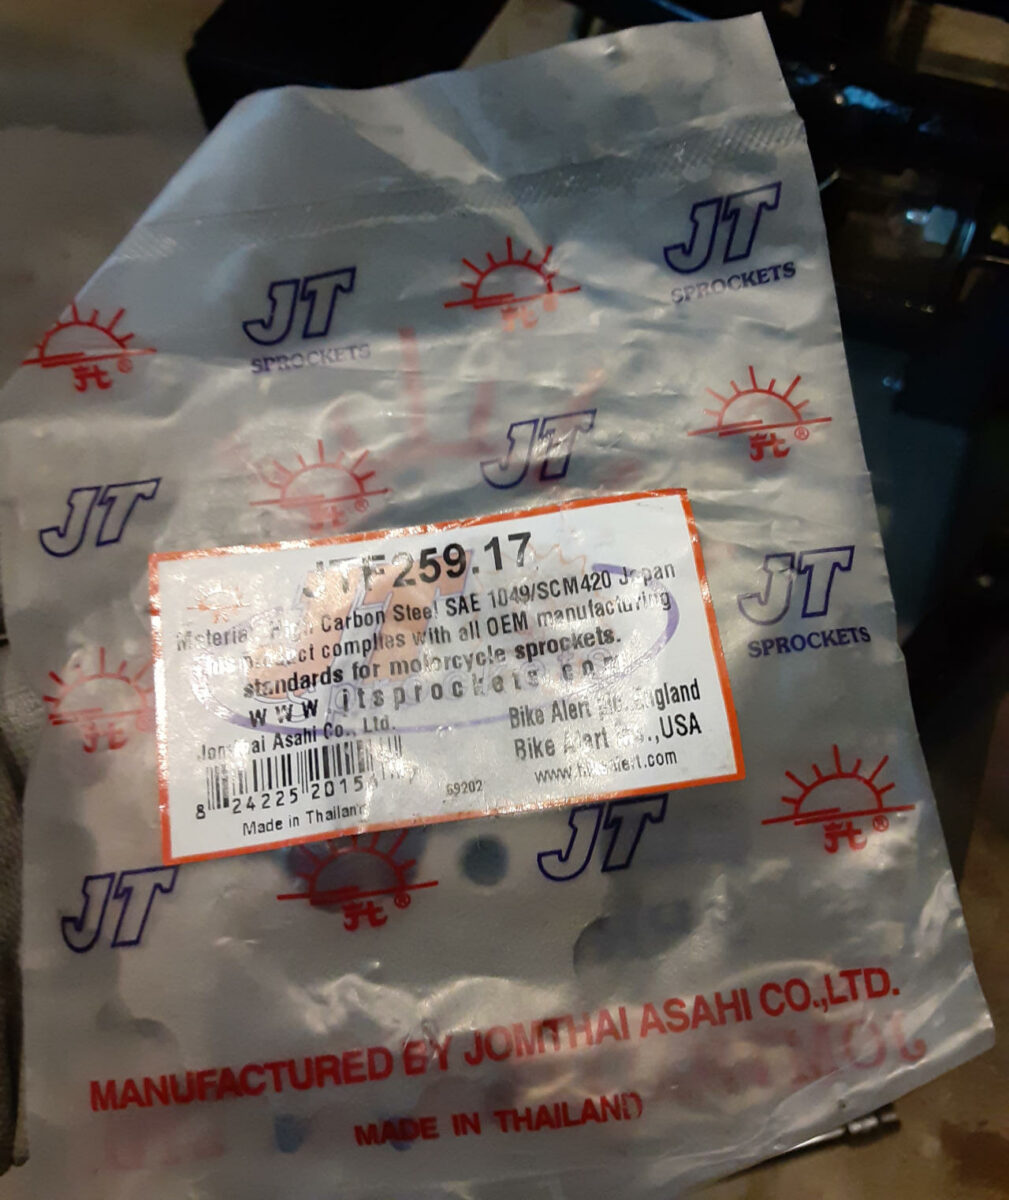
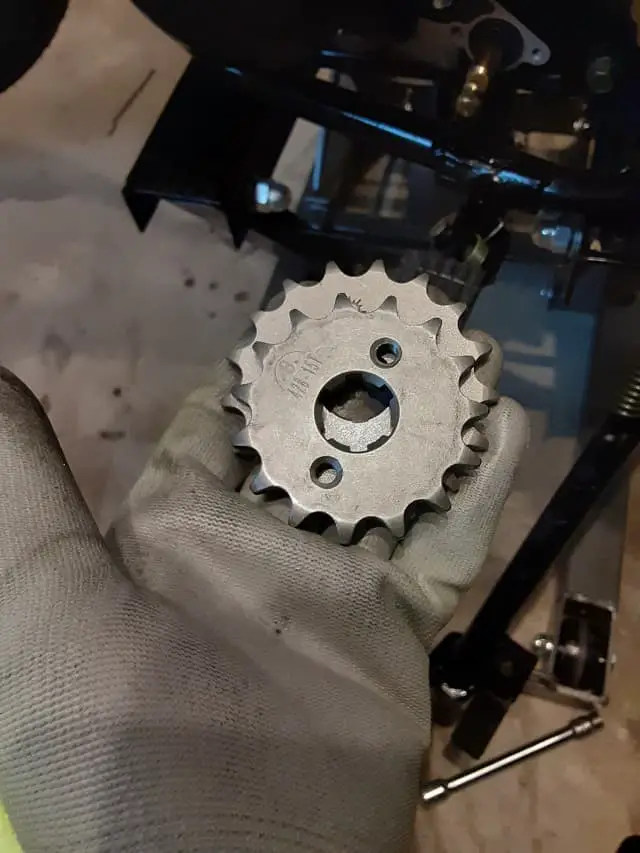
Current prices: JTF259.17 17T Steel Front Sprocket, 17 Tooth
TBR7 Motorcycle Front Sprocket Upgrade Steps:
Now we get into the steps I took to do the sprocket upgrade:
Step 1. Ensure The Motorcycle Is Safe.
FAQ: Motorcycle Garage Safety Rules.
- The motorcycle is cool to the touch. Let the motorcycle cool overnight.
- The motorcycle is on a stable level surface and elevated.
- The rear wheel will have to be off the ground to allow for chain slack.
- Disabled the motorcycle from starting or cranking. Disconnect the battery for sure.
- Assemble your tools ( Must-Have Motorcycle Tools ).
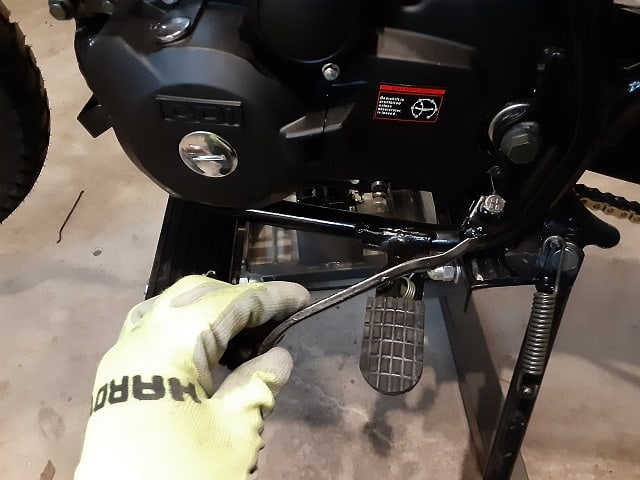
Step 2. Place Motorcycle In Neutral And Remove The Shifter.
There is a small bolt under the shifter that can be removed with a wrench. The transmission being neutral allows for chain movement after installation and before riding.
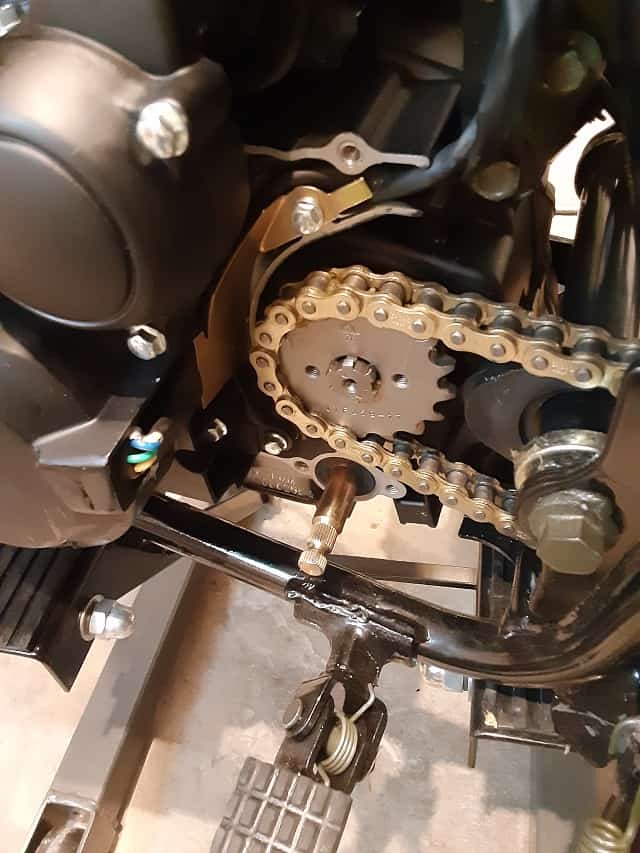
Step 3. Remove The Front Sprocket Cover.
There are two bolts, top, and bottom. After the bolts are removed, the cover is stuck, a light tap should break it free.
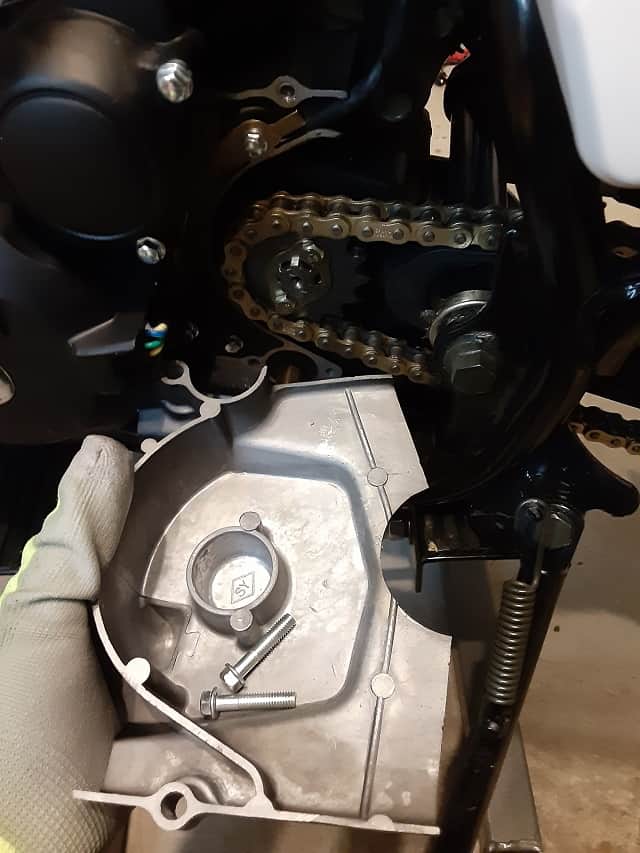
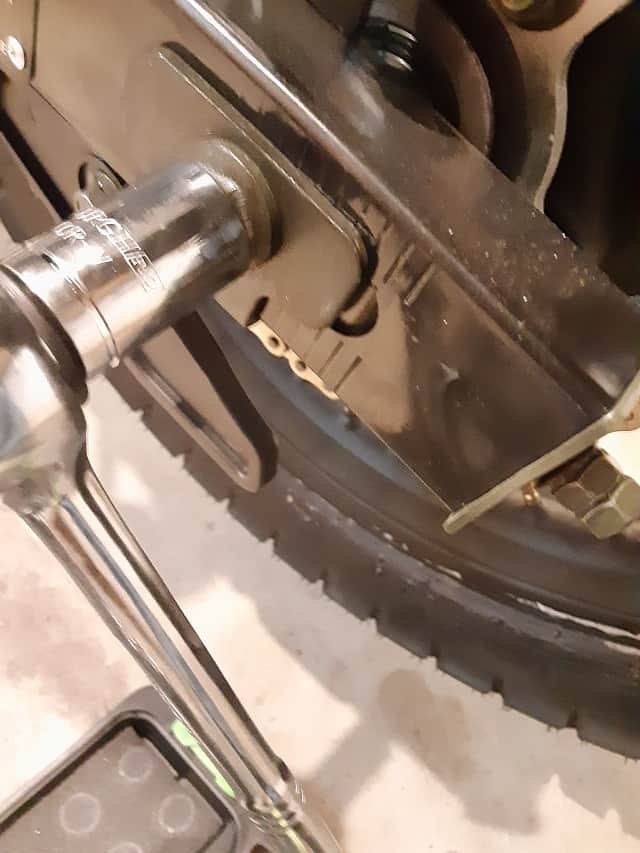
Step 4. Remove The Two Locking Plate Bolts.
Step 5. Remove The Front Sprocket.
Rotate the locking plate, lining up the splines, and remove the locking plate.
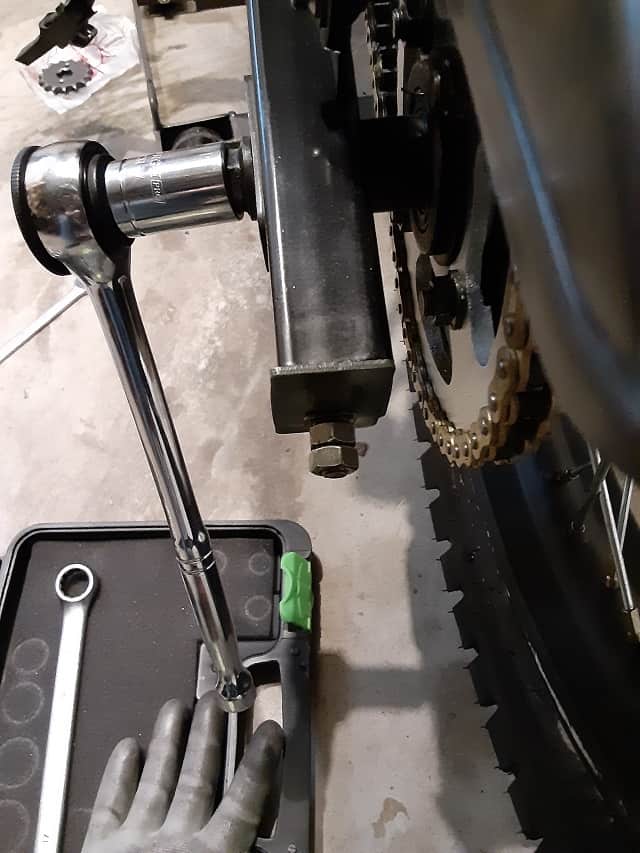
Step 6. Loosen The Rear Axle Tensioners.
I loosen by removing the locking nut (most rearward nut) and then losing the remaining nut till the end plate falls free. Keep the last nut on the tensioner. This way, it doesn’t fall apart.
Step 7. Loosen The Rear Axle.
By loosening to the rear axle, the wheel and rear sprocket can move forward, allowing chain slack to occur.
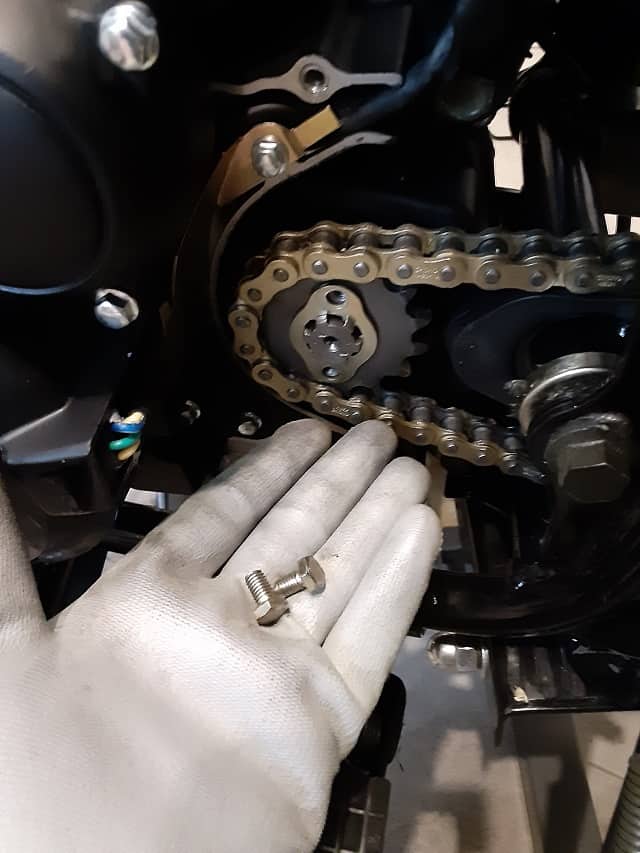
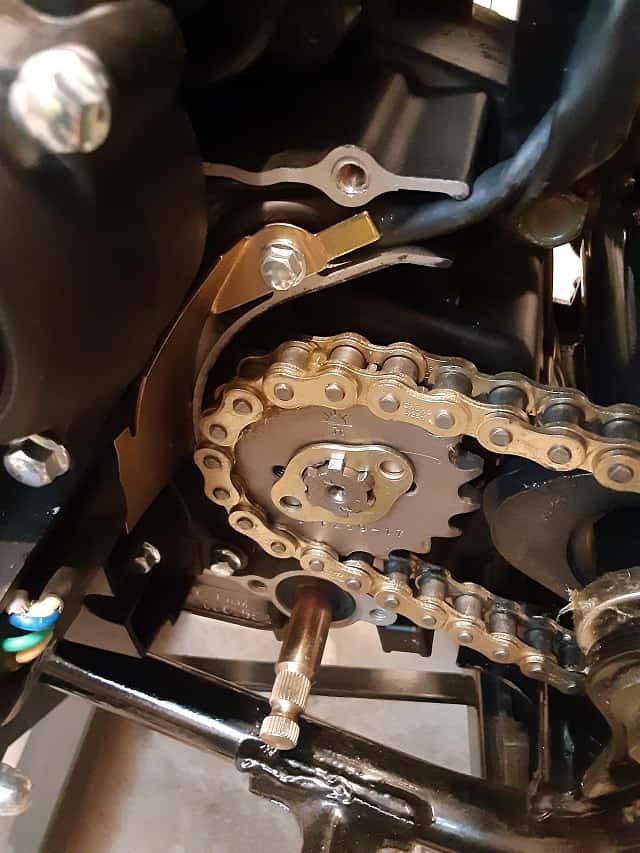
Step 8. Remove The Front Sprocket.
The sprocket and overlapping chain will slide off the engine output shaft.
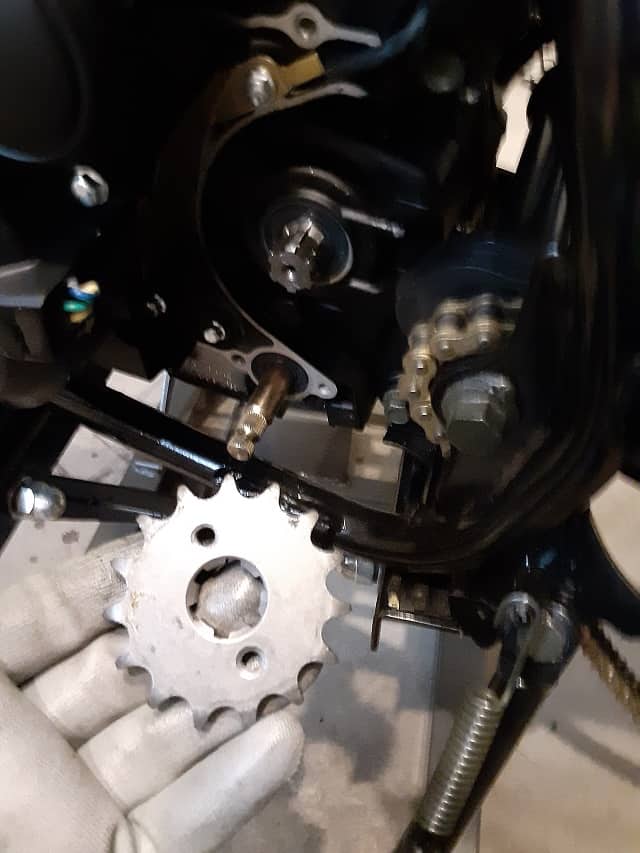
Step 9. Install Chain And Sprocket Together.
Overlap The Chain On The New Sprocket And Install It Together.
With a 17 tooth front sprocket, extra space is minimal. So the front sprocket must be installed with the chain already applied over it. If there is not enough slack, loosen the chain by allowing the rear axle to move forward.
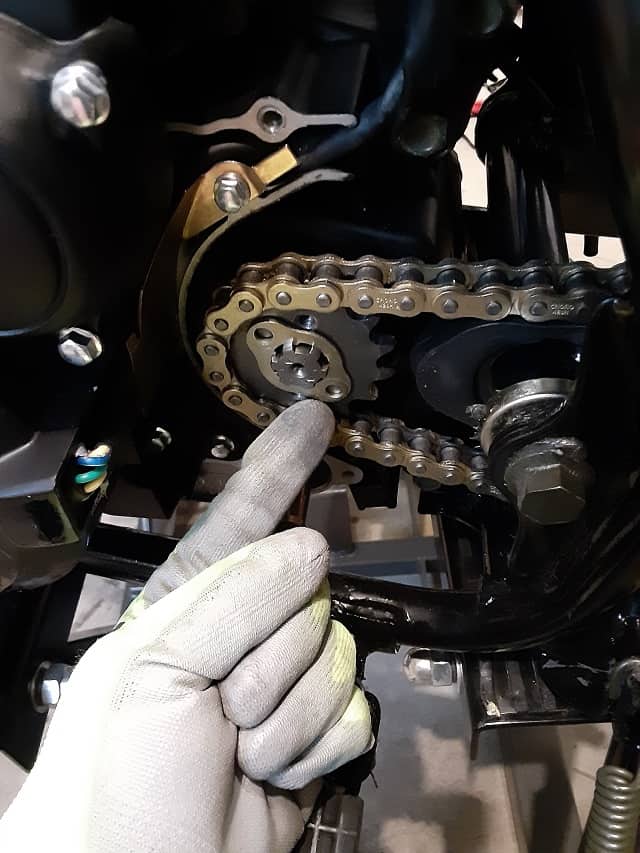
Step 10. Reinstall The Front Sprocket Locking Plate.
Once I slid the locking plate over the output shaft splines, I rotated the locking plate till the bolt holes lined up. Using the blue thread locker on the threads, I reinstalled the bolts till snug.
Step 11. Test Your Work.
With the motorcycle’s rear wheel still elevated, and the motorcycle is in neutral; check your work carefully by rotating the rear wheel.
The motorcycle chain links should be lined up with the new front sprocket and should not bind with the casing. Your chain is still very loose for the installation, so carefully test and do not entrap any body parts.
Step 12. Reinstall The Bike’s Front Sprocket Cover.
Line up the top and bottom bolt holes, apply a blue thread-locker to the threads, and install the bolts. I tightened the bolts till snug.
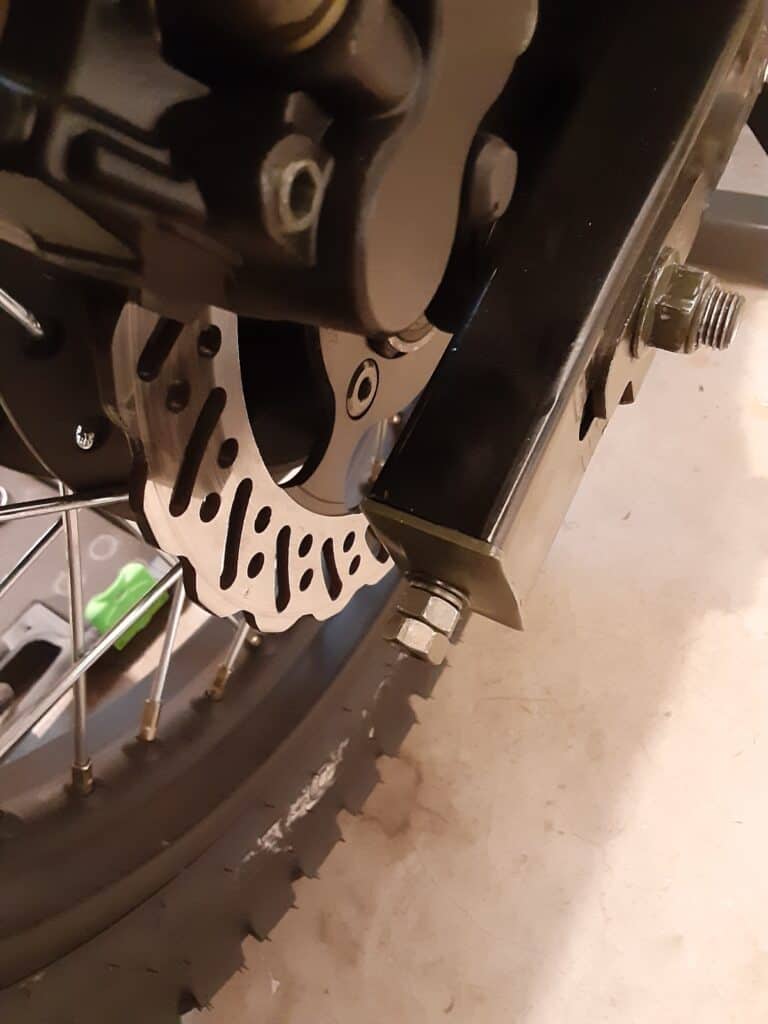
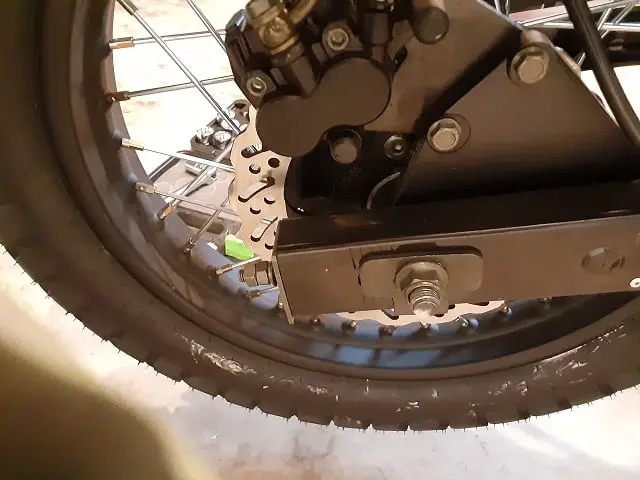
Step 13. Readjust And Secure The Rear Wheel/Axle.
I used the axle tensioners to pull back the rear axle, ensuring the wheel was centered and in line with the motorcycle body. I have a post here: TBR7 Chain Adjustment about chain tension adjustments that can help.
Step 14. Test Your Work.
Again the wheel should turn, and there should be no binding of the chain.
Step 15. Reinstall the shifter.
Remember to use a blue thread locker on the bolt and snug it up.

Step 16. Clean up your area.
a. Shift into gear. (Prevents bike from rolling away).
b. Lower the motorcycle.
c. Clean up tools( Must-Have Motorcycle Tools ) and check your work.
Step 17. Test Your Work.
While holding the clutch or placing the motorcycle back into neutral, rock the bike back and forth, checking for free movement and no chain binding.
Step 18. Test Ride.
Get the motorcycle ready for a test ride. I should not have to mention dress for the slide, not the ride( FAQ: What Is ATGATT?). Have fun. I love a good test ride after making an upgrade to my TBR7.
Current prices: JTF259.17 17T Steel Front Sprocket, 17 Tooth
Motorcycle Front Sprocket Upgrade Tips:
- Blue thread locker for anything that has threads. Bolts, nuts, etc.
- Use a magnetic tool parts tray to keep small parts from getting lost.
- Understand I am a motorcycle novice. Working on motorcycles is a unique skill, and this isn’t a how-to but a documentary of what I did to upgrade my TBR7’s front sprocket.
I hope you enjoyed this post, and remember to have fun and ride safe!!!!
What Does A Motorcycle Sprocket Change Do?
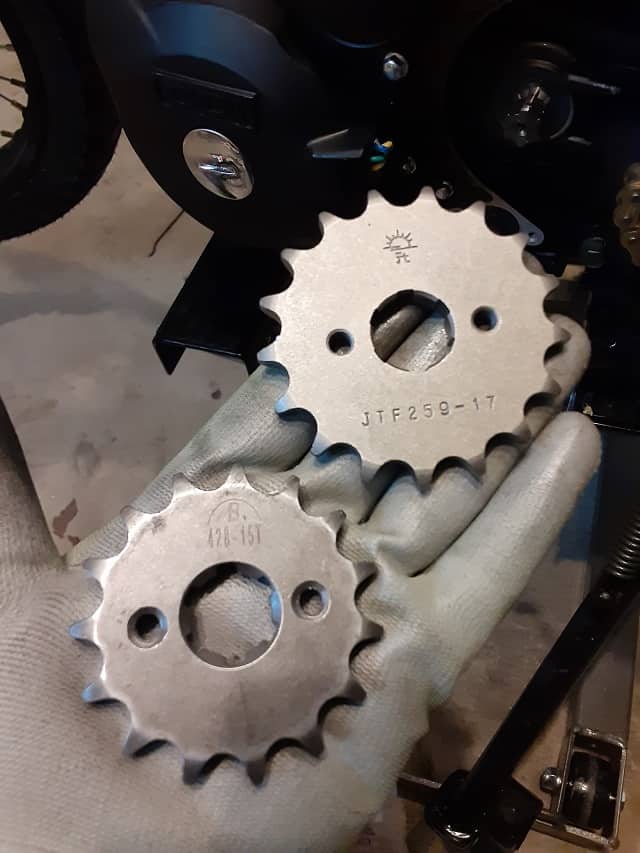
Changing the front sprocket changes how much chain the engine output moves for the same RPM. The TBR7’s stock front sprocket is a 15 tooth front sprocket.
The stock sprocket moves 15 links of chain per revolution of the output shaft. If you increase the number of teeth on the front sprocket, the sprocket will then move more chain links per revolution. If you decrease the number of teeth on the front sprocket, the sprocket will move fewer chain links per revolution.
Does Changing The Front Sprocket Size Affect Speed?
My goal is to increase the range of the first gear, so I don’t have to shift into second so fast and increase the top end of the motorcycle.
Now, if there is a max rpm the engine can output, and you increase the size of the front sprocket, the engine can move more links of chain per revolution of the engine output shaft. The more chain links translate to a faster-moving chain. A faster-moving chain means a faster rear sprocket, which in turn rotates the rear wheel faster. So the TBR7 will have a new increased maximum speed.
Does Reducing The Teeth On The Front Sprocket Make You Go Slower?
As in the examples above, with a constant maximum RPMs of the engine’s output shaft, reducing the number of teeth on the front sprocket will also reduce the number of chain links moved per revolution. With a constant RPM and slower-moving chain, this results in a slower-moving rear wheel. So the speed is lowered.
What Benefit To Lowering The Number Of Front Sprocket Teeth?
Once you look past the lower maximum speed, there is a benefit: A higher torque. Again, this translates into better climbing power of the motorcycle. The TBR7 is a front sprocket geared low stock from the factor, and I believe the Hawk 250 is front sprocket geared even lower.
Does Changing Gearing Change The Bike’s Horsepower?
I wish. The TBR7, and likewise the Hawk 250, are small 229cc single-cylinder engines. Both have different HP ratings depending on the source, but neither has any high horsepower output. The engine design has the most bearing over horsepower. Gearing only changes how the horsepower is delivered to the rear wheel.
Sadly, there will be no increase in engine horsepower output after upgrading my TBR7. 🙁
Do I Need To Replace The Chain With The Sprocket?
Some upgrades I heard require a chain change or even a front sprocket cover change, but not what I am planning.
The front sprocket change will maximize the size of the front sprocket but fit inside the current sprocket cover and use the stock chain. However, changing motorcycle sprockets and the chain at the same time, is recommended since all these components wear together. TaoTao TBR7 Motorcycle Chain Upgrade.
Best Sprocket Combo For Both The Hawk 250 And TBR7?
I do not know yet. Just know I am keeping the stock 46 tooth rear sprocket and only plan to upgrade the front sprocket from 15 teeth to 17 teeth. I plan first to research a little more and plan out the rear sprocket change better. The rear sprocket involves more steps than changing the front sprocket, so taking my time with that upgrade.
So stock, I have a 15/46 ratio. After the upgrade, I will have a 17/46 ratio.
These ratios are for my TBR7. The Hawk 250 has a different stock sprocket gear ratio.
Current prices: JTF259.17 17T Steel Front Sprocket, 17 Tooth
Click To See My Recommended
TBR7 Upgrades

Hi I’m Tom, A New Motorcycle Rider and Blog Author.
I am a new rider(Pa Learners Permit at the end of 2020, and I received a Pa Motorcycle License in 2021 after passing a Motorcycle Safety Course).
I bought my first motorcycle, a TaoTao TBR7, at the beginning of 2021 and have been doing upgrades on that motorcycle since.
I added to my motorcycle collection by buying a Boom Vader Gen 2 in 2022, and that Grom-Clone motorcycle has been upgraded by me as well.
I continue to ride my Boom Vader Gen 2 motorcycle as well as my TaoTao TBR7 dual-sport bike.
Read more on my About Me page.
Fun Fact: I’ve only been on one group ride.
