
I’m a fan of Nibbi carburetors, but I’m keeping it simple for this Boom Vader carburetor upgrade. My Boom Vader still has the stock 125cc engine, so a Mikuni VM22 carburetor should be an easy upgrade. In the future, if I do the big bore kit upgrade on my Boom Vader, I might be going to a racing Nibbi carburetor, but when this carburetor upgrade, I’ll post it here.
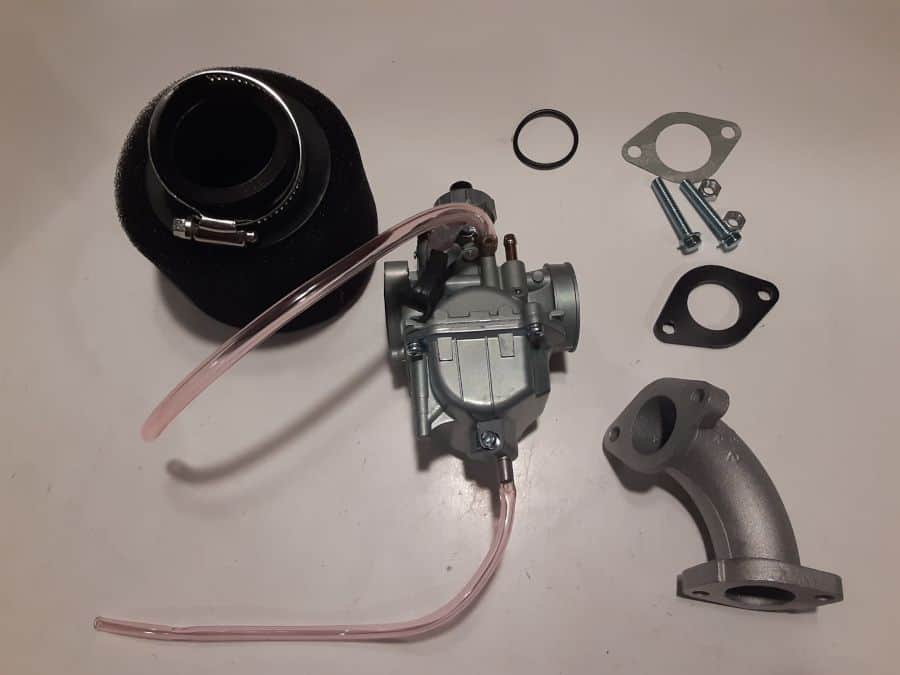
In the meantime, I will upgrade my Boom Vader 125 motorcycle with this awesome Mikuni carburetor kit I picked up off Amazon ( Boom Vader Carburetor Upgrade Kit ). It’s cheap and contains almost everything I need. I added additional steps to make the Boom Vader safer, like a new cut-off valve and an engine exhaust port cap(made from putty, read on).
Why Post My Boom Vader Carburetor Upgrade?
You might be wondering why I am posting such a weird question, but please read for those who don’t know me. I’m new at riding motorcycles (Even took the motorcycle safety course to learn how to ride a motorcycle: Is The Motorcycle Safety Course Worth It? ), a newer motorcycle owner( Should I Buy New Or Used For My First Motorcycle? ), and even a newer motorcycle tinkerer( TaoTao TBR7 Upgrades To Do List & Boom Vader 125 Upgrades To-Do List ).
My posts are documentation of what I’m doing as a new motorcyclist and not a how-to posts. I want you to be inspired and entertained since I am still new to the hobby of motorcycling.
Why The Mikuni VM22 Carburetor?
As stated before, I’m a Nibbi fan; I installed a Nibbi carburetor( TBR7 Nibbi Carburetor Installation Instructions (Hawk 250 info) ) and a Nibbi Ignition Coil( TBR7 Nibbi Ignition Coil Installation Instructions ) on my TaoTao TBR7 with excellent results. However, the VM22 carburetor, a Mikuni Carburetor, made it easier to jet and cheaper to set up.
My TaoTao TBR7 motorcycle’s Nibbi carburetor( TBR7 Nibbi PE30 Carburetor Upgrade Shopping List ) was significantly more expensive than my Mikuni VM-26 carburetor ( TBR7’s Mikuni Carburetor Upgrade ).
Also, with my limited carb experience, the Mikuni carburetor was easier to tune the jets ( TBR7 Nibbi Carburetor Tuning & TBR7 Carburetor Upgrade Tips ) .
As icing on the cake, it came as a complete kit with and air intake and air filter included. I got this carb upgrade kit for cheap: ( Grom-Clone Carb Upgrade Kit ). One click from Amazon.
I hope I calmed down the Grom Clone Nibbi Carb Fans; I can move on.
My Boom Vader Carburetor Upgrade Steps
This post is a documentation of what I did, and I hope to demonstrate how easy this upgrade to my Boom Vader’s carb is. I used a carburetor kit that included a new manifold and foam air filter with the new carb upgrade.
1.- Motorcycle Garage Safety
Common sense here sets yourself up for success by working safely.
FAQ URL: Motorcycle Garage Safety Rules.
2.- Tools and Material You Will Need For Carburetor Upgrade.
FYI: Must Have Motorcycle Tools
a. Phillips head screwdriver.
I use one of those multi-tip screwdriver sets, and it saves space and is nice having all the screwdriver tips I need in one place.
b. Needle-nose pliers.
Or regular pliers that can grip small items.
c. Metric wrenches.
I use a combination wrench set, with a box end and open end on each size.
d. Metric socket set.
I could have gotten away with using the metric wrenches, but socket set with extension helps so much in tight spaces.
e. Thread Locker.
The blessed fluid of the Chonda Owner.
f. Anti-seize.
I use it, but some people like only clean threads. I’ve had bolt/nuts seize, so I use anti-seize. Plus, it’s cheap.
g. Magnetic Parts Tray.
Now, a magnetic parts tray is just an option, and I thought I would slip it in here since these parts trays have prevented me from losing parts from the begging. Just too useful. 😀
h. Wire Cutters, or Large Scissors.
Needed for cutting fuel line, and remaining wire ties.
FYI: Building My List of Must-Have Tools For Motorcycle Owners
3.- Boom Vader Carburetor Upgrade Parts You Need.
I picked up a compete Grom Clone carburetor upgrade kit, so many of these parts were in the kit.
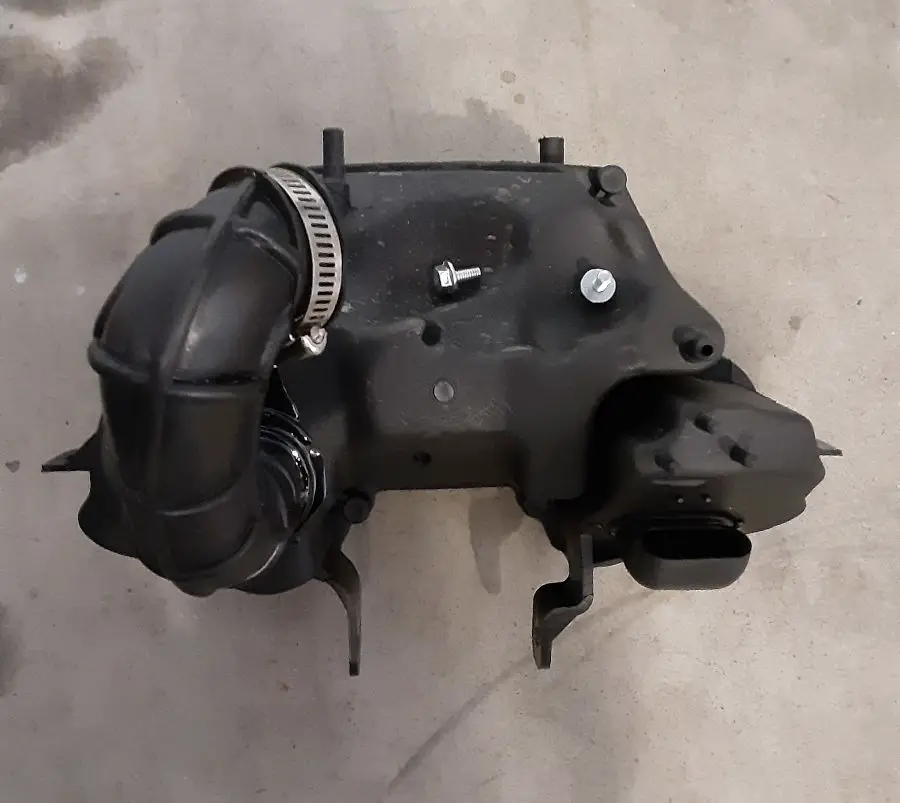
Air Box Note: some people have upgraded Boom Vader motorcycles by reusing the stock air filter box.
There are benefits I found out later to keep the stock air filter box. The foam filter on the carburetor sucks air, yes, we all know that, but it does so “loudly.”
I read if you use the Grom Clone’s stock airbox, the sucking sounds are decreased, and I would rather have the sucking sounds rather than the sucky stock motorcycle performance. So the Boom Vader’s air box is going.
I went with the foam filter included with the Grom Clone Carb Upgrade Kit. I’ve had a similar filter with my TaoTao TBR7 motorcycle made by Uni ( TBR7 Air Filter Pod Replacement ). The Uni foam filter was before I moved on to a Nibbi cone filter( TaoTao TBR7 Nibbi Carburetor, An Unboxing! ).
What was in my Mikuni VM22 Grom Clone carburetor upgrade-kit:
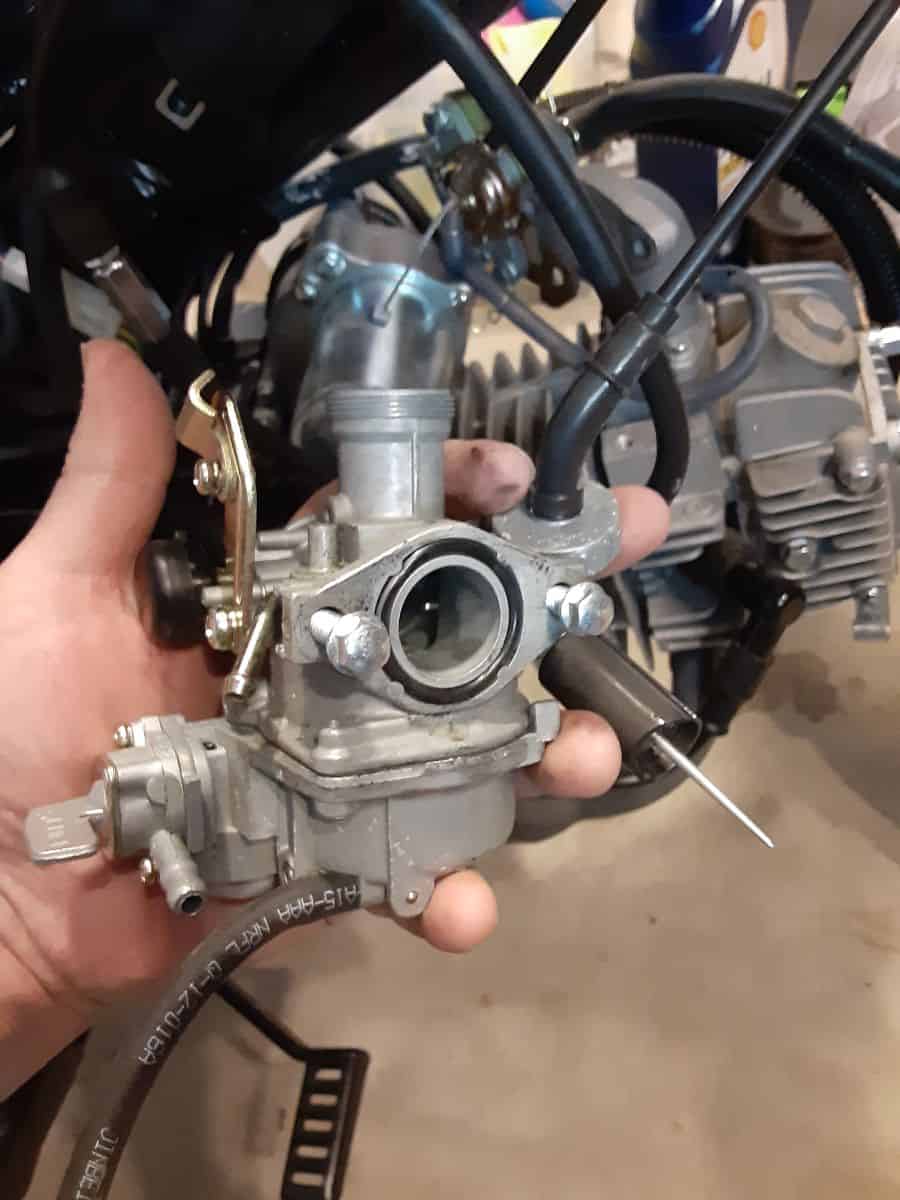
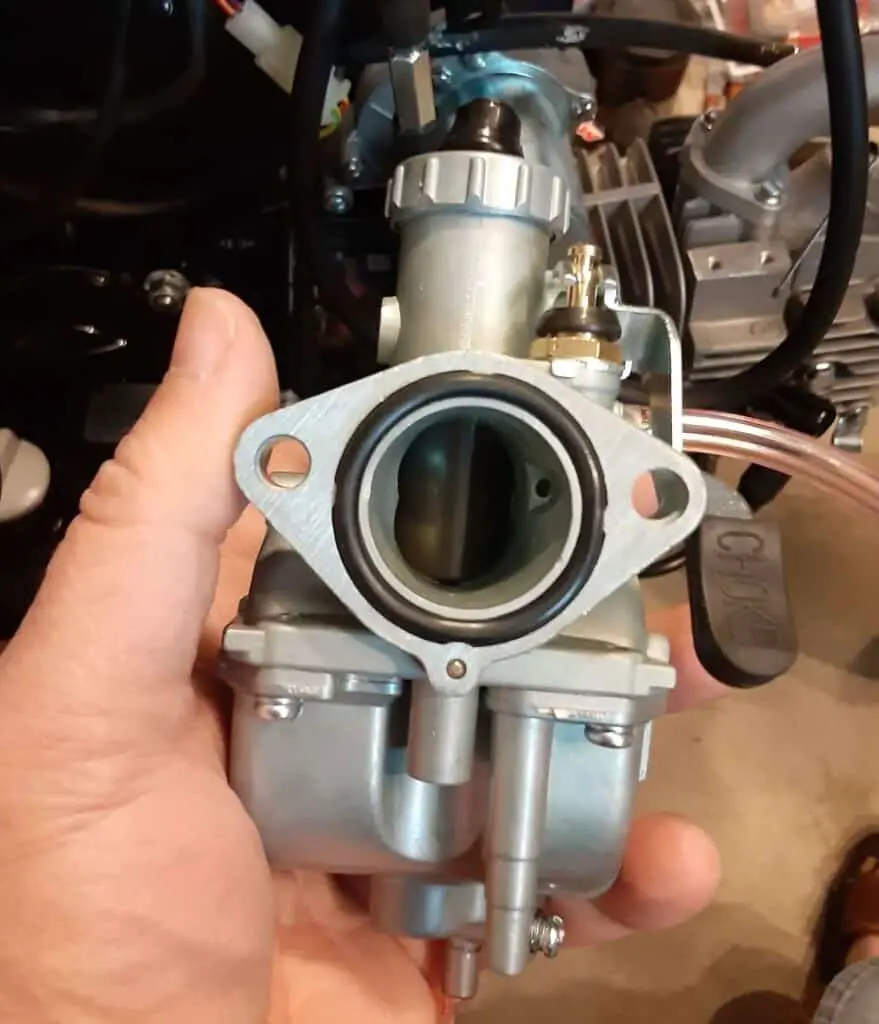
a. New Carburetor. I went with a Mikuni VM22 carburetor. The standard for Grom Clone 125cc motorcycles.
b. New manifold. With the larger new carburetor, a larger intake manifold is the best option.
c. New Air filter. The foam filter came with the kit. Some people like cone filters. Just using what I have.
d. New Gaskets to match the larger intake manifold.
Extra Carburetor Upgrade Parts Needed:
a. New Fuel Cutoff Valve.
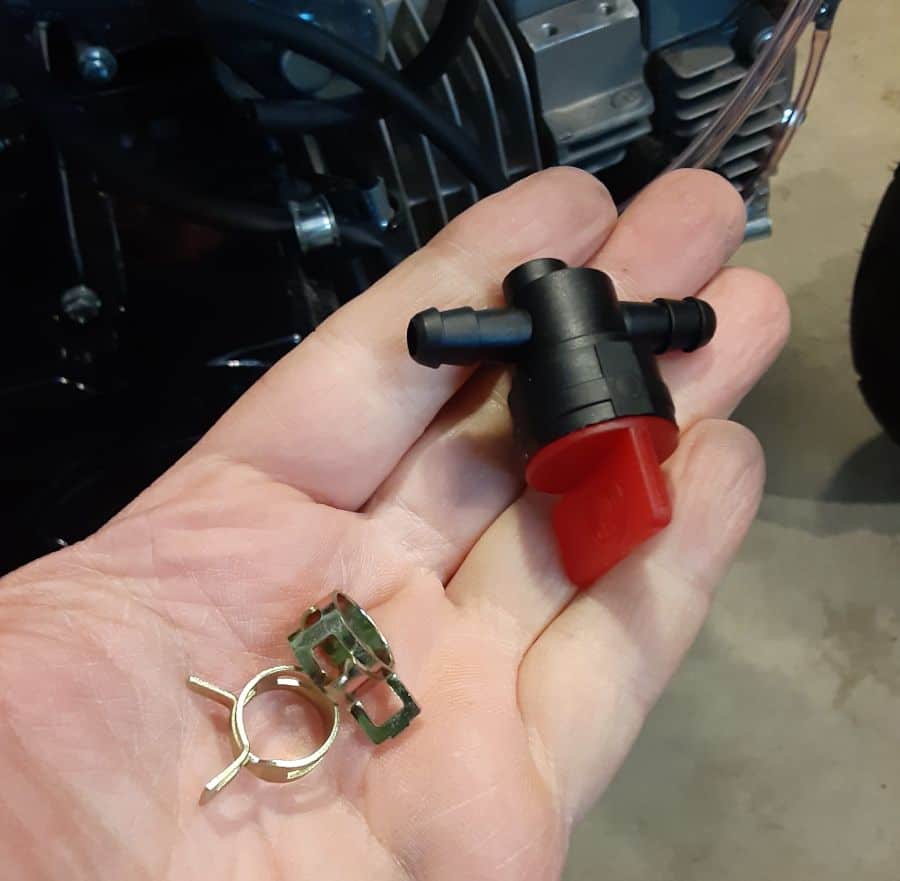
Since the stock carburetor has an integrated fuel shutoff valve and is being removed, you need a new fuel shutoff valve.
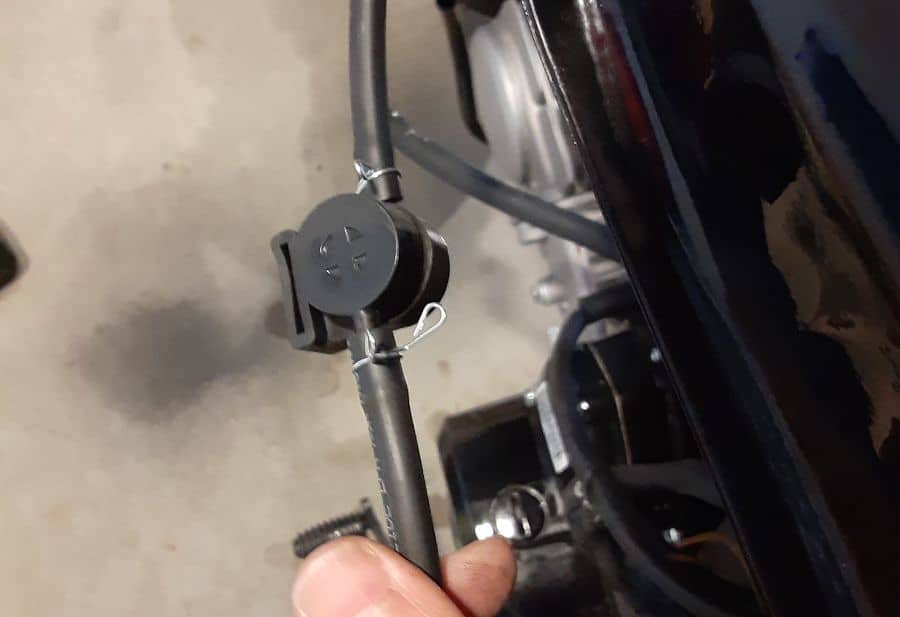
b. New Gas Tank Vent Vacuum Breaker Cap.
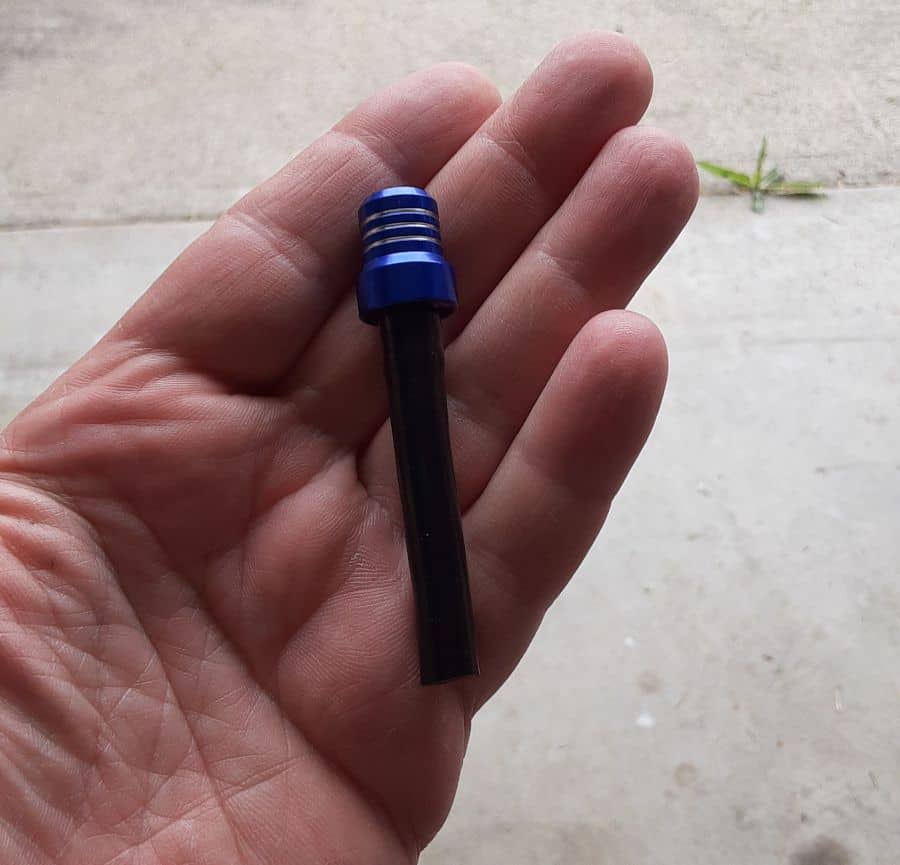
Because I didn’t want to vent gasoline fumes into my garage, I bought a gas tank vacuum breaker breather vent cap. I strongly suggest you also get one: Gas Tank Vent Cap.
4.- Remove The Motorcycle Side Panels.
At a minimum, remove the right-side motorcycle body panel. This step gives you access to all the necessary areas to change and upgrade with the new carburetor kit.
Also, this creates a lot of space for removing the stock air box. The stock air box on the Boom Vader motorcycle is very large.
FYI: I had my side panels off since I was chasing down and testing the latest solution for my gas tank leak. The extra space helped with doing this carburetor upgrade.
5.- Drain The Gas Tank!
Let’s talk about this. There is a step where you remove the fuel line from the stock carburetor, and you can direct the fuel line into a gas can and drain the motorcycle gas tank.
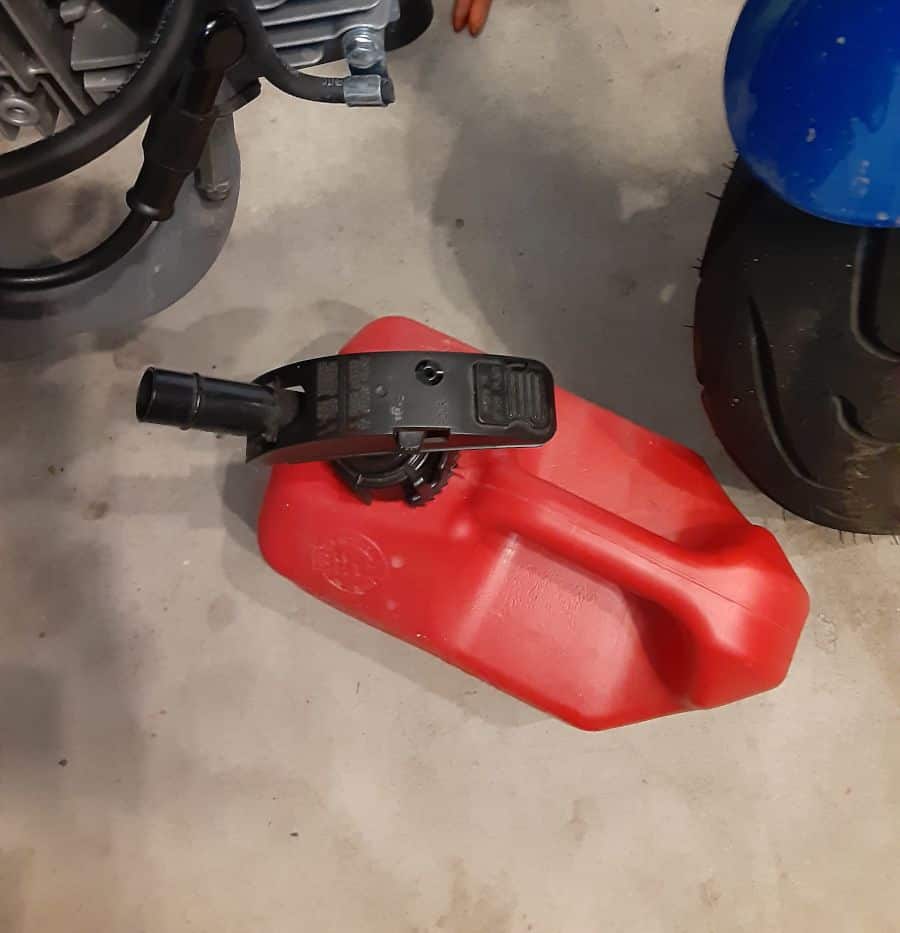
Some people would suggest you can pinch the fuel line closer to the gas tank and put in a new fuel shutoff line at the same time. This multitasking is unsafe since you are doing too many things simultaneously.
Just drain the tank. Use this time as a chance to do any other maintenance items like inspecting the inside of the tank or changing the fuel filter—work Safe.
How I drained my gas tank: Draining A Motorcycle Gas Tank.
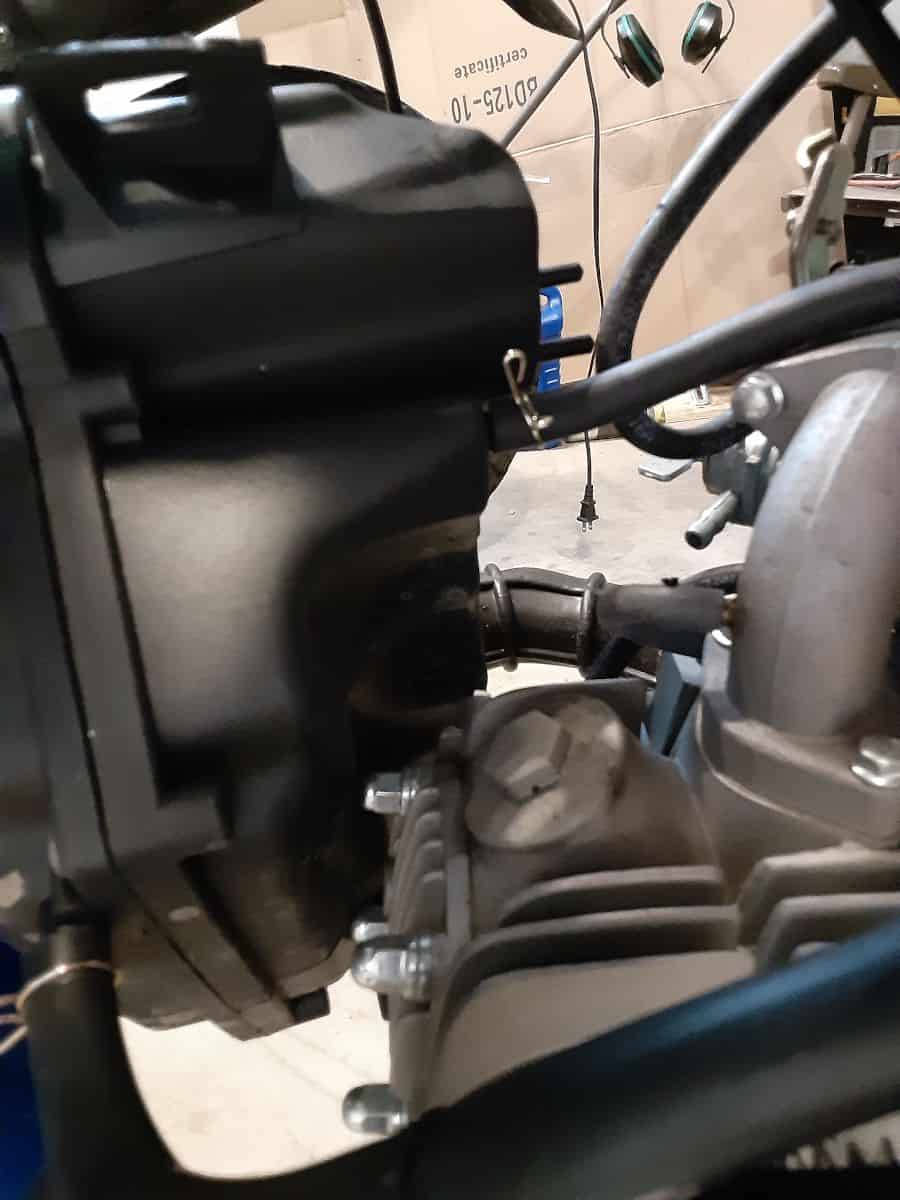
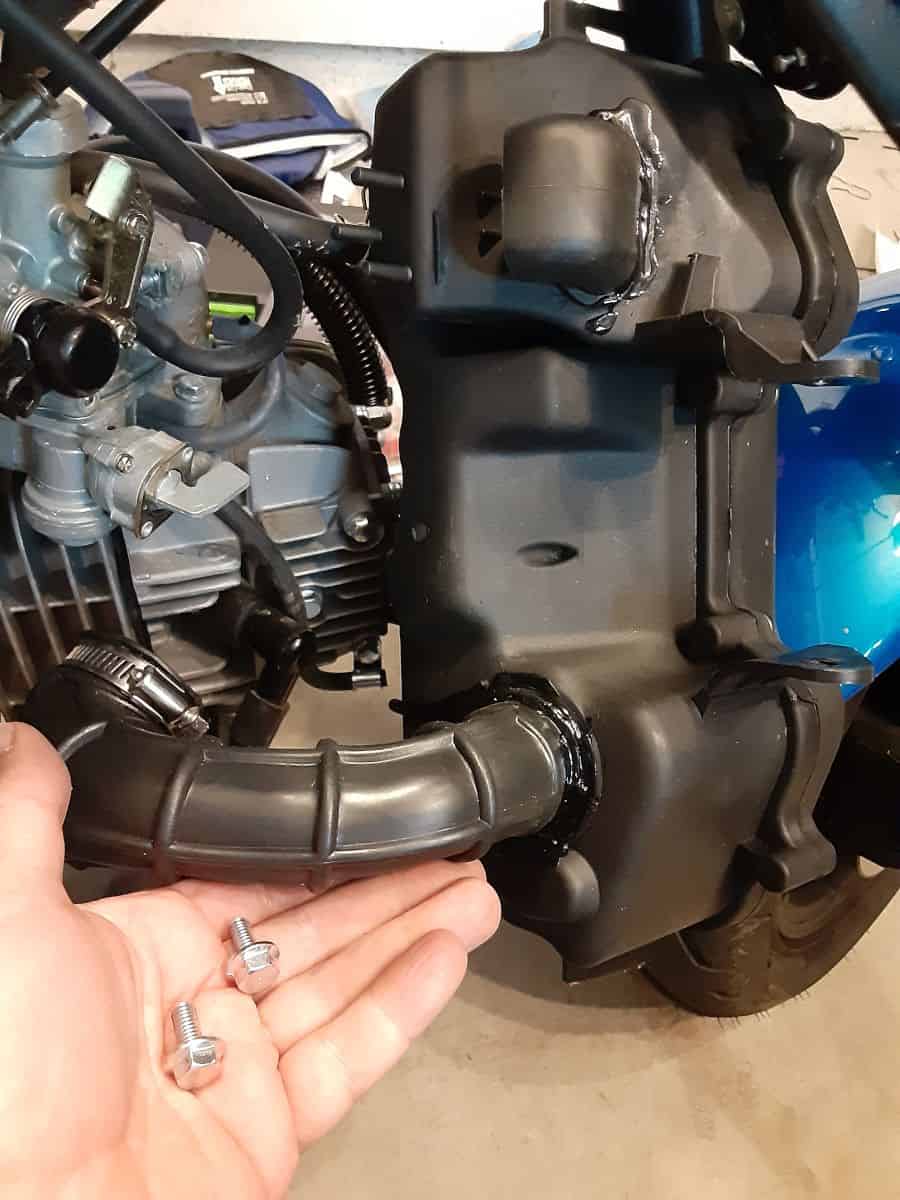
6.- Remove The Air Box.
Removing the airbox creates a lot of space for you to work with.
a. Unclamp and slide off the air intake tubing to the carburetor.
b. Disconnect all the hoses going to the air box.
c. Remove bolts and remove the air box. If any remaining tubes are attached, you can remove them as you slide out the air box.
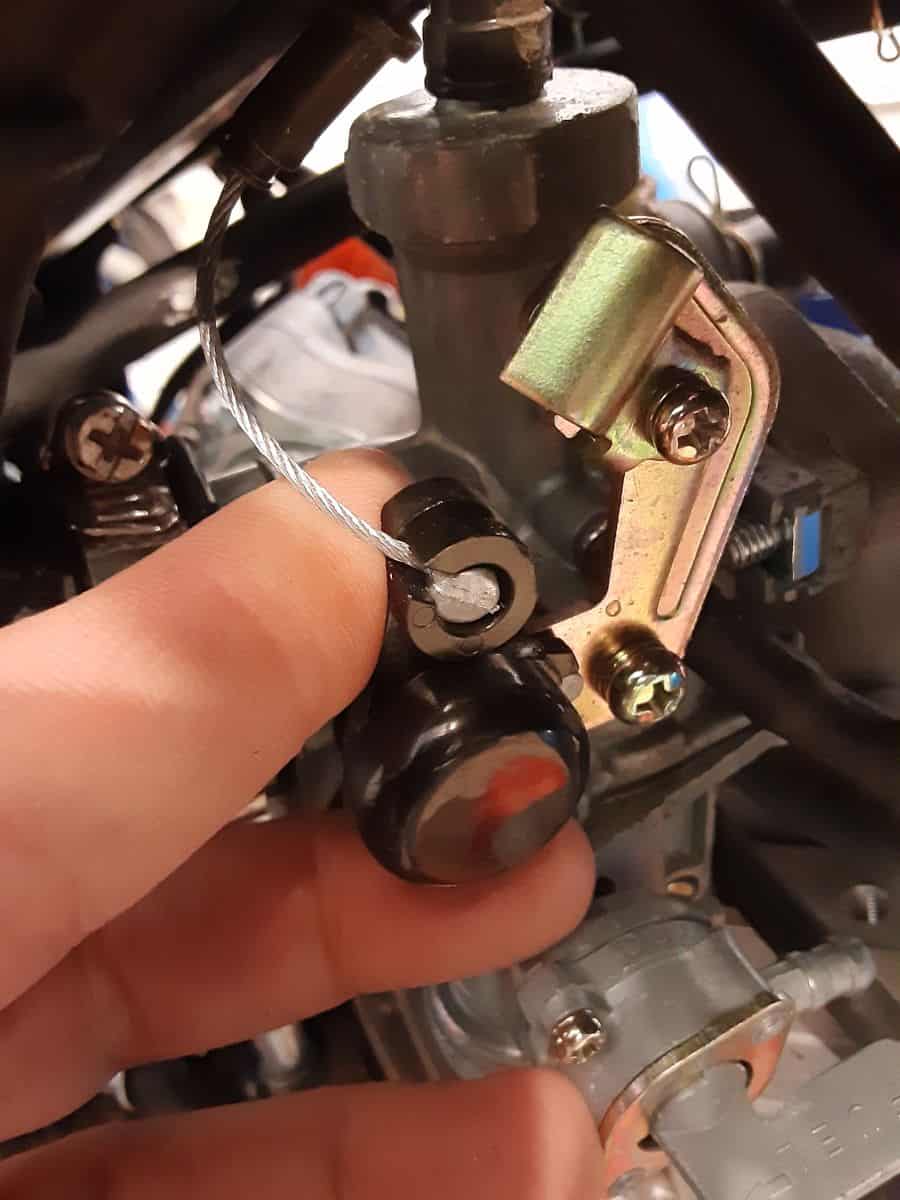
7.- Disconnect The Stock Carburetor’s Remote Choke Cable.
a. Loosen the choke cable jacket holder—simple Phillips head screwdriver.
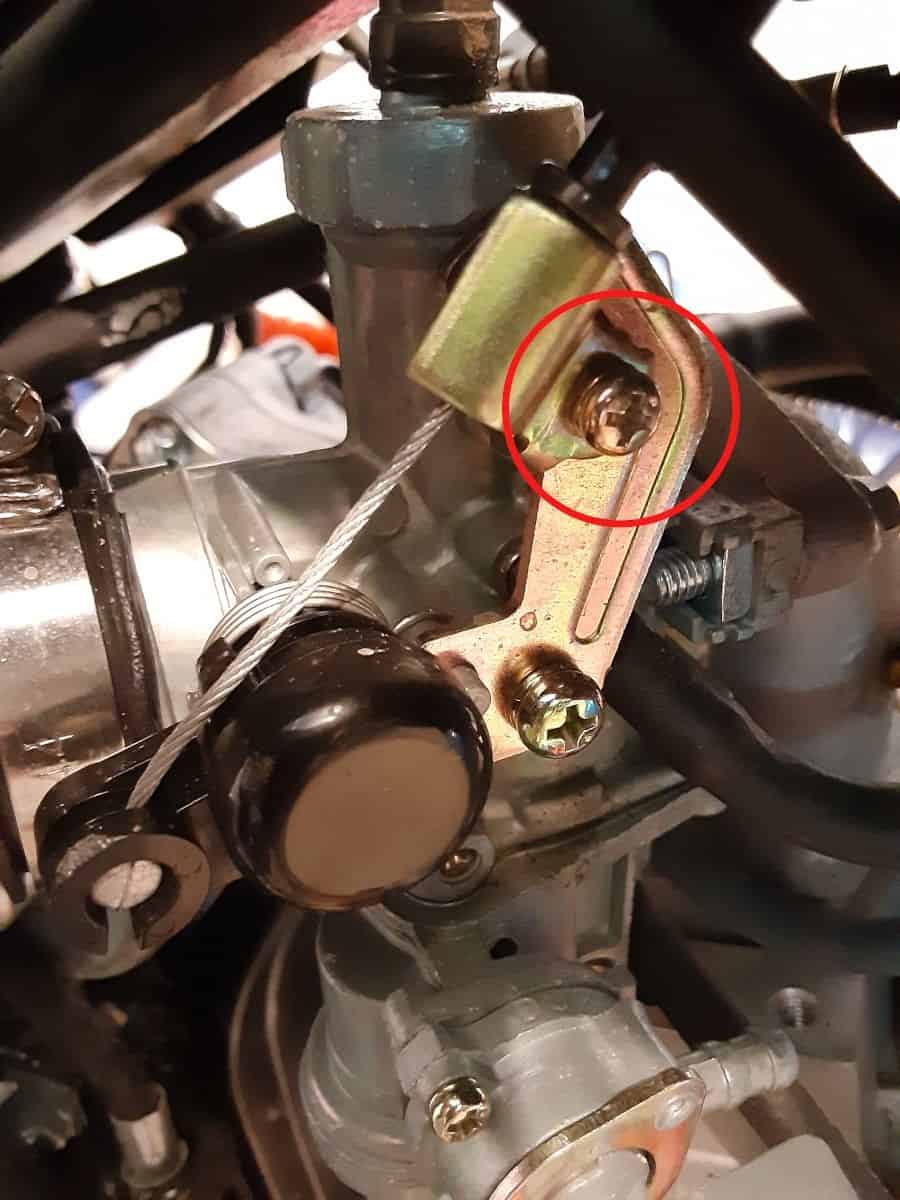
b. After the choke cable is free from the jacket holder, you can take the cable and rotate it such that the nub at the end will be free. I removed the choke cable end and put the cable to the side. Keeping it free from the work area.
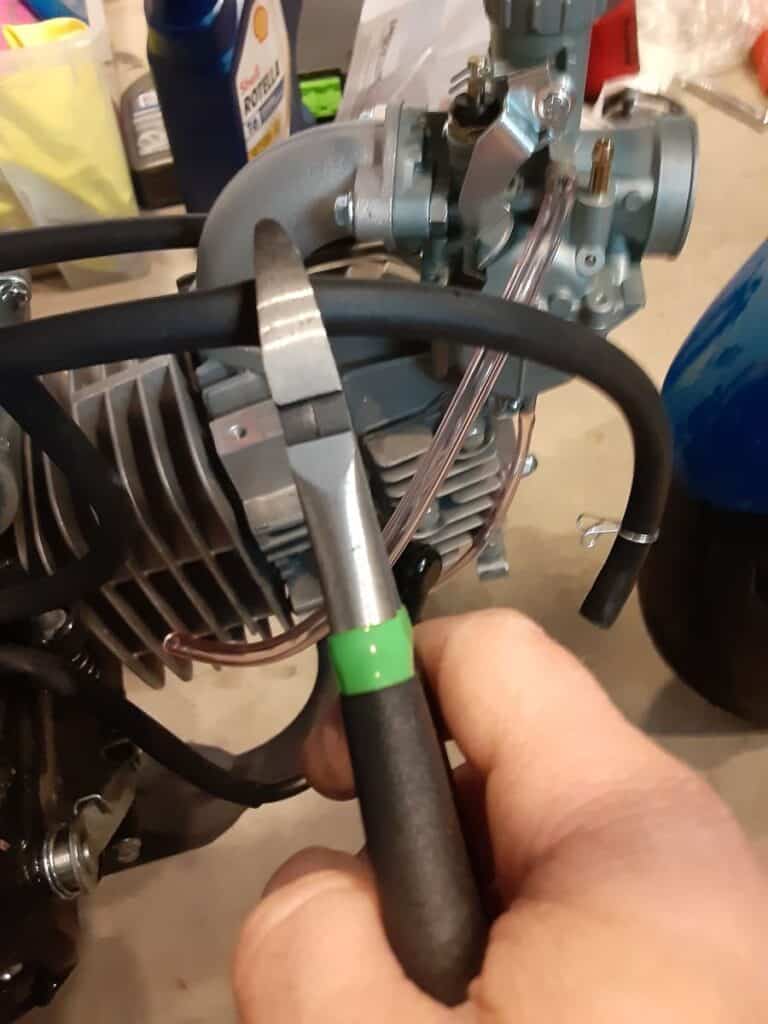
8.- Disconnect The Fuel Line And Any Remaining Tubes.
Safety Note: This should be an easy operation if you drain the gas tank. If you didn’t, I suggest you do so now. Drain the gas into a safe container.
Catch any drops of gasoline that might still be in the fuel line. This step might be a good time to change the fuel filter.
If a couple of tubes are still connected to the carburetor(after removing the fuel line).

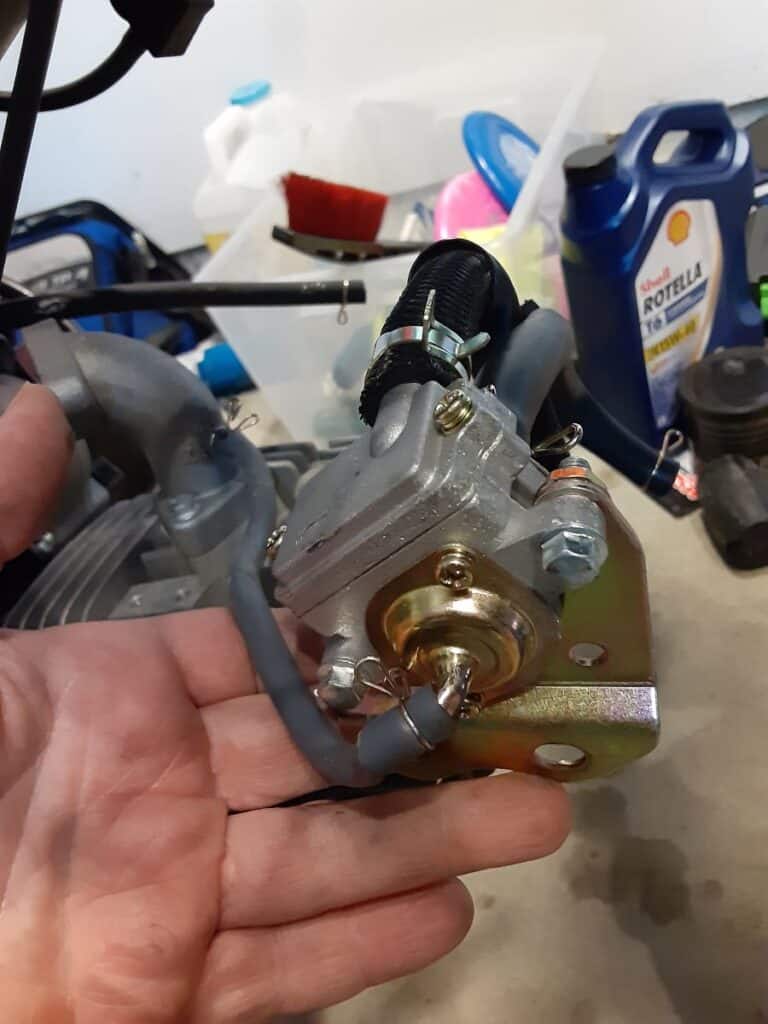
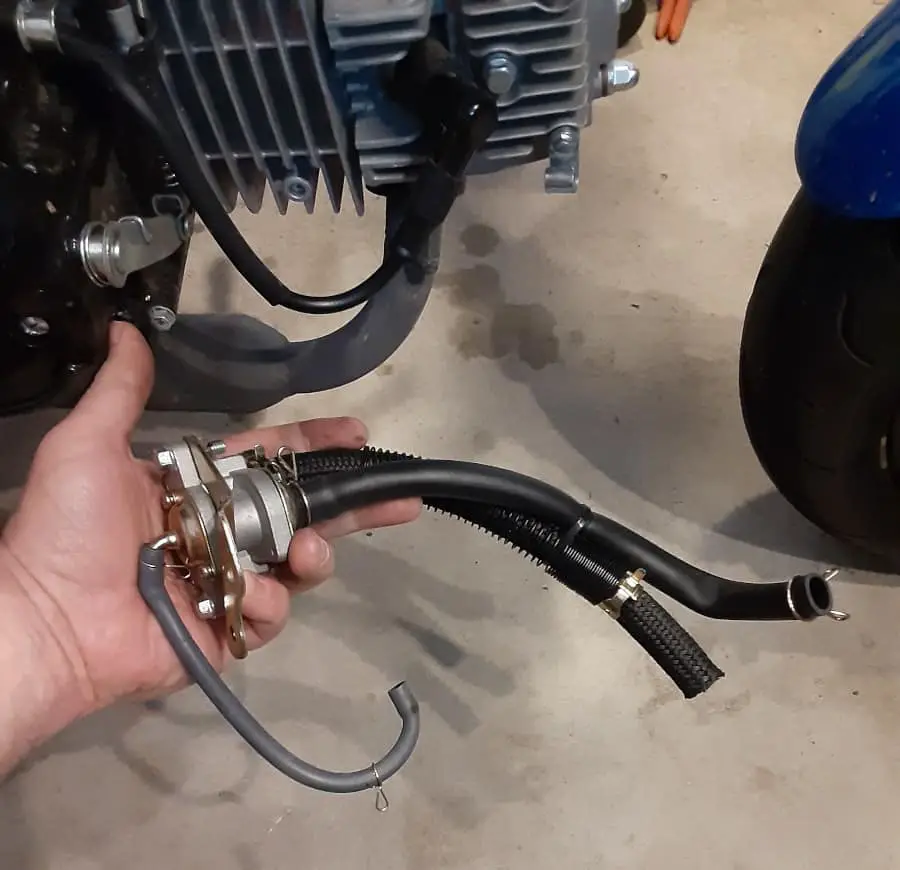
9.- Remove Stock Carburetor From Engine Intake Manifold.
Now when you do this, you are not only removing the carburetor but part of the exhaust gas recirculation system(???). Once the old carburetor is loose, move the carburetor away, creating more space to address leftover components and tubing.
10.- Unscrew Throttle Slide Cap, And Remove/Disassemble Throttle Slide.
Now with the stock carburetor removed, all tubing and throttle slide removed, the old carb can be placed off to the side, and it is no longer needed.
Once the throttle slide was removed from the old carburetor, I disassembled it to remove everything leaving only the throttle cable for the new carburetor installation. Leaving me just the throttle cable and jacket ready for the new carburetor’s throttle slide installation.
11.- Remove The Air Injection System.
The Air Injection System will not fit work with the new carburetor kit. No place for the tubes to go, so I removed them. The air injection system device should be unmounted once you remove the stock carburetor; the tubing going to the carburetor has been removed, and the tube going to the air box.
Using pliers, compress the clamp and remove it from the tube on the left side of the engine. Remember, the tube on the side of the engine is now open, and these ports exhaust gas out. I will address this later.
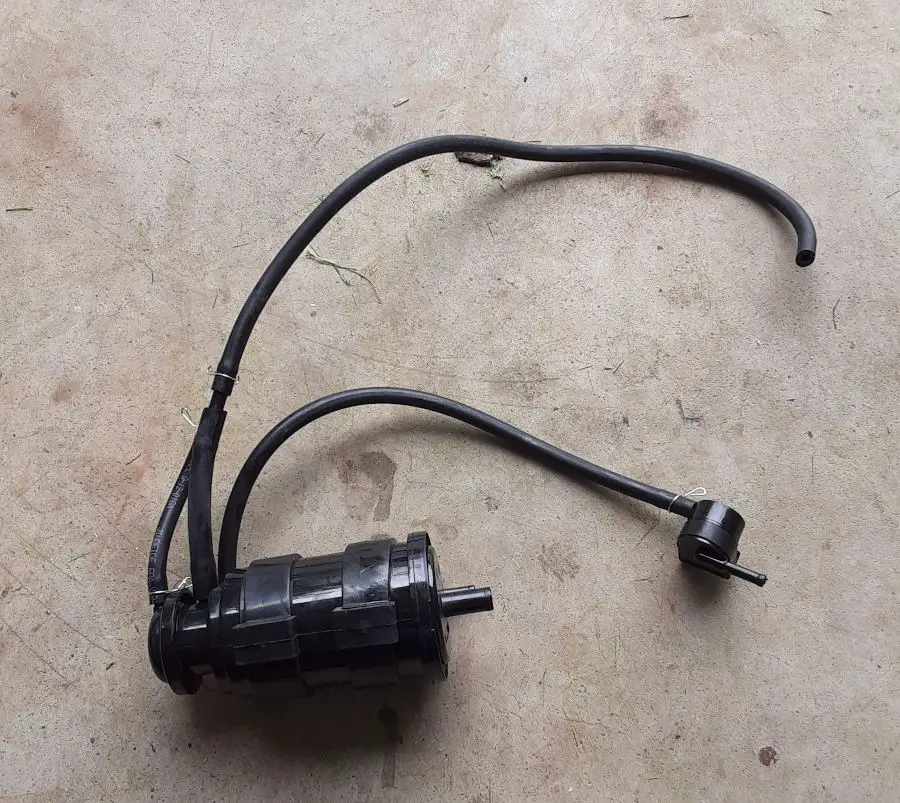
12.- Remove Charcoal Canister And Tubing.
Now the charcoal canister is a round black plastic cylinder with multiple tubes coming off of it. One tube goes to the engine intake manifold, and the other goes to the motorcycle gas tank vent line.
This setup causes what others call ‘vapor locking’ in the Boom Vader, like other Grom Clone Motorcycles, so I removed the canister and let the tube vent into the gas tank.
Another step at the end will help prevent the gas tank from venting fumes; stay tuned.
a. Pulled gas tank vent line from the black button.
b. Cut wire tie holding the charcoal canister in place.
c. Removed the whole charcoal canister from the frame.
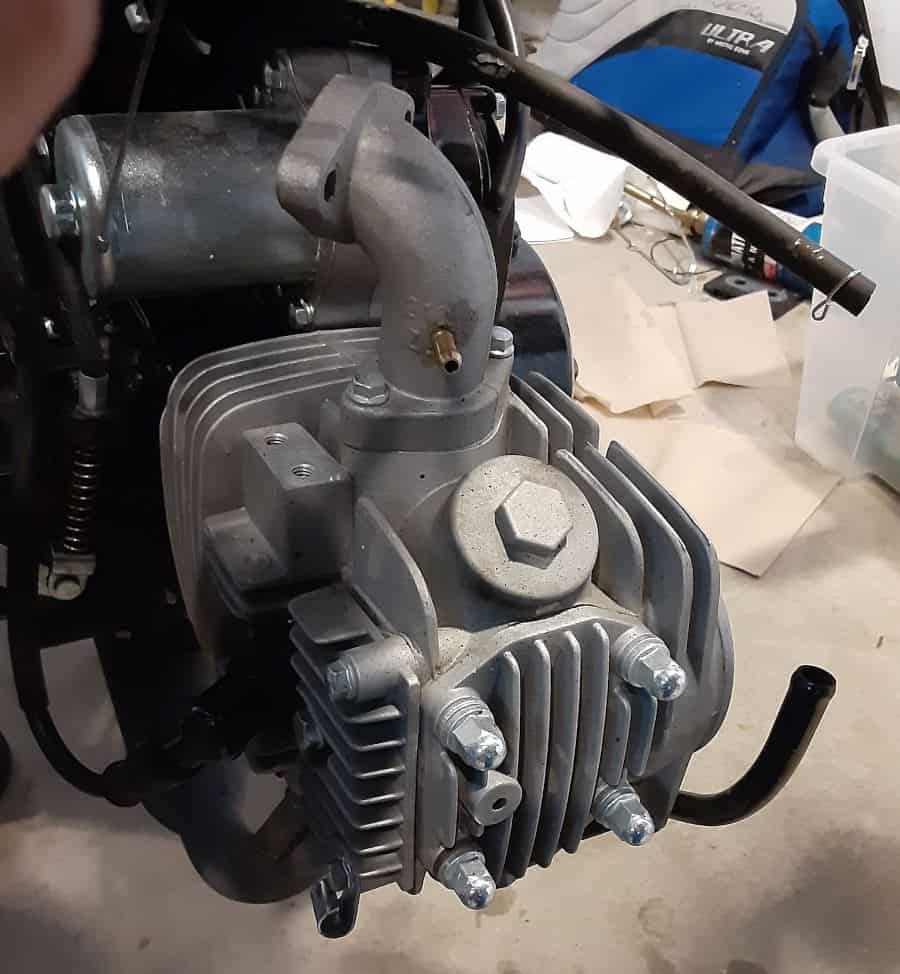
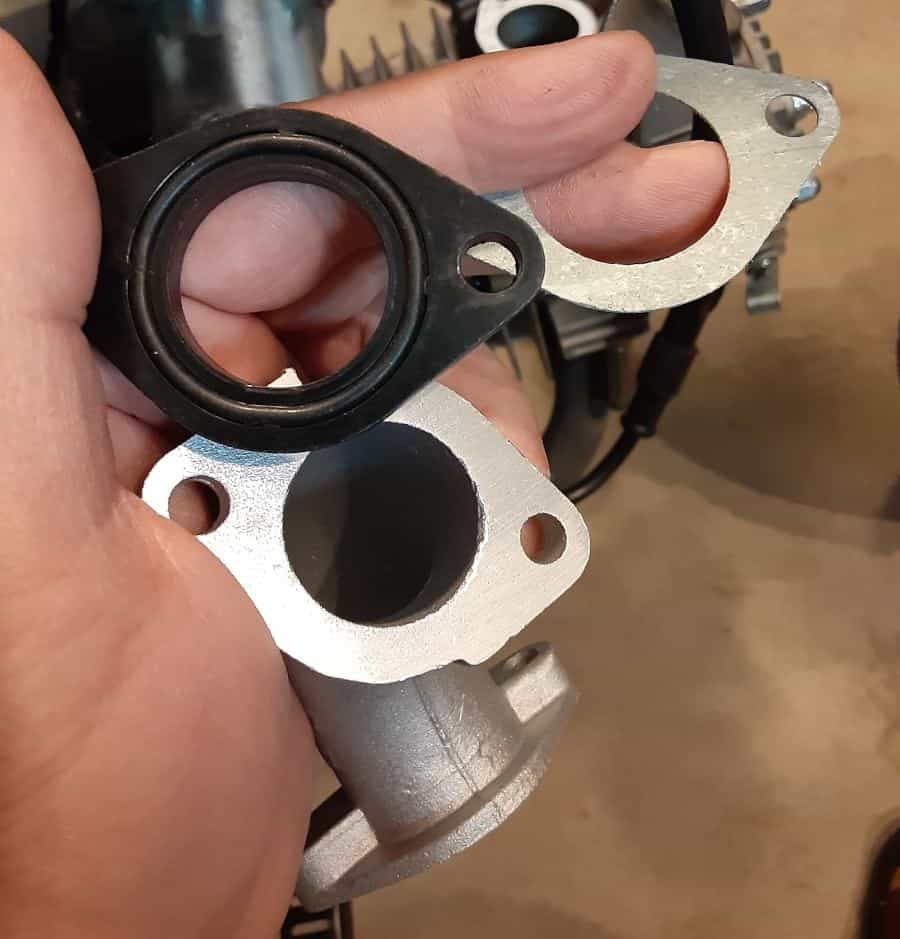
13.- Remove Old-Engine Intake Manifold.
The stock intake manifold has a smaller inside diameter than the new engine manifold included with the kit: more air, more fuel, and hopefully, more power.
a. Removed the engine manifold mounting bolts.
b. Remove the manifold.
c. Ensure the gasket has been removed; if not, I used a straight razor to clean off the surface. Ensure nothing falls into the engine intake.
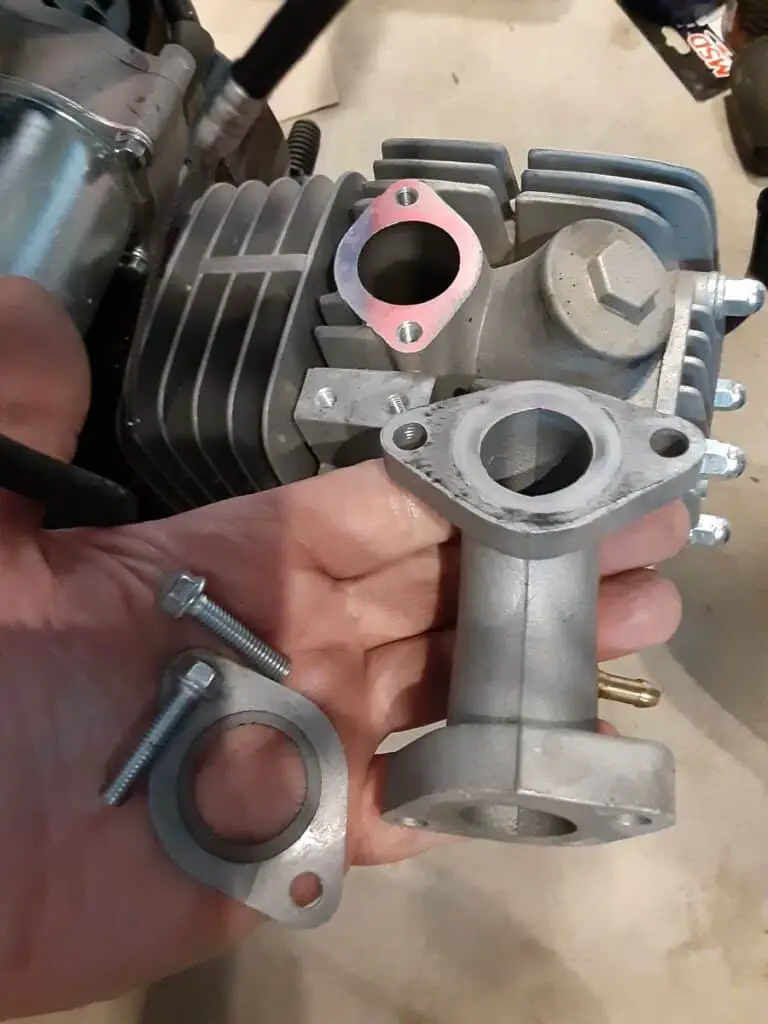
14.- Install New Engine Intake Manifold.
Now a couple of important observations for the new carburetor and engine intake manifold. The stock carburetor faced backwards, and the air intake tube from the air box did a 180 into the stock carburetor’s intake.
The new upgraded carburetor isn’t connected to the original air box, so it’s not limited to facing backward, so the carb upgrade kit has an intake manifold that positions the new carburetor forward. Keep this in mind. The new installation will look ‘backward’ to the stock installation.
Also, the included gasket(between the engine intake port and new intake manifold) was not completely sized right.

I lined up the new gasket and found the hole in the gasket was smaller than the diameter of the new intake manifold. To correct this, I dropped in the bolts to hold the new gasket in alignment and trimmed the inside of the gasket with a razor.
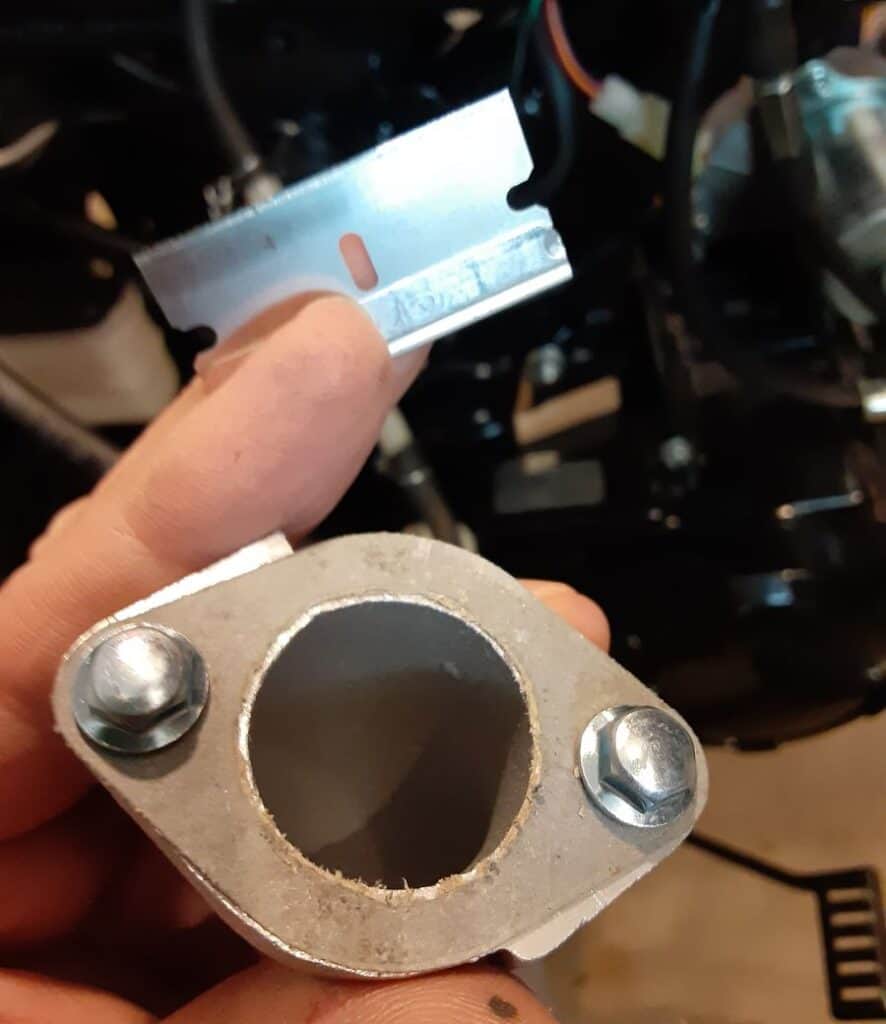
Be sure to clean up any loose material. No need to let gasket material enter the engine intake.
Now the inner gasket diameter matches the new engine intake manifold diameter. No flow restrictions.
a. Line up the new engine intake gasket.
b. Line up and position the new engine intake manifold with my kit if it faces forward, and hold it in place with bolts.
c. (Optional) I use anti-seize on my bolt threads. So I pulled the bolts and lightly coated the end threads of the bolts.
d. Finger tighten the bolts.
e. Tighten the bolts. I didn’t have a torque spec, so make it ‘tight’ without white-knuckling it. If I get an actual spec, I will update it here. But for now, I just cranked down on the bolts till they were tight with a wrench.
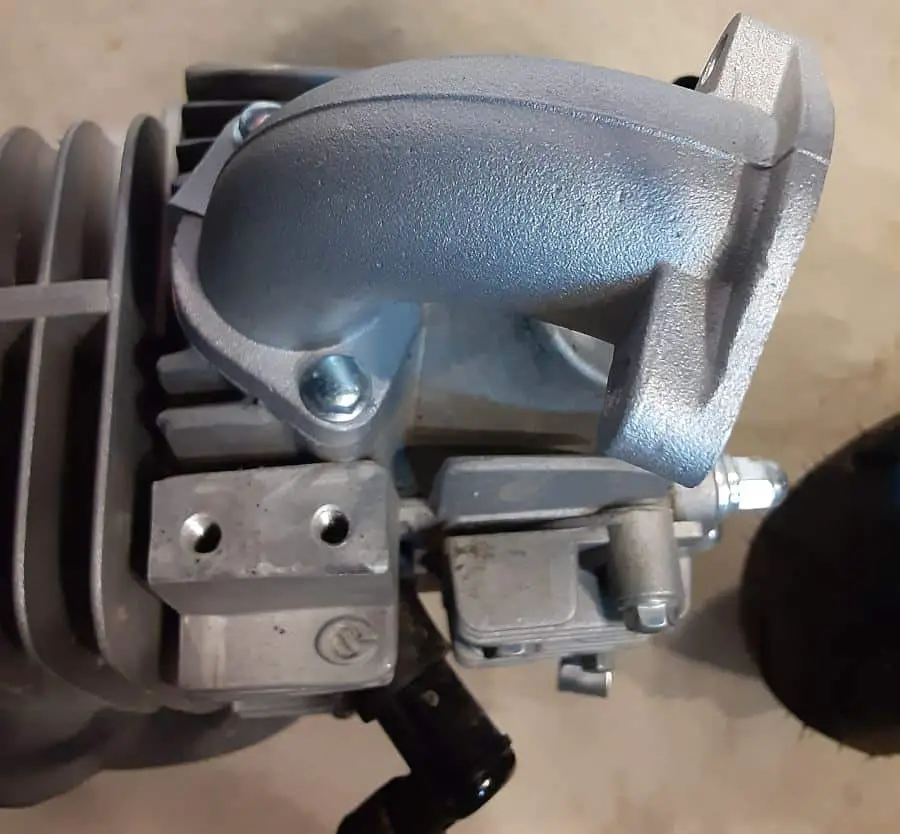
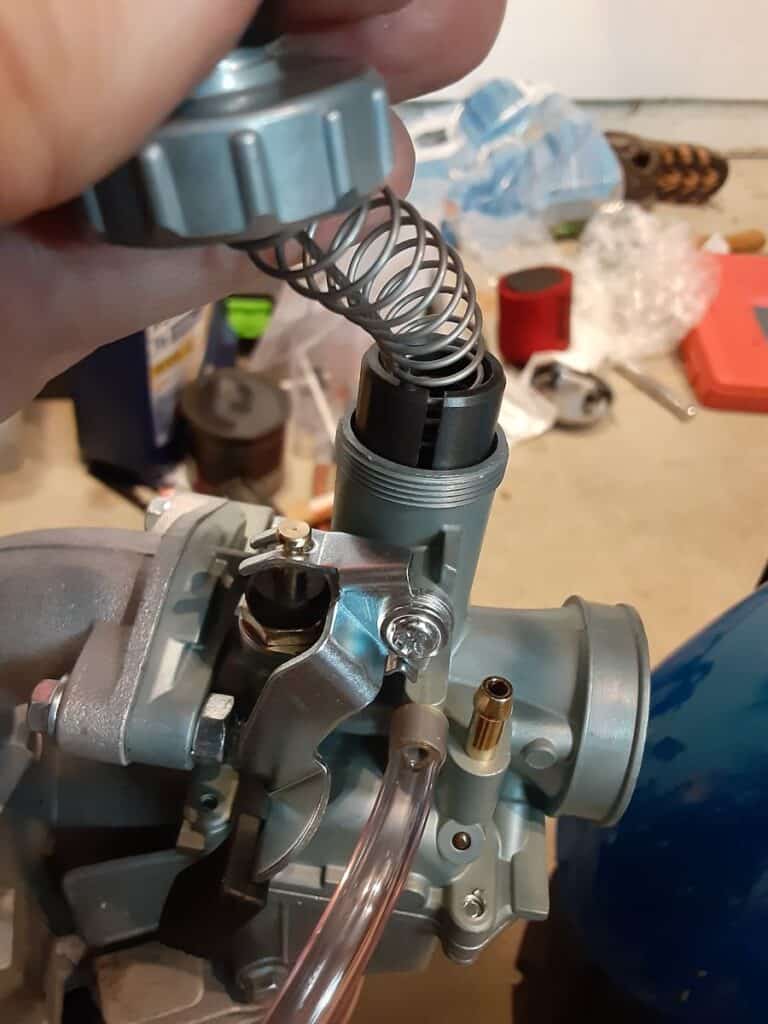
15.- Mount New Carburetor.
Note: I will be setting up the new carburetor’s throttle slide later.
Now the then Boom Vader Update Carburetor Kit came with a spacer. A small black plastic piece appears to fit between the intake manifold and the carburetor(being plastic, it clearly couldn’t go on the other end of the new manifold.)
I check carburetor installation placement with the spacer on and off. I found it with the spacer, and the carburetor was too forward to use the spacer.
The air filter comes in contact with the right fork turning the handlebars to the right. So omitted the use of this plastic spacer.
Besides, fewer connections mean fewer connections to fail. Less chance of air intake leakage.
Addendum: Install this non-metallic spacer between the engine intake pip and the carburetor. Or, you might actually have a motorcycle vapor lock condition develop later. Ensure the o-rings are seated in the rearward direction, sealing against air leakage.
Adjust the fuel/air mixture screw: I closed it all the way, very lightly, and opened the mixture screw to 1 and a half turns open. This 1.5 turns open is a good starting point I found. If there are idle problems later, I can adjust this screw open and close as needed.
a. Inspect the engine intake side of the carburetor. Ensure the o-ring is present.
b. Position the new carburetor to the intake manifold using the bolts as guides.
c. (Optional) some people recommend using anti-seize on the treads of the bolts. I do not recall doing so. These bolts shouldn’t have too many heating/cooling cycles to mess with them, but they are exposed to the elements, so treating the threads might be a good idea.
d. Finger tighten the nuts/bolts.
e. Tighten the nuts/bolts. I didn’t have a torque spec, so make it ‘tight’ without white-knuckling it. If I get an actual spec, I will update it here. But for now, I just cranked down on the nuts till they were tight with a wrench.
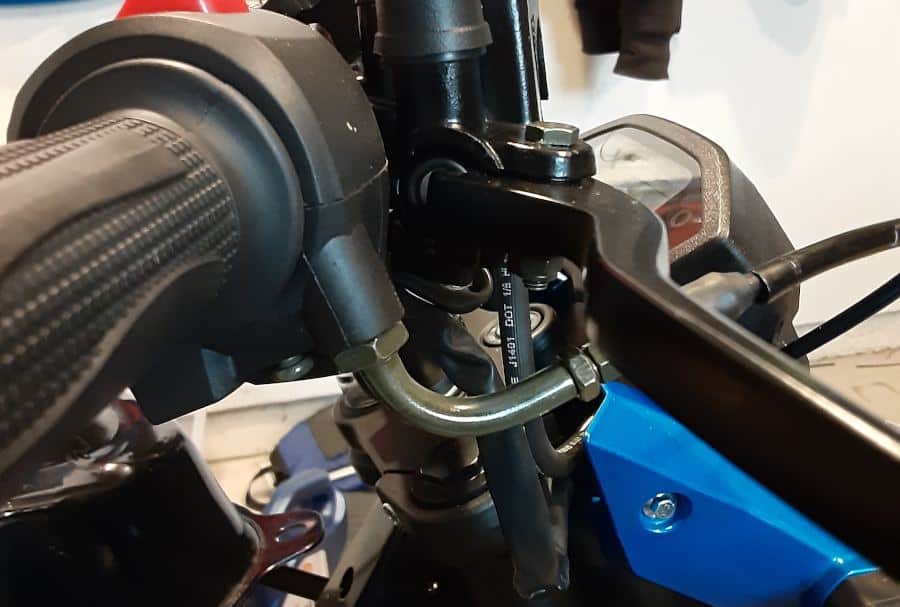
16.- Install New Fuel Cutoff Valve.
This step is much easier with the Boom Vader gas tank drained; why it was safest to drain it before even starting the carburetor upgrade process.
a. Located an area where the fuel shut off would be accessible when the body panel is on.
b. Cut fuel line.
c. Slide on compression end rings on each cut end.
d. Insert valve inlet and out into cut ends.
e. Move the compression end ring over the tube/valve end area to seal against leaks.
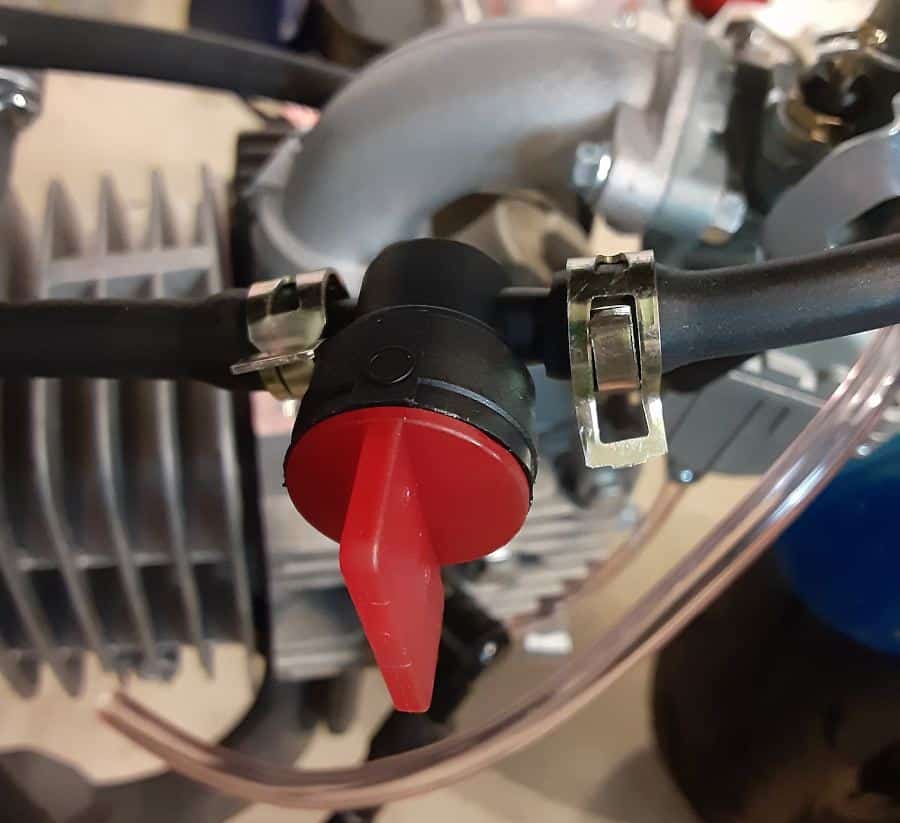
Note: the only way to test against gasoline leaks is to refill the motorcycle’s gas tank. I waited until the end to test all my connections as one. Just remember this adds to the number of gas line connections that might leak, and I recommend being prepared for this.
17.- Install Fuel Line.
Very few connections are friendly about the Mikuni vm22 carburetor and new intake. Air goes in, fuel goes in, and fuel/air comes out with a simple design. The previous stock carburetor was very busy with the built-in fuel shutoff valve and other tubes.
Now with this upgraded carburetor, you only have to connect the fuel line. Now if you connected the fuel line with previous step, just go through these steps to ensure it’s correctly installed.
a. Slip on the compression end ring over the end of the fuel line.
b. Slip the fuel line tube over the carburetor inlet.
c. Compress and slide the compression end ring down to seal against fuel leaks.
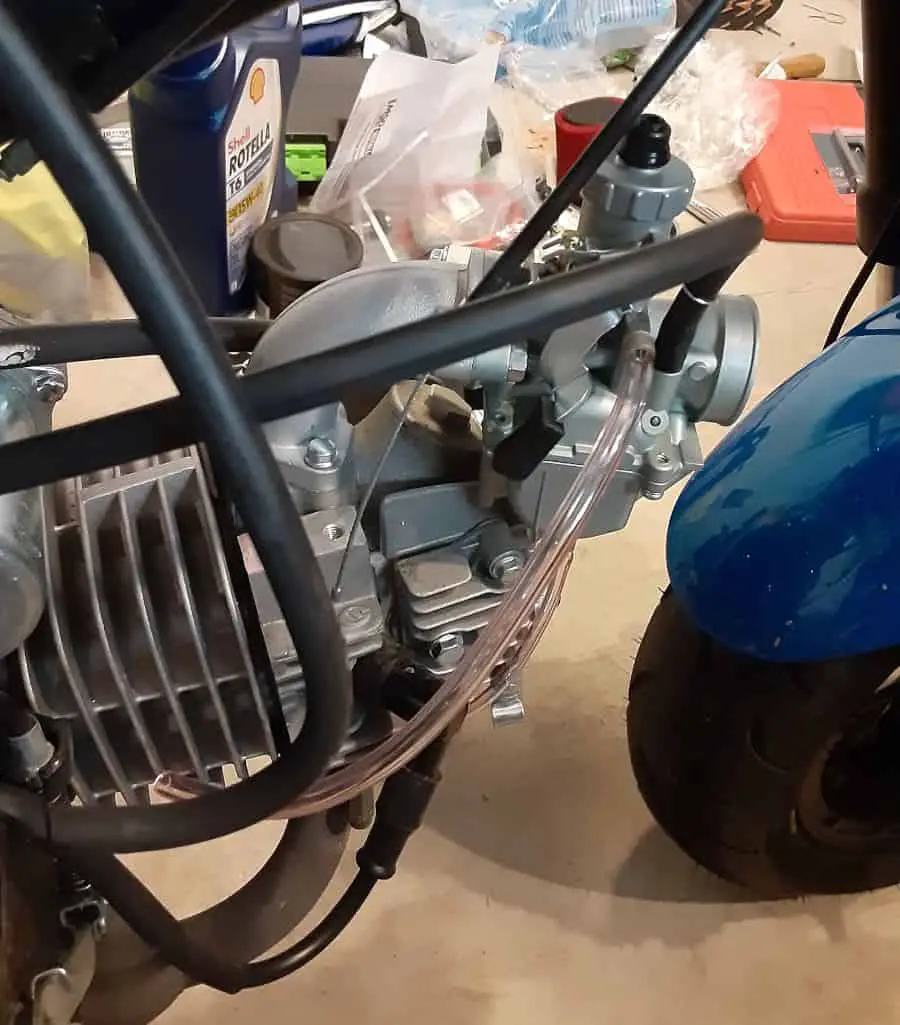
18.- Route Remaining Engine Tubes and Lines.
a. The Remote Choke Lever And Cable.
There is a remote choke setup on the left handlebar side for the stock carburetor’s choke. With that carburetor gone, I routed the free end of the cable along with the frame and wire-tied it out of the way. This way, it’s still there if I find a use for it later but out of the way from causing problems later.
b. Crank Case Vent.
The crankcase vent originally went to the air box. Now without an airbox, there needs to be a safe location for this tube.
Gases escape this crankcase vent tube, so there is little chance I found of anything thing being sucked in. However, You want the line high up so no debris or water enters the open end of the tube.
I routed mine high up, facing backward, and secured it with wire ties, ensuring there were no kinks or restrictions for crankcase gases to flow freely.
c. Gas Tank Vent.
Now the gas tank vent tube that went to the black button is disconnected, and some people just let it hang freely. I didn’t want to do this, don’t want gas fumes in my garage, and at the cost of gas, I wanted all the gas to stay in the tank.
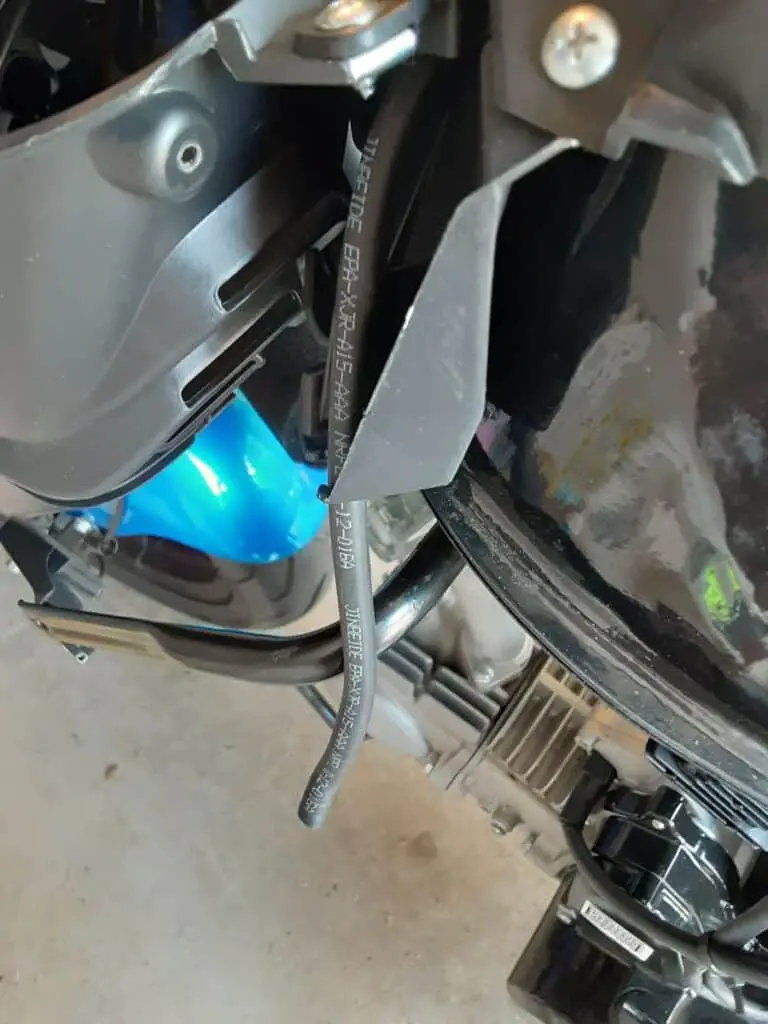
I purchased a motorcycle gas tank vacuum breaker breather vent cap. This cap allows gases to remain in the gas tank while allowing air in when needed. So the flow of gas isn’t interrupted like experienced by Grom Clone owners feeling the effects of “vapor lock”/”Vacuum Lock.” Read: Boom Vader Vapor Lock? No, But No Fuel? Yes!
a. Trim the gas tank vent tubing to length.
b. Attach vacuum breaker vent cap to end.
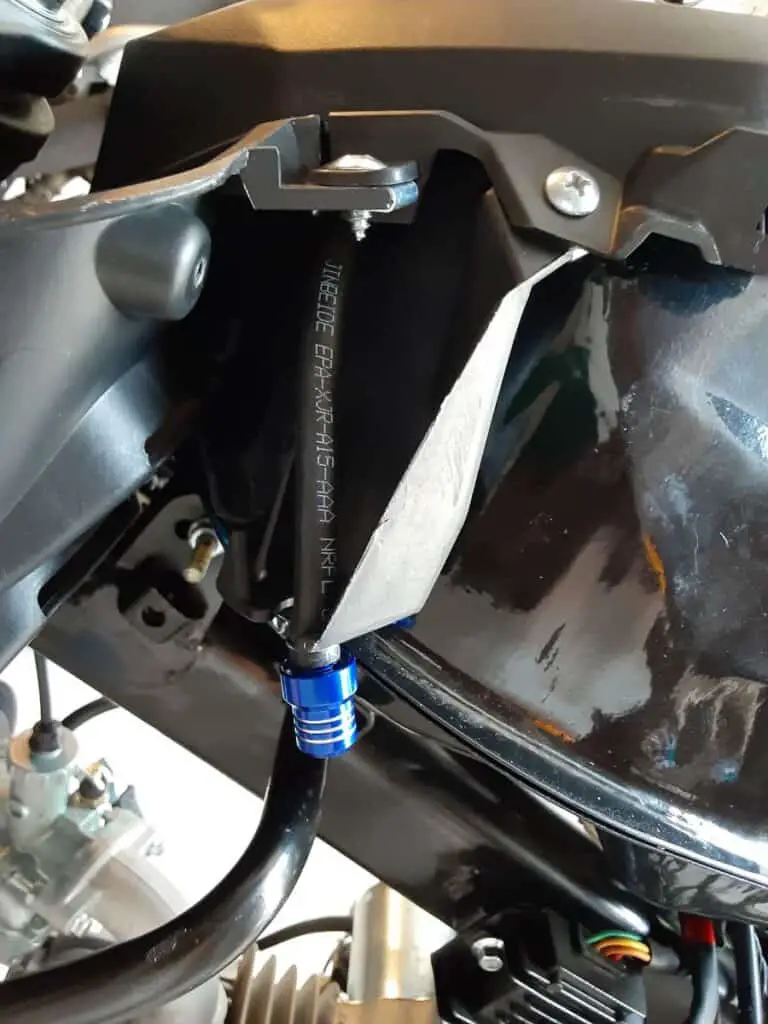
c. Ensure no part of the vent tubing is compressed or restricted by body panels.
Note: I show this done with the left side motorcycle body panel removed. You can find the vent tube underneath and attach the vacuum breaker breather cap to the end. And when you get around to removing the left side body panel, you can trim to length.
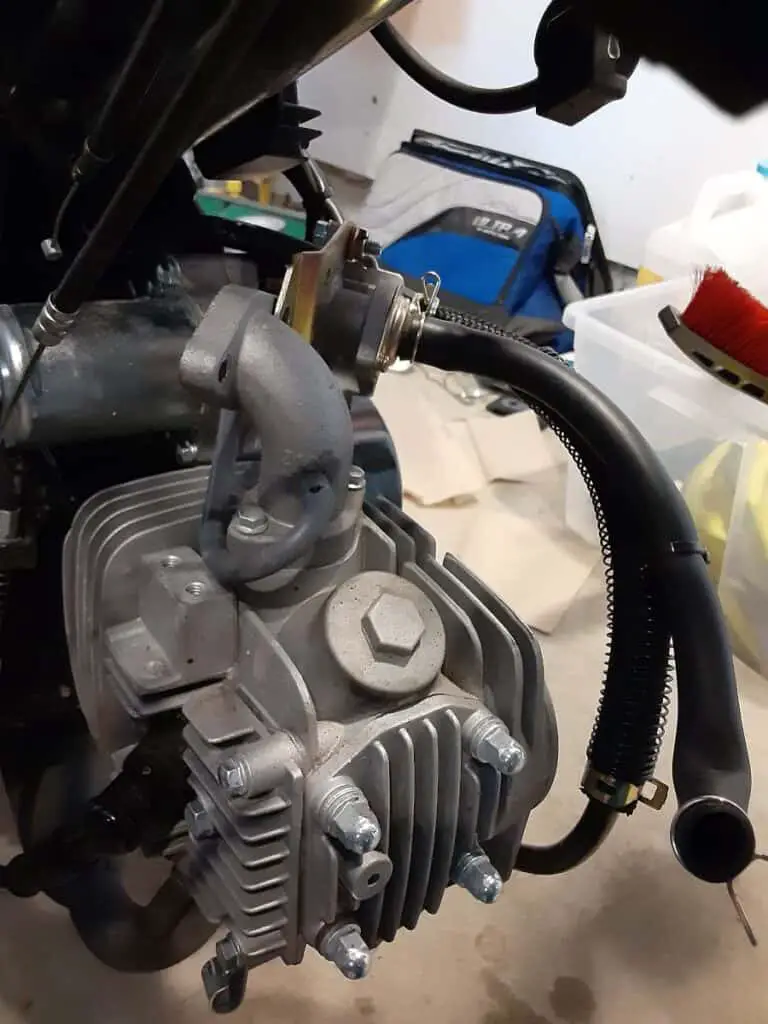
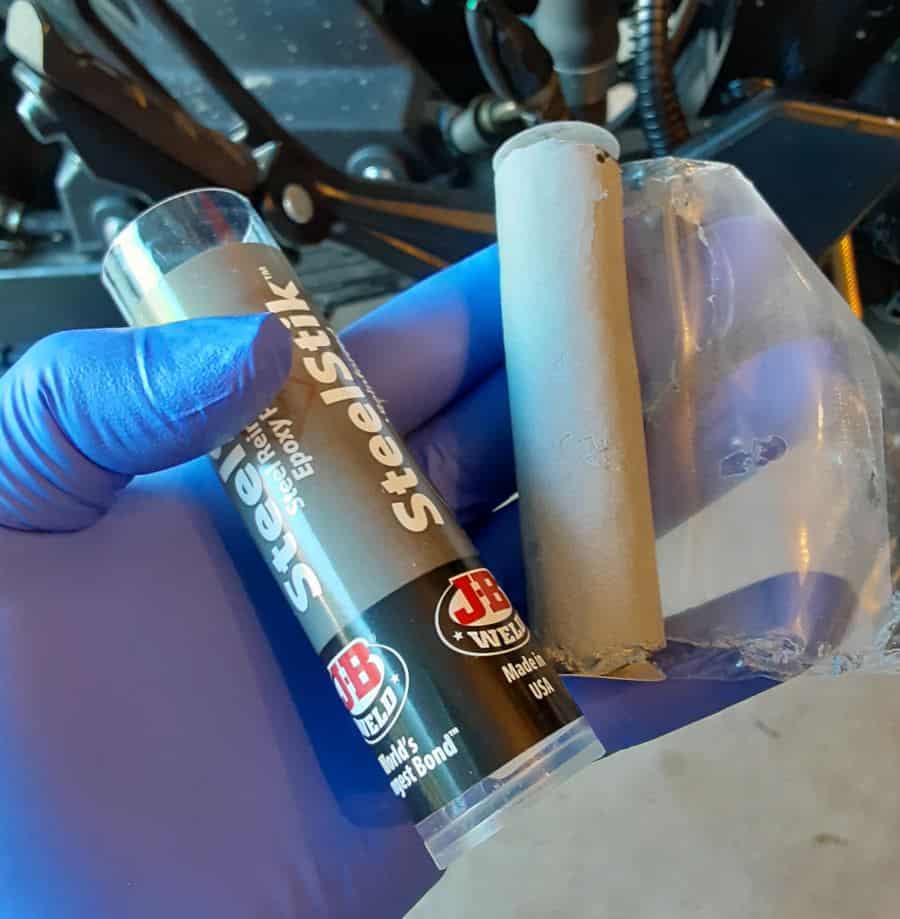
19.- Plug Engine Exhaust Port.
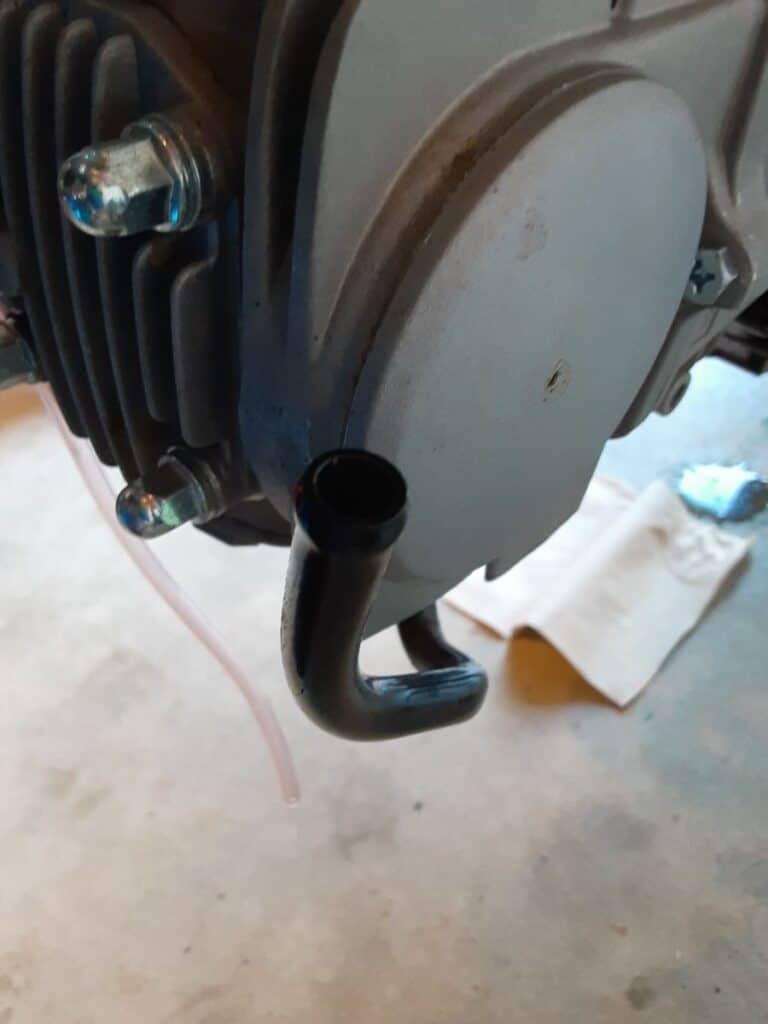
Some people buy end plates off eBay, crimp and bend the tubing, or even put a bolt into the end. I decided to use J-B Weld Putty.
Regardless of what you use, block this port. Exhaust gases will exit the port, and the motorcycle will be excessively loud. Also, the hot gases are escaping toward you.
What I did to the exhaust port:
a. Cut off a piece of J-B Weld SteelStik putty.
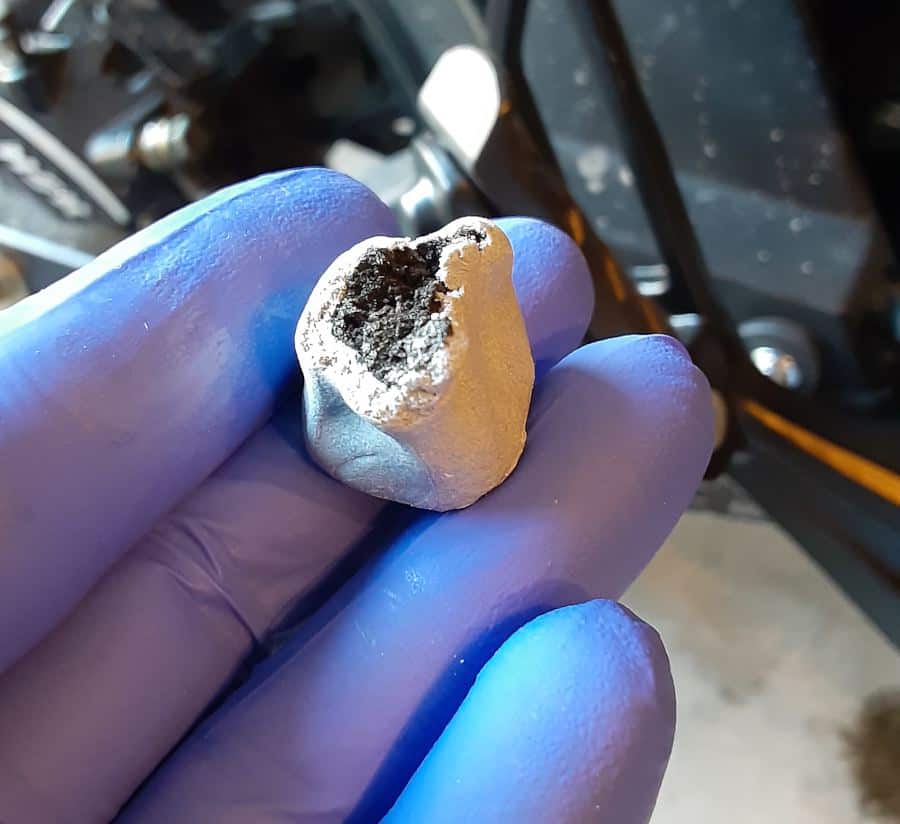
b. Kneaded it till even color.
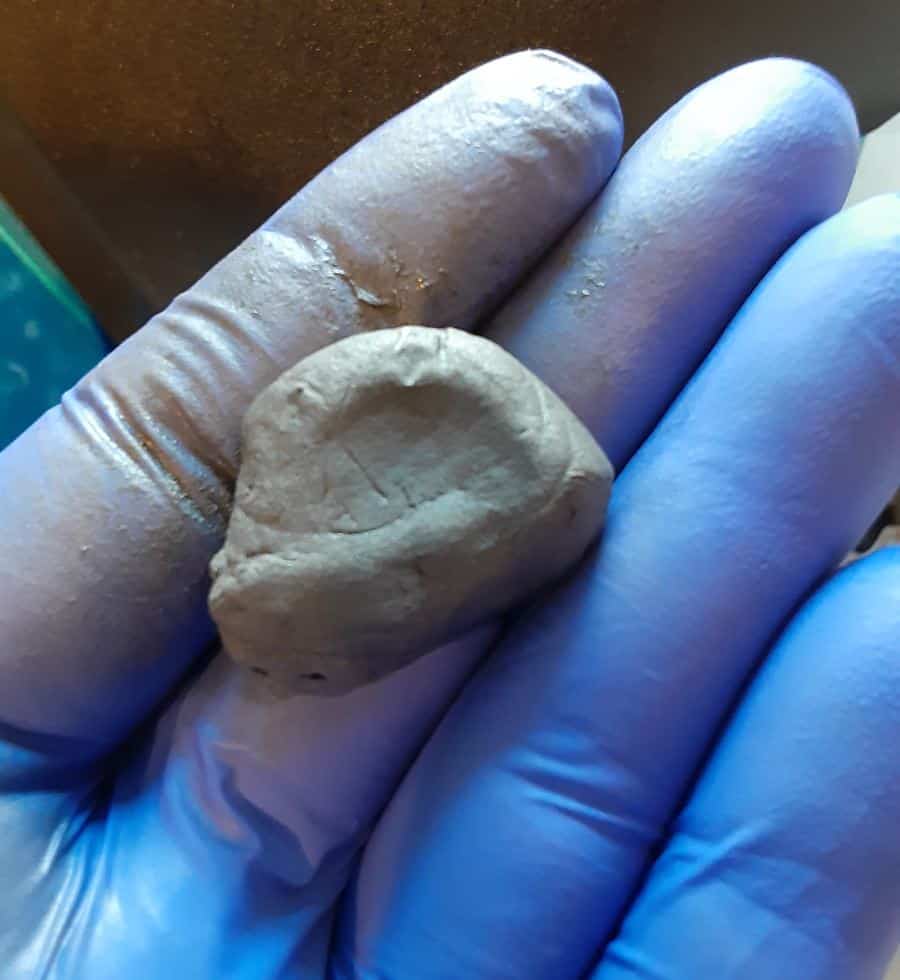
c. Forced putting into the vent opening till no more would go in.
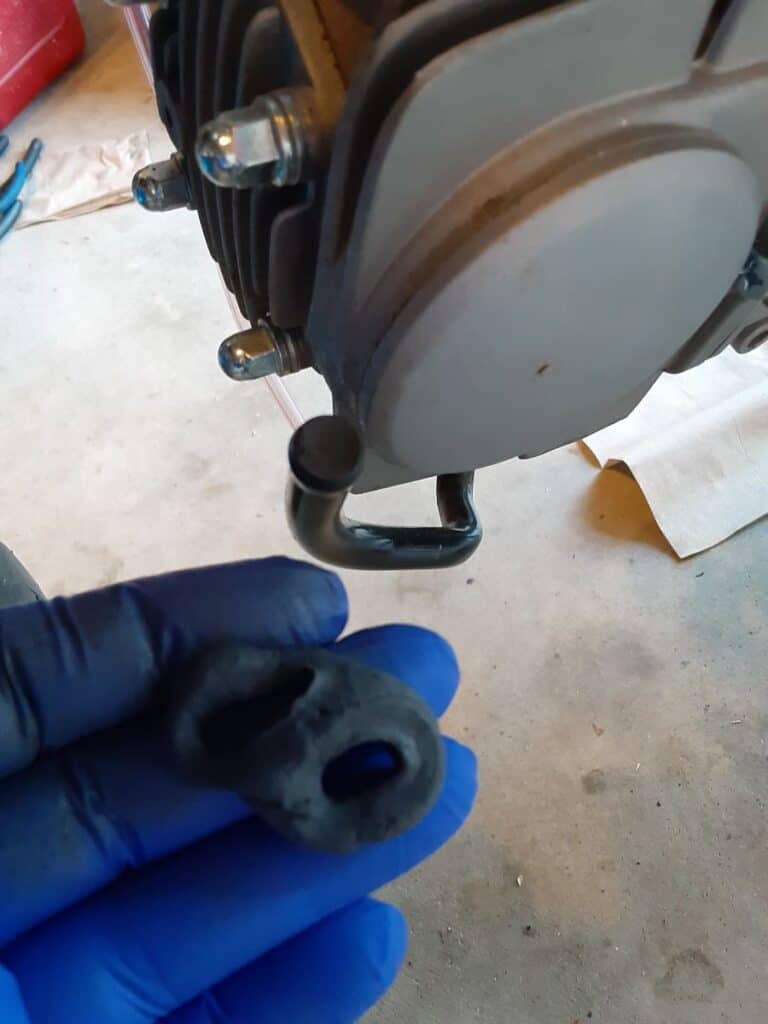
d. Allowed hardening.
Simply put, I followed J-B Weld’s directions, and so should you.
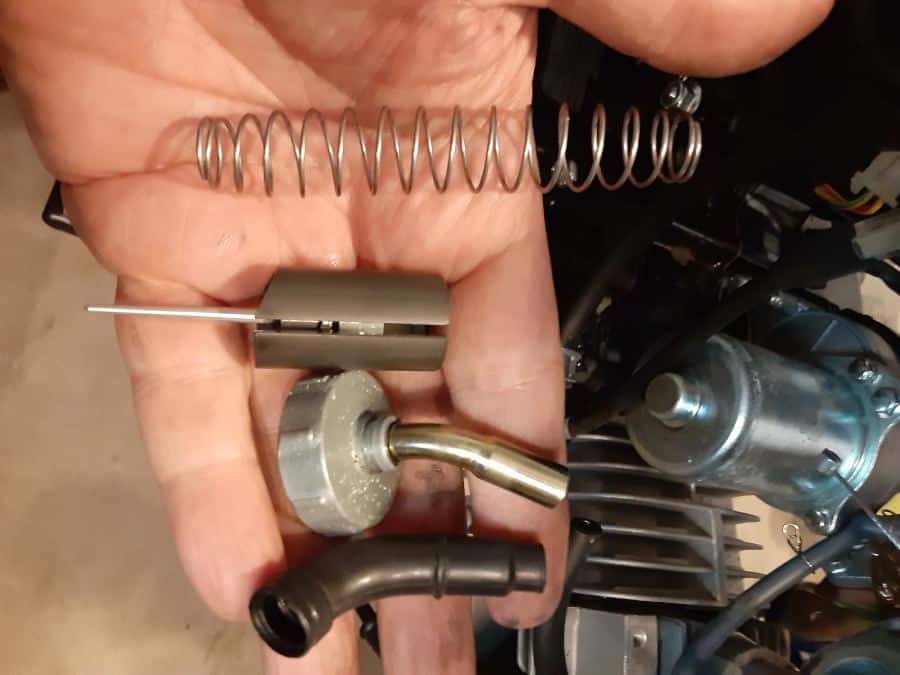
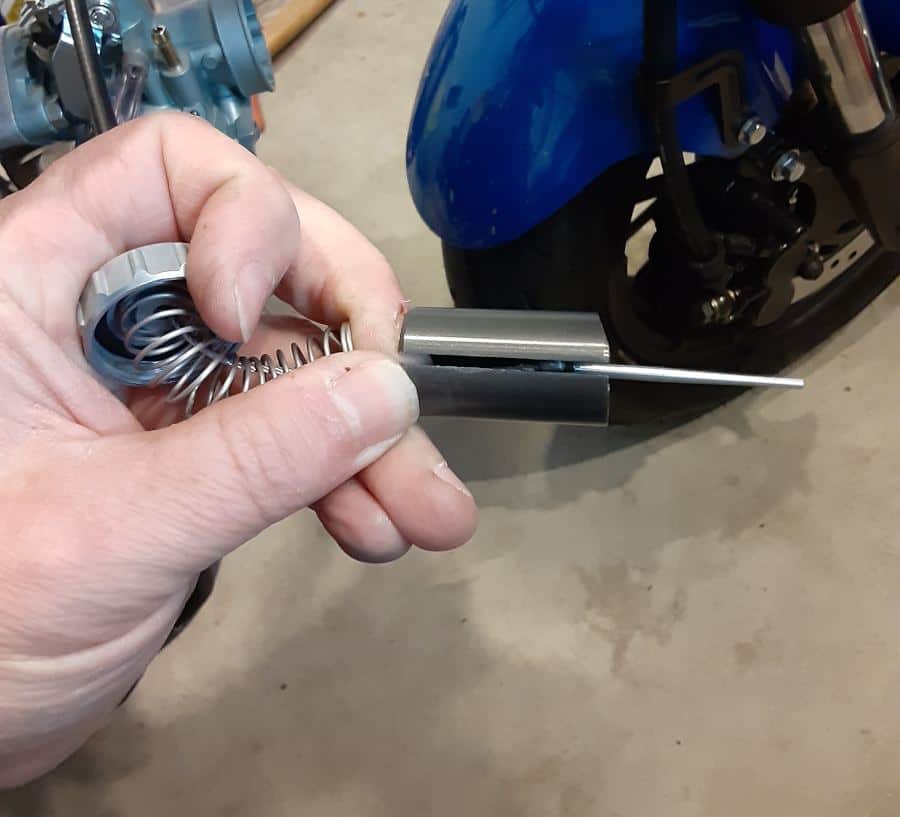
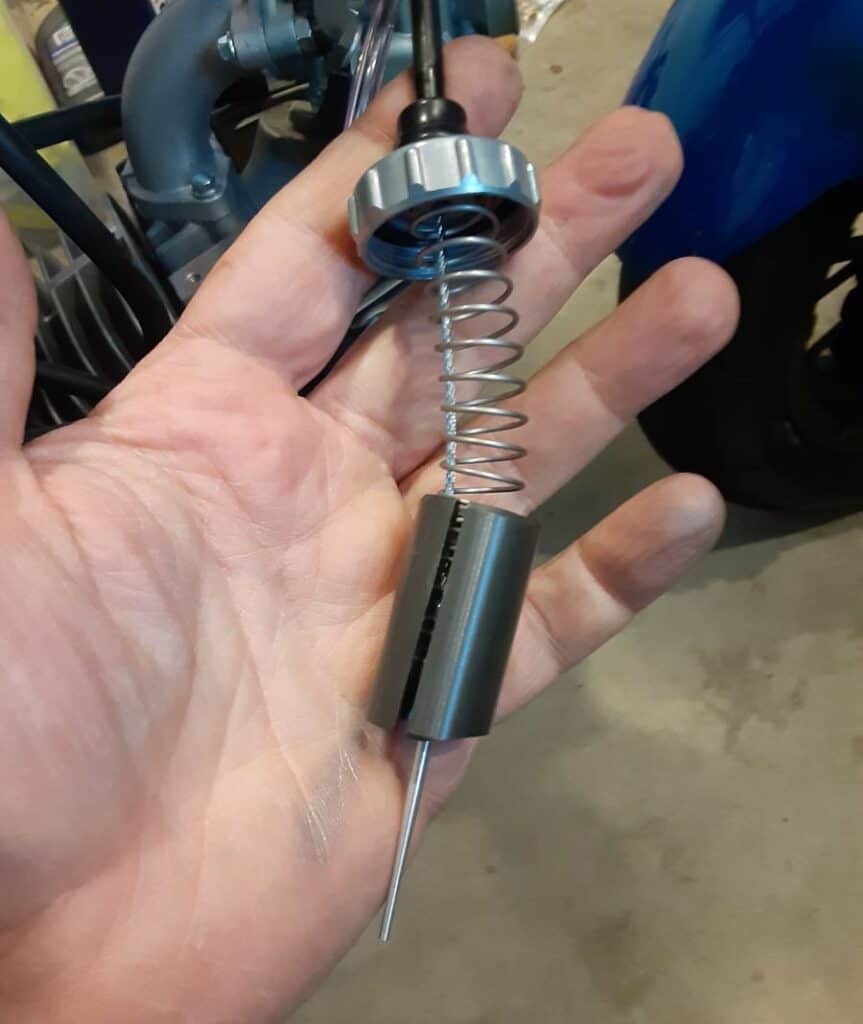
20.- Assemble The Throttle Slide And Connect The Throttle Cable.
From previous steps, you should have just the free end of the throttle cable, if not just go back and dissemble the stock throttle cable.
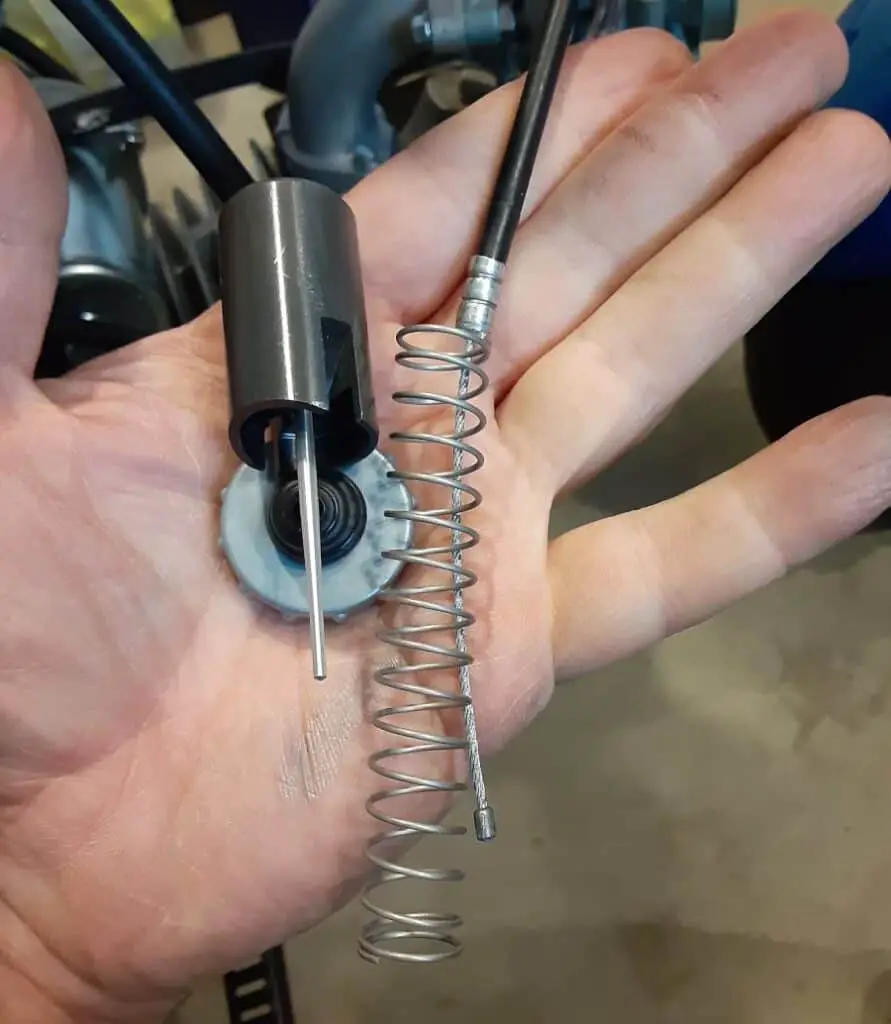
Assemble Throttle Slide.
1.- Slide dust cover over throttle cable jacket.
2.- Slide throttle cable through throttle slide cap.
3.- Slide and compress the throttle closing spring over the end of the throttle cable. The spring end should be inside the throttle slide cap, and enough of the spring should be compressed in your hand to expose the end of the throttle cable.
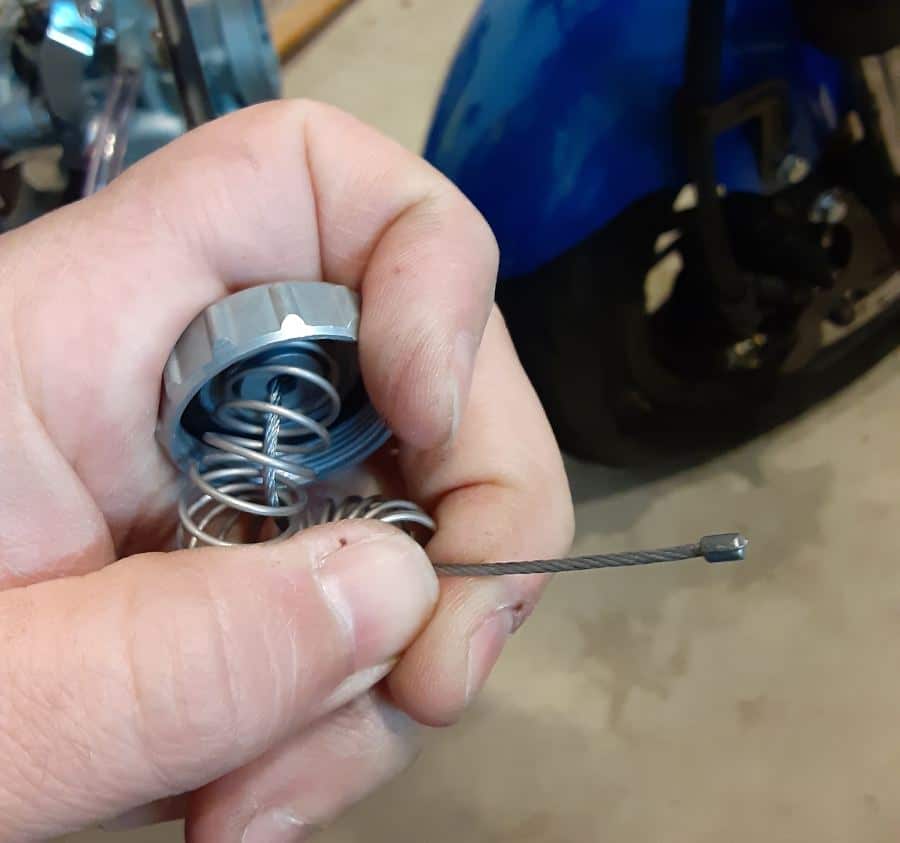
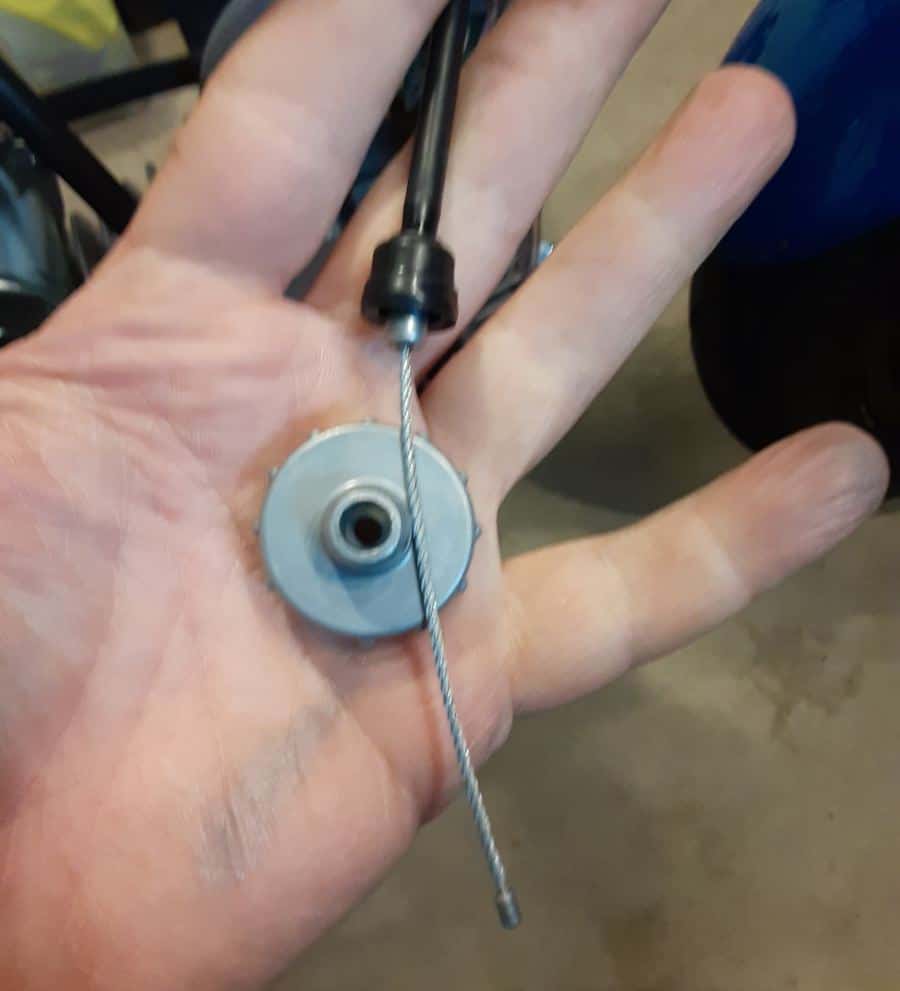
4.- Work throttle cable tip to the bottom of the slide, allowing the cable to move into the throttle slide groove up the body.
5.- Release, carefully, throttle closing spring, allowing end to enter throttle slide.
6.- Check the seating of throttle cable end, in recesses of throttle slide.
7.- Insert throttle slide into carburetor body. Groove on throttle slide(where throttle cable slid in) should be opposite of idle screw. The tiny notch at the bottom of the throttle slide makes contact with the idle speed screw; therefore, they both should be on both sides of the throttle.
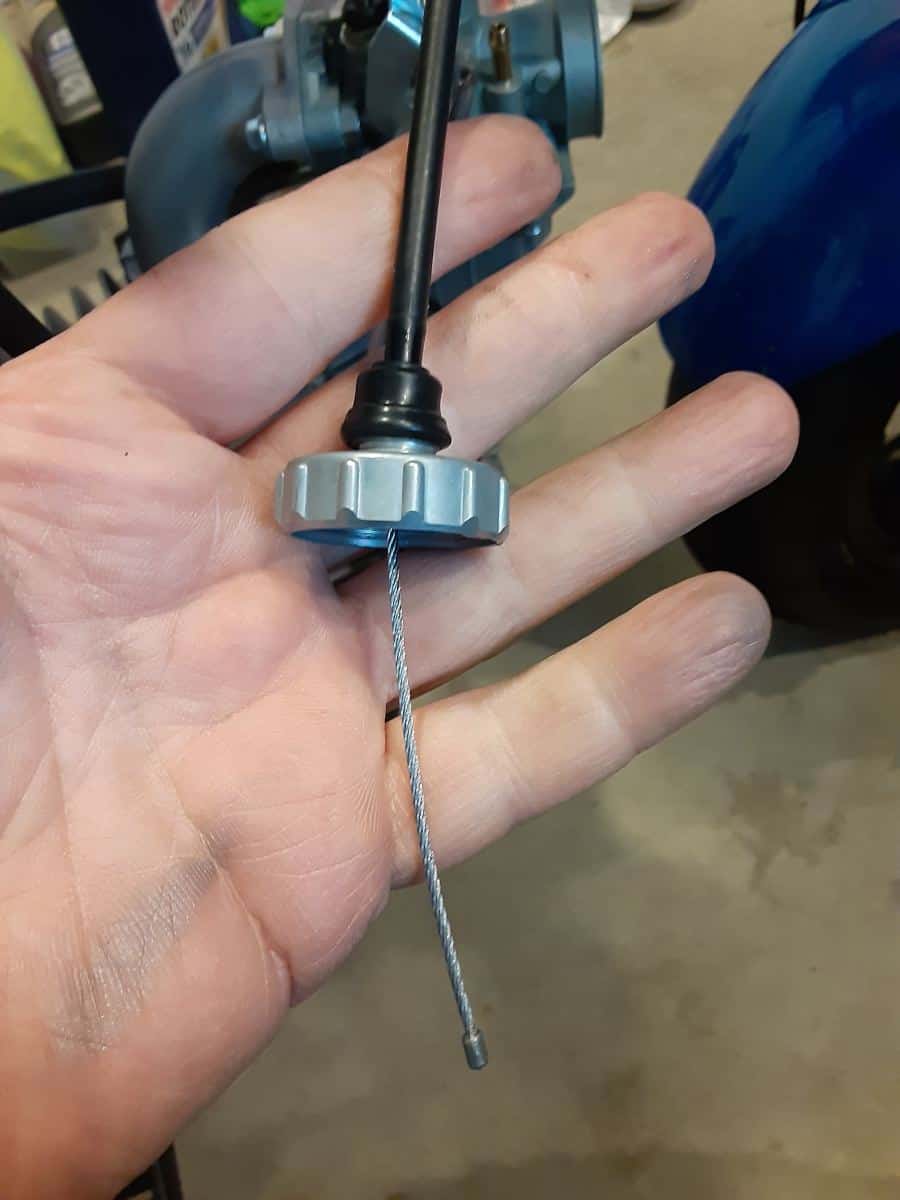
8.- Compress throttle closing spring, and screw on throttle slide cap. Take steps to avoid cross-threading; metal is ‘soft.’
9.- Slide down the plastic dust cap.
10.- Test operation of the throttle. Twist and release the throttle, inspecting the throttle slide for full opening and closing in the carburetor. It can be viewed from the inlet side of the carburetor. If not, check for possible slide insertion errors.
Once the carburetor is completed and the slide operation is verified, the final tweaking of the throttle cable can be made with an adjustment screw by the handlebar twist throttle.
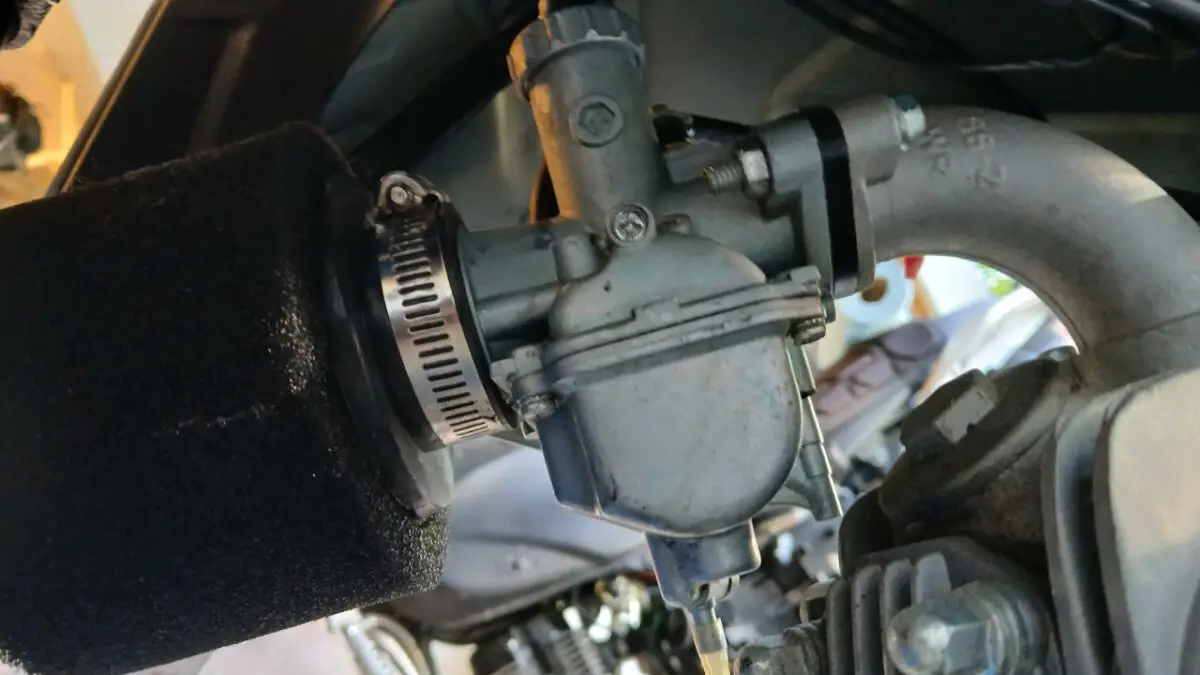
21.- Mount New Foam Air Filter
I used the foam air filter that came with the carburetor upgrade kit. However, in the future, I plan to get a nice K&N air filter (or knock-off) for my Boom Vader.
a. I oiled the filter, and a light coating of oil was sprayed on the filter and a few squeezes to spread the oil around.
b. If note already done so, loosen the hose clamp.
c. Slide foam air filter onto carburetor inlet and tighten the hose clamp until it does not fall off.
22.- Add Gas To The Gas Tank And Check For Leaks.
Check carburetor drain is closed, and lines are secured with clamps and no kinks.
Start with your fuel line cutoff valve closed.
Slowly pour gasoline into the tank until you have a good level for checking leaks.
Check for leaks. If none, slowly open the fuel cutoff valve. Check around the carburetor fuel flow bowl and all the connections. If no leaks, move on.
23.- Test The Engine And New Carburetor.
Get the bike ready for your first start. The gas cap is on, fuel cutoff open, choke in the needed position, and start the motorcycle up.
24- Check for proper operations.
If the motorcycle engine stumbles idle, the fuel/air mixture might be off; adjust the fuel/air mixture screw as needed. I ran the VM22 carburetor stock out of the box, and the 1.5 turns open on the fuel/air screw works for me.
If the motorcycle idle is too high or too low(It should be about 1500 RPMs), make necessary adjustments with a screwdriver from the left side of the carburetor.
If the bike idles too high and the idle screw isn’t lowering the RPMs, shut off the motorcycle engine and ensure the throttle slide isn’t installed 180 degrees backward.
For more information: Why Is My Motorcycle Idling So High – (Boom Vader/Grom Clone)
To test for this, unscrew the throttle slide cap, pull up the slide, and see if the groove(where the throttle cable is housed on the slide) is facing the right side of the motorcycle. The idle notch should be on the same side as the idle screw(left side of the carburetor).
25- Go For A Test Ride.
After cleaning up all the tools and materials, that first ride is a great way to celebrate a new motorcycle upgrade.
Now go easy. The motorcycle’s behavior should change, and the throttle response should be peppier. Listen and feel for any signs the engine isn’t running at peak performance.
Does the engine shutter when opening the throttle?
Does the engine bog(lose power) as you open the throttle?
Does the engine exhaust pop when decelerating or idling?
These are signs of an improper fuel/air ratio controlled by various circuits in the carburetor.
I had no problems running the new VM22 Mikuni Carburetor out of the box, so that I will address carburetor tuning issues later.
For now, get out and enjoy your Grom Clone. It’s meant to be ridden.
Ride Safe, Ride Fun,
Click To See My Recommended
Boom Vader Gen 2 Upgrades
Author’s Notice: This page contains affiliate links, for which I may earn a commission by their use. As an Amazon Associate, I earn from qualifying Amazon purchases.

Hi I’m Tom, A New Motorcycle Rider and Blog Author.
I am a new rider(Pa Learners Permit at the end of 2020, and I received a Pa Motorcycle License in 2021 after passing a Motorcycle Safety Course).
I bought my first motorcycle, a TaoTao TBR7, at the beginning of 2021 and have been doing upgrades on that motorcycle since.
I added to my motorcycle collection by buying a Boom Vader Gen 2 in 2022, and that Grom-Clone motorcycle has been upgraded by me as well.
I continue to ride my Boom Vader Gen 2 motorcycle as well as my TaoTao TBR7 dual-sport bike.
Read more on my About Me page.
Fun Fact: I’ve only been on one group ride.
